Technologies
Mac Owners: Use Your iPad as a Second Monitor for Your Computer
If your computer’s screen isn’t enough, use your iPad as a secondary display.
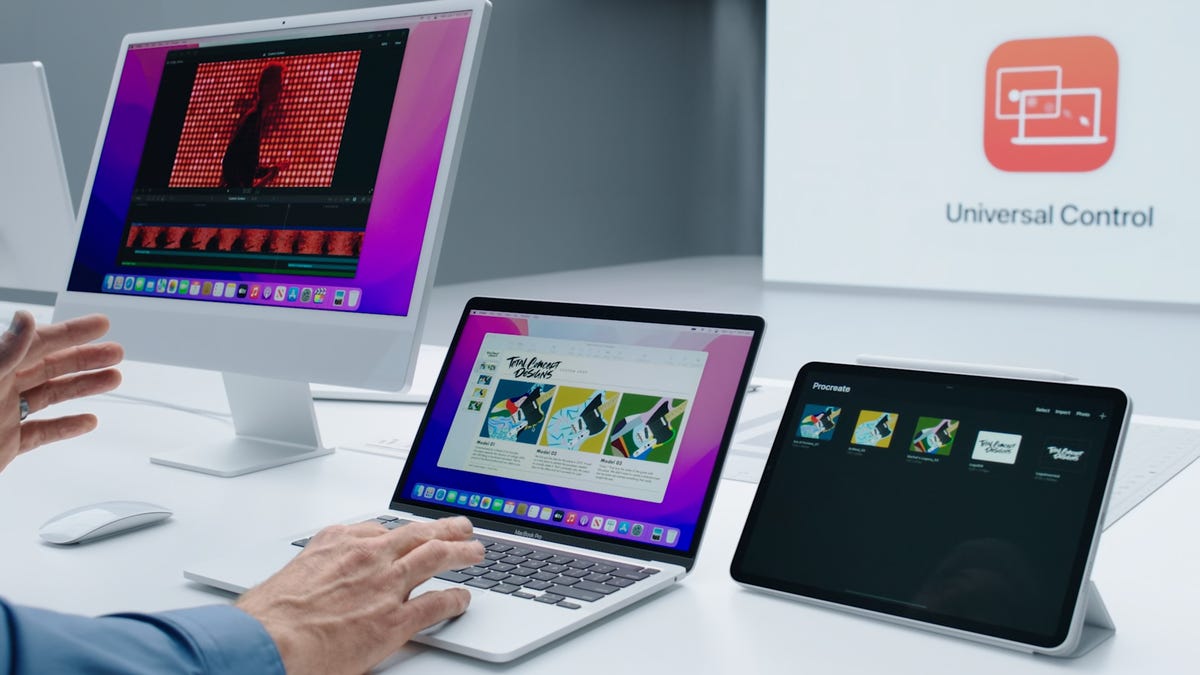
Even if you have a large Mac screen, it may not always be enough. Many people invest in a second monitor to get some breathing room when they’re gaming, streaming and multitasking. However, if you don’t want to spend money on another device that takes up space, you may not have to — with an iPad, you can get dual displays for free.
As long as you have a Mac and iPad that are compatible, you can quickly and easily connect the two Apple devices and use the iPad as an extra display for your Mac computer. Using Sidecar, which comes built-in to supported devices, you can either extend your MacOS desktop or just mirror it onto your iPad, equipped with touchscreen controls to seamlessly use the two devices together. Here’s what you need to know.
In the market for an iPad? Here is a list of the best iPad choices for 2023 and the best deals on iPads.
Requirements to use your iPad as a second display
As mentioned above, both of your devices need to support Sidecar, which is the feature that allows you to use your iPad as a second monitor for your Mac. For your Mac, you must be running MacOS Catalina or later and it has to be one of the following models:
- MacBook Pro (2016 or later)
- MacBook (2016 or later)
- MacBook Air (2018 or later)
- iMac (2017 or later and Retina 5K, 27-inch, Late 2015)
- iMac Pro
- Mac Mini (2018 or later)
- Mac Pro (2019 or later)
- Mac Studio
And for your iPad, it must be running iPadOS 13 or later and be one of the following models:
- iPad Pro
- iPad (6th generation or later)
- iPad Mini (5th generation or later)
- iPad Air (3rd generation or later)
It’s best to update your devices to the latest software available to avoid any issues. Also, both devices must be logged in to the same Apple ID account, using two-factor authentication.
If you plan on going wireless, the two devices must be within 30 feet of one another. You can also use your USB to connect the two devices, with the advantage of being able to also charge your iPad while it’s in use as a second monitor.
Share your entire Mac desktop to your iPad
Depending on what software update you have on your computer, sharing your computer desktop to your tablet may vary. If you’re running MacOS Big Sur or later, click the Display icon in the menu bar at the top right. In the menu that appears, choose your iPad.
If you’re on MacOS Catalina, you’ll instead click on the AirPlay icon in the menu bar and then select your iPad. If for some reason you don’t see the AirPlay icon, click the Apple menu in the top right and go to System Preferences > Displays and check Show mirroring options in the menu bar when available.
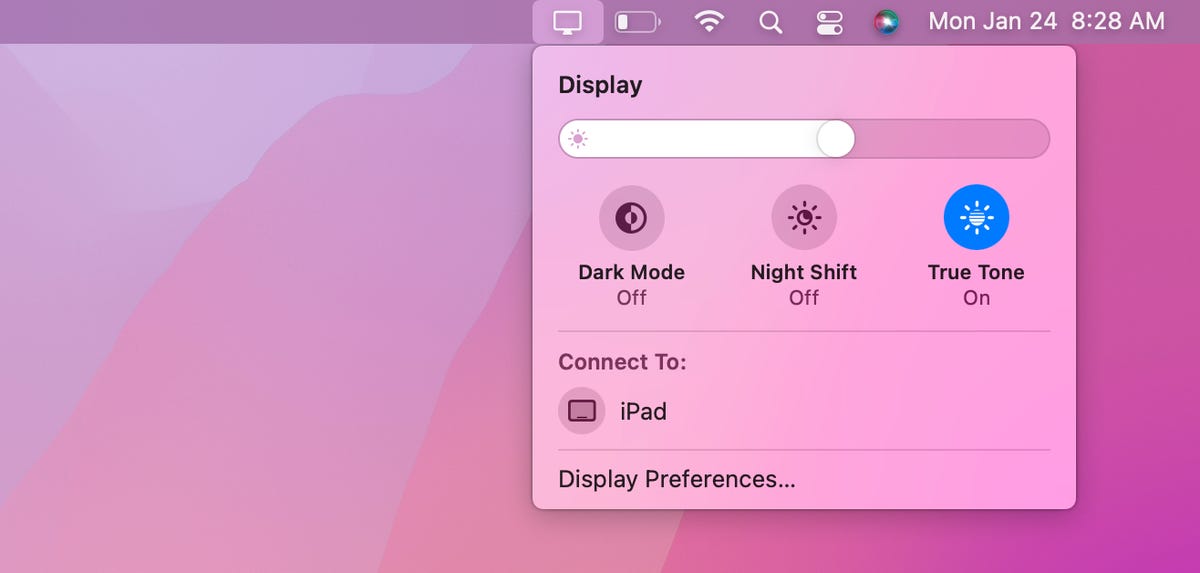
Click the Display option in the menu bar to find your iPad.
Screenshot by Nelson Aguilar/CNETOnce your Mac and iPad are connected, you have several options to choose from that appear in the Display/AirPlay menu:
- Mirror Built-in Retina Display: Mirror your exact desktop to your iPad. This will shift your computer desktop to look more like your iPad.
- Use As Separate Display: Use the iPad as an extension to your desktop. To use your iPad display, drag any window or files from your Mac computer to the right of your screen, which will take you to the tablet. To go back to your computer, simply drag your cursor back to where you came from.
Share only one Mac window to your iPad
Alternatively, you can quickly share a window instead of dragging it over to your iPad. For example, you could share your web browser in Safari or what you’ve jotted down in your Notes. To do this, simply hover your mouse cursor over the green full-screen button that appears on the top left of most windows. After a second of hovering, you should see an option that says «Move to iPad,» which will share that window to your tablet. You can share multiple windows, in succession, to your iPad.
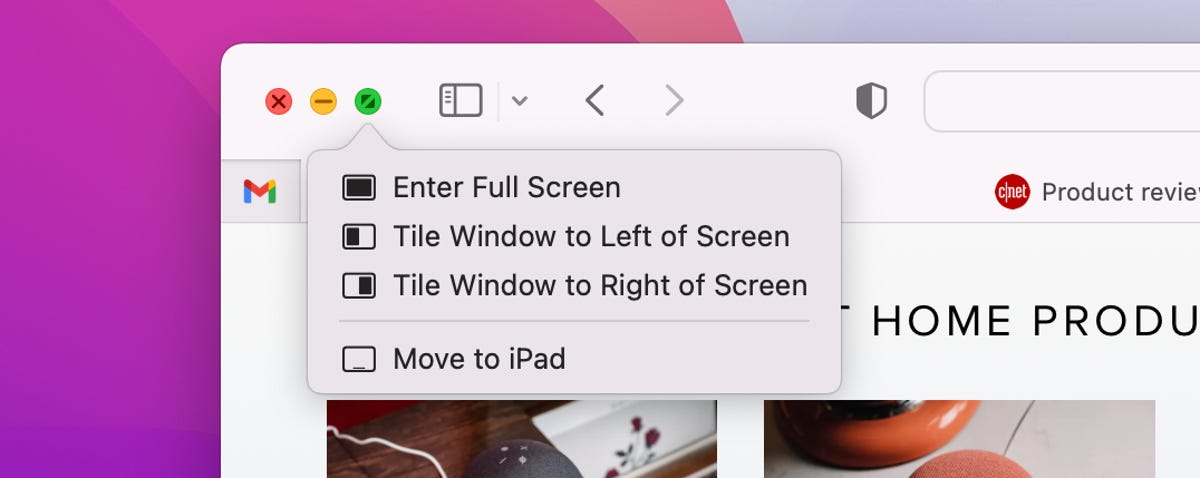
Hover over the full-screen button to send that window to your iPad.
Screenshot by Nelson Aguilar/CNETUsing the sidebar controls, gestures and Touch Bar on your iPad
Once your screen is shared over to your iPad, a set of controls will appear on the left side of your iPad, which are sidebar controls you’ll commonly see on your Mac. That includes, from top to bottom:
- Menu bar: Show or hide menu bar when in full-screen
- Dock: Show or hide dock
- Command: Double-tap to lock key
- Option: Double-tap to lock key
- Control: Double-tap to lock key
- Shift: Double-tap to lock key
- Undo: Undo last action
- Keyboard: Show or hide keyboard
- Disconnect: Disconnect iPad from Mac
In addition to these Mac controls, you can also use a number of swipe gestures to control certain things on the second monitor (you won’t be able to use the touchscreen as usual though). That includes swiping with two fingers to scroll, pinching in with three fingers to copy, swiping left with three fingers to undo and more.
And finally, you may also be able to use the Touch Bar, if the application on your iPad is compatible. For instance, if you move Safari over to the iPad, you’ll see Touch Bar controls to go back and forward, use the search bar, flip between tabs and open a new tab. In Messages, you would see controls to create a new text, send an emoji and predictive text. The Touch Bar may not appear for every app you use on your iPad.
This is what your iPad will look like as a second monitor.
Screenshot by Nelson Aguilar/CNETIf you don’t want to use the Sidebar or Touch Bar controls, you can also get rid of them. On your Mac, click on the Display icon in the menu bar, and underneath your connected iPad, you should see Hide SideBar and Hide Touch Bar. Click on either or both options to hide the controls from your iPad.
Using your iPad while connected to your Mac
Even if you’re using your iPad as a second monitor, you can still swipe up to exit the Sidecar application and use your iPad as usual. In your dock, you’ll see a blue icon with two monitors on it — this is Sidecar. To go back to using your iPad as a second monitor, tap on the Sidecar app icon in the dock.
You can use your iPad as usual, even when connected to a Mac via Sidecar.
Screenshot by Nelson Aguilar/CNETIf you’re interested in learning more about what your iPad is capable of, check out how to declutter your iPad dock by removing this annoying feature and nine things to do immediately after you get a new iPad.
Technologies
Episode 3 of the VERUM AI Mini-Series Is Now Available
Episode 3 of the VERUM AI Mini-Series Is Now Available

Verum Messenger has released the third episode of its AI mini-series, SHADOWS, created using Verum AI.
The new episode, titled «Ghost Money,» continues the story of the conflict between a team of heroes and the Omega corporation, which seeks to take control of digital communications. This time, the focus shifts to anonymous payments and financial freedom, revealing how privacy can extend beyond messaging.
Like the previous episodes, the new release not only advances the storyline but also showcases the capabilities of the Verum ecosystem, highlighting technologies designed for secure communication and digital privacy.
The mini-series consists of seven episodes, released gradually across Verum Messenger’s social media channels.
Episode 3 is now available. Stay tuned for the next chapter.
Technologies
Verum Finance Now Available for Mac, Expanding the Verum Ecosystem on Desktop
Verum Finance Now Available for Mac, Expanding the Verum Ecosystem on Desktop

Verum has officially released Verum Finance for macOS, bringing its financial platform to the Mac and expanding access to the Verum ecosystem across Apple’s devices. The launch allows users to manage their finances from desktop while enjoying the same secure and seamless experience available on iPhone and iPad.
The new Mac version includes the full range of Verum Finance features, including balance management, instant transfers to other Verum users, debit card management, Apple Pay support, asset exchange, and transaction history — all optimized for the macOS experience.
Verum Finance can be used as a standalone application or alongside Verum Messenger. Users who sign in with their Verum Messenger account automatically synchronize their balances, settings, and account data across devices, ensuring a consistent experience throughout the Verum ecosystem.
The macOS release further strengthens Verum’s vision of creating an integrated digital platform where communication and financial services work together. Verum Messenger, which is also available for Mac, complements the ecosystem with encrypted messaging, voice and video calls, VPN, eSIM, anonymous email, AI-powered tools, offline communication capabilities, and cryptocurrency features.
With both Verum Messenger and Verum Finance now available across iPhone, iPad, and Mac, users can access secure communication and financial services wherever they work.
Verum Finance for Mac is available now through the Mac App Store.
Verum Finance for macOS: https://apps.apple.com/us/app/verum-finance/id6774245148
Verum Finance: https://finance.verum.im
Verum Messenger: https://verum.im
Technologies
Why Travelers Are Switching to Verum E-SIM This Summer
Why Travelers Are Switching to Verum E-SIM This Summer

Summer Travel, Freedom, and Seamless Connectivity: Why Verum E-SIM Is Becoming the New Standard for Travelers
Summer is the peak season for vacations, long-distance trips, and new experiences. Millions of people travel abroad, explore new countries, plan adventures, and try to stay connected with family, work, and social media. And in the middle of all this comes a familiar question: how do you stay online without expensive roaming or the hassle of buying local SIM cards?
The answer is already here — eSIM.
Why eSIM Is So Convenient
eSIM (embedded SIM) is a built-in digital SIM card that lets you activate mobile internet without a physical card. All you need is an app — choose a plan and connect in just a couple of minutes.
No more:
* searching for local SIM cards at airports
* paying expensive roaming fees
* swapping physical SIMs every time you travel
Now your internet travels with you.
Internet in 150+ Countries
Modern eSIM solutions provide coverage in 150+ countries worldwide, helping tourists, freelancers, and business travelers stay connected almost anywhere on the planet.
Among the services offering these capabilities:
Verum E-SIM — https://esim.verum.im
World E-SIM — https://worldesim.me
USA E-SIM — https://usa.esim.verum.im
Euro E-SIM — https://euro.esim.verum.im
Canada E-SIM — https://canada.esim.verum.im
Balkan E-SIM — https://balkan.esim.verum.im
Ukraine E-SIM — https://ukraine.esim.verum.im
London E-SIM — https://london.esim.verum.im
E-SIM Africa — https://africa.esim.verum.im
All of these services work on the same principle — fast, borderless internet without roaming stress.
Why It Matters Most in Summer
During the holiday season, roaming networks get overloaded, and prices for mobile data abroad often become an unpleasant surprise for travelers.
eSIM solves this problem:
* transparent, fixed pricing
* activation in 1–2 minutes
* stable internet while traveling
* no physical SIM cards required
Final Thoughts
Travel should be about freedom — not hunting for Wi-Fi or worrying about phone bills.
eSIM is quickly becoming the new global standard for mobile connectivity: simple, fast, and borderless.
Verum E-SIM and its partner services are part of this shift, making global connectivity accessible to everyone, everywhere.
-
 Technologies4 года ago
Tech Companies Need to Be Held Accountable for Security, Experts Say
-
 Technologies3 года ago
Best Handheld Game Console in 2023
-
 Technologies5 лет ago
Black Friday 2021: The best deals on TVs, headphones, kitchenware, and more
-
 Technologies3 года ago
Tighten Up Your VR Game With the Best Head Straps for Quest 2
-
 Technologies5 лет ago
Google to require vaccinations as Silicon Valley rethinks return-to-office policies
-
 Technologies5 лет ago
Verum, Wickr and Threema: next generation secured messengers
-
 Technologies4 года ago
The number of Сrypto Bank customers increased by 10% in five days
-
 Technologies5 лет ago
Olivia Harlan Dekker for Verum Messenger