Technologies
Cardinals vs. 49ers Livestream: How to Watch NFL Week 18 Online Today
Want to watch the Arizona Cardinals take on the San Francisco 49ers? Here’s everything you need to stream Sunday’s afternoon game on Fox.
Winners of nine straight, the 49ers have looked like the best team in football the past two months. They have had the NFC West wrapped up for a few weeks now but still have something to play for in the final weekend. The 49ers can leapfrog the Eagles for the top spot in the conference and a first-round bye with a win against the Cardinals on Sunday coupled with an Eagles loss to the Giants. Kickoff in San Francisco is set for 1:25 p.m. PT (4:25 p.m. ET) on Fox.
The game will be shown on TV in the San Francisco and Arizona areas (according to 506 Sports) on live TV streaming services, but there may be cases where you’re blocked because of an internet location glitch or just want an added layer of privacy for streaming. There is an option that doesn’t require subscribing to something like NFL Sunday Ticket or NFL Plus, or searching the internet for a sketchy website: You can use a virtual private network, or VPN.
Here’s how you can watch the game from anywhere in the US with a VPN.
Read more: NFL 2022: How to Stream Every Game Live Without Cable
Cardinals vs. 49ers: When and where?
For Week 18 of the NFL season, the 49ers host the Cardinals at 1:25 p.m. PT (4:25 p.m. ET) on Sunday. The game is set to take place at Levi’s Stadium in Santa Clara, California.
How to watch the Cardinals vs. 49ers game online from anywhere using a VPN
If you find yourself unable to view the game locally due to incorrectly applied blackout restrictions, you may need a different way to watch the game and that’s where using a VPN can come in handy. A VPN is also the best way to stop your ISP from throttling your speeds on game day by encrypting your traffic, plus it’s a great idea for when you’re traveling and find yourself connected to a Wi-Fi network, and you want to add an extra layer of privacy for your devices and logins.
With a VPN, you’re able to virtually change your location on your phone, tablet or laptop to get access to the game. So if your internet provider or mobile carrier has stuck you with an IP address that incorrectly shows your location in a blackout zone, a VPN can correct that problem by giving you an IP address in your correct, nonblackout area. Most VPNs, like our Editors’ Choice, ExpressVPN, make it really easy to do this.
Using a VPN to watch or stream sports is legal in any country where VPNs are legal, including the US and Canada, as long as you’ve got a legitimate subscription to the service you’re streaming. You should be sure your VPN is set up correctly to prevent leaks: Even where VPNs are legal, the streaming service may terminate the account of anyone it deems to be circumventing correctly applied blackout restrictions.
Looking for other options? Be sure to check out some of the other great VPN deals taking place right now.
Livestream the Cardinals vs. 49ers game in the US
This week’s Cardinals-49ers game is on Fox, so you’ll need a live TV streaming service that carries a local Fox affiliate that’s broadcasting the game. The least expensive such service is Sling TV Blue.
Numerous other live TV streaming services carry local Fox stations as well, namely YouTube TV, Hulu Plus Live TV, DirecTV Stream and FuboTV. They all cost more than Sling TV, but they also carry more channels, including football-specific channels like Fox, ESPN, NFL Network and/or RedZone. Check out our live TV streaming channel guide for details.
Quick tips for streaming Cardinals vs. 49ers using a VPN
- With four variables at play — your ISP, browser, video streaming provider and VPN — experience and success may vary.
- Sling Blue is only an option if and when the ability to get Fox local affiliates is active on your account. You may want to verify that your billing address is eligible for that option before committing your credit card.
- We tested the game successfully using an ExpressVPN server in San Francisco, so that location should work for watching the game.
- If you don’t see your desired location as a default option for ExpressVPN, try using the «search for city or country» option.
- If you’re having trouble getting the game after you’ve turned on your VPN and set it to the correct viewing area, there are two things you can try for a quick fix. First, log into your streaming service subscription account and make sure the address registered for the account is an address in the correct viewing area. If not, you may need to change the physical address on file with your account. Second, some smart TVs — like Roku — don’t have VPN apps you can install directly on the device itself. Instead, you’ll have to install the VPN on your router or the mobile hotspot you’re using (like your phone) so that any device on its Wi-Fi network now appears in the correct viewing location.
- All of the VPN providers we recommend have helpful instructions on their main site for quickly installing the VPN on your router. In some cases with smart TV services, after you install a cable network’s sports app, you’ll be asked to verify a numeric code or click a link sent to your email address on file for your smart TV. This is where having a VPN on your router will also help, since both devices will appear to be in the correct location.
- And remember, browsers can often give away a location despite using a VPN, so be sure you’re using a privacy-first browser to log into your services. We normally recommend Brave.
How we test VPN streaming for Sunday NFL games
For every game, we use a combination of ExpressVPN and either Paramount Plus (for CBS games) or Sling TV Blue (for Fox games). Using the maps on 506 Sports, we determine which servers are nearby and connect to one, then launch the streaming service and tune to the local CBS or Fox affiliate. If the channel comes through, it’s successful and we report the results above. We also screenshot the relevant program guide listing (see above) on either the local CBS affiliate’s website or Sling TV.
Technologies
YouTubers Sue Amazon, Claim AI Tool Was Trained on Scraped Videos
The lawsuit alleges that Amazon bypassed YouTube protections to collect content for its generative AI video system.

A group of YouTube creators is suing Amazon, accusing the tech giant of secretly scraping their videos to train its AI video model without permission.
The proposed class action lawsuit, filed in federal court in Seattle, alleges Amazon used automated tools to download and extract data from millions of YouTube videos to build and improve its Nova Reel generative AI system — a model that can create short videos from text prompts and images.
At the center of the complaint is how that data was obtained. The plaintiffs claim that Amazon bypassed YouTube’s protections using virtual machines and rotating IP addresses to avoid detection, effectively sidestepping the platform’s safeguards against bulk downloading.
The lawsuit was brought by several creators, including Ted Entertainment (the company behind the H3 Podcast and h3h3 Productions), as well as individual YouTubers and channel operators. They argue that the alleged scraping violated copyright law and the Digital Millennium Copyright Act, and are seeking damages as well as an injunction to stop the practice.
Amazon did not respond to a request for comment.
The case lands at a pivotal moment for generative AI, as courts weigh whether training on copyrighted material qualifies as fair use and how much control creators retain once their work is used to build these systems. The disputes have often centered on written material, which has been at the center of the AI revolution for several years, while AI video generators such as OpenAI’s Sora and Google’s Veo have emerged more recently.
The lawsuit is one of dozens testing the boundaries of AI training practices, alongside high-profile cases from authors, artists and news organizations, including lawsuits against OpenAI and Meta, all circling the same unresolved question: Where does fair use end and infringement begin?
Technologies
The Galaxy Z TriFold Is Back. You Can Buy It From Samsung Soon
The $2,899 phone paused its sales in March after selling through its inventory, but Samsung is bringing it back to its online store.
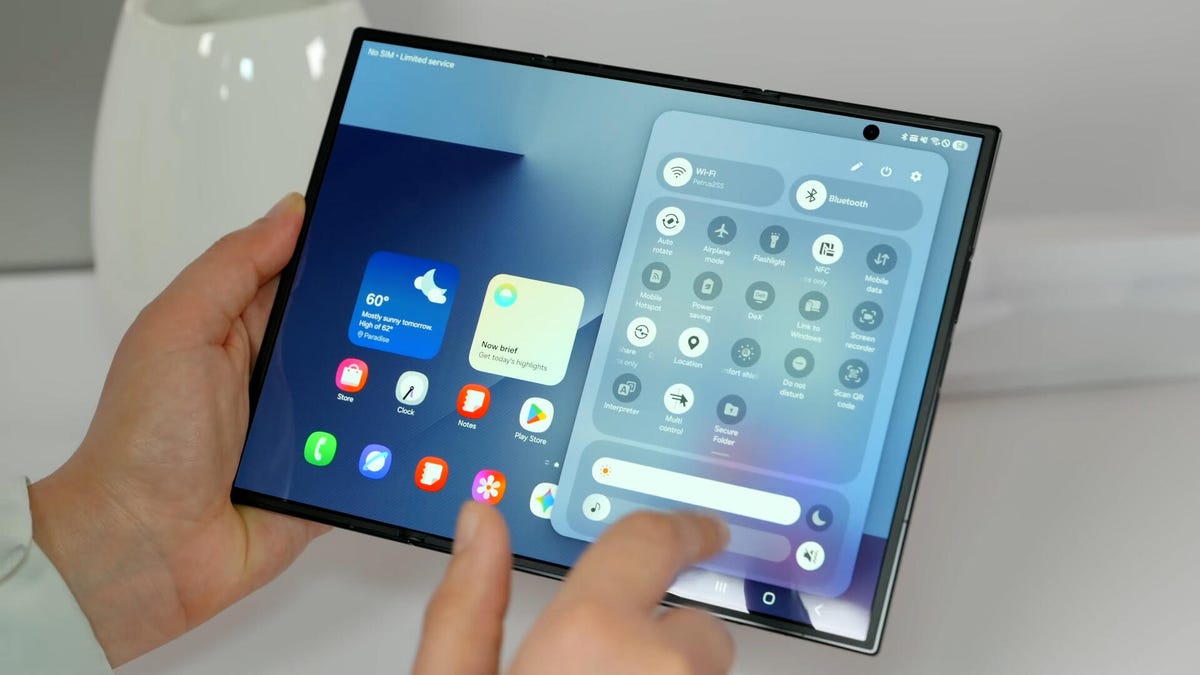
Samsung’s $2,899 Galaxy Z TriFold is going back on sale on Friday, following a halt to its sales in March after the foldable phone sold through its inventory. Samsung has announced the TriFold’s return with a countdown clock on the phone’s online store page along with a Wednesday newsletter email sent to customers.
The initial pause, which Samsung said at the time was related to the TriFold being a «super-premium device in limited quantities,» happened after just three months of availability. The TriFold first went on sale in South Korea on Dec. 12 and then arrived in Samsung’s US store on Jan. 30. The TriFold sold out in the US within minutes of going on sale — which I know personally after joining my colleagues that morning in an attempt to buy it. Thankfully Senior Reporter Abrar Al-Heeti succeeded, and then reviewed the TriFold.
It’s unclear whether the Galaxy Z TriFold is now permanently returning to Samsung’s online store or if it is again on sale until its stock sells through. Given that the phone is very expensive, and unfolds to reveal a large, 10-inch display, it wouldn’t be surprising if its stock will be in limited quantities. We’ve asked a Samsung representative to clarify and will update if we hear more.
The Galaxy Z TriFold’s return also comes ahead of the summer season when we expect a slew of other foldable phones: Samsung typically refreshes its Galaxy Z Fold and Z Flip line in July or August, and Motorola has announced its first book-style Razr Fold phone will also debut during the season. And Apple’s rumored iPhone Fold (or perhaps iPhone Ultra based on latest rumors) could also be teased later this year.
Technologies
Help Us Crown the Most Loved Headphones and Earbuds of 2026
Got a pair you swear by? Take our People’s Picks survey to help us find a winner.

CNET just launched People’s Picks, a series of surveys where actual humans like you vote for the products and services you use. Starting in April, we want you to weigh in on your favorite headphones and earbuds. We’ll pick a winner based on which ones you love the most.
Why we want to hear from you
Our writers and editors test hundreds of products each year, but your real-world experience with these devices is something we can’t replicate in our labs. You’ve used these headphones at the gym, on your commute to work and on long flights, and that perspective is invaluable. Your voice helps others know about the headphones or earbuds you love, too.
«I review a lot of headphones and earbuds for CNET, and there are plenty of great models from the top brands in this survey that I rate highly. I’m always curious about what models people ultimately choose and why, so I’m excited to get your feedback and learn the results of this survey,» says David Carnoy, CNET’s executive editor and headphones expert.
With our survey, we’ll collect answers from real-world users like you. The headphones and earbuds chosen through our 3-minute survey will be featured in our People’s Picks roundup of the top picks based on your recommendation.
Make your voice heard
Whether you swear by a pair of $25 earbuds or love a pair of high-end headphones, your pick counts. The survey takes just a few minutes to complete, and after we gather enough information, we’ll tally the results and publish the winners.
Not sure what to pick? Check out our Best Headphones to revisit your favorites before voting.
-
 Technologies3 года ago
Tech Companies Need to Be Held Accountable for Security, Experts Say
-
 Technologies3 года ago
Best Handheld Game Console in 2023
-
 Technologies3 года ago
Tighten Up Your VR Game With the Best Head Straps for Quest 2
-
 Technologies4 года ago
Black Friday 2021: The best deals on TVs, headphones, kitchenware, and more
-
 Technologies5 лет ago
Google to require vaccinations as Silicon Valley rethinks return-to-office policies
-
 Technologies5 лет ago
Verum, Wickr and Threema: next generation secured messengers
-
 Technologies4 года ago
Olivia Harlan Dekker for Verum Messenger
-
 Technologies4 года ago
The number of Сrypto Bank customers increased by 10% in five days