Technologies
Stop Headphone Headaches: 6 Tweaks I Use for All-Day Comfort
Headphone headaches are common, especially for gamers or remote workers. But a few important changes can help you use headsets for hours on end, pain-free.

Equipped with better drivers, the latest Bluetooth technology and upgraded chipsets, full-size headphones are delivering increasingly powerful performance for more affordable prices. However, some headphone models can cause real headaches.
In the past, I typically used lighter headsets for studying or communication, so headaches were never much of a problem until I started reviewing larger gaming and work headsets early in my tech reporting career.
After a few lengthy Overwatch and Destiny sessions, I noticed my head throbbing and my temples aching — and after researching the issue, I found many people had headphone headaches to share, especially when gaming or working for long periods with tight headphones. But it doesn’t have to be that way.
These headphone-induced headaches typically occur from a combo of pressure, weight, heat, wearing glasses and similar factors. But I have good news: it’s possible to treat headset woes like these with a few careful tweaks to your setup. Here’s what I’ve found works best, even when headphone sessions last for hours.
1. Try over-ear or open-ear headphones
On-ear headphones are smaller and lighter than the large earcups of over-ear models, and often more affordable, but they can also cause headaches. That may sound counterintuitive, but it’s due to the earbuds’ gripping design and the lack of padding in on-ear models. That includes popular music headphones like the Sony WH-CH520 or the Beats Solo 4.
The smaller earcup design of on-ear headphones typically puts more pressure directly on the ear, which gets very tiring during extended use. That’s especially true for people with glasses, who often experience pain with these headphones.
The best alternative, without sacrificing too much audio quality or extra features, is switching to over-ear headphones. These headphones have significantly larger, cushier earcups that create less pressure and improve noise isolation. In this case, going big may be the best way to ease your pain.
The other option is to use earbuds or innovative open-ear headphones like Shockz, which use bone conduction and other methods to reduce ear fatigue. You may lose audio quality compared with over-ear models, but it’s a pain-free option, especially for those relying on their glasses while they work, study or play.
2. Switch to a better ear cup material
If you’re adamant about sticking to over-the-ear headphones, consider a better ear pad material for your earcups, as it can significantly reduce pain. If your headset is stuck with basic foam covers, it’s time to find a model with thick memory foam or a similar material.
Likewise, if you find the padding material on your earcups is scratchy, stiff, or pulls on your ears, try switching out the covering material. Velour tends to work best for comfort levels, as does suede. If you find your earphones overheat your head and lead to headaches, consider trying a mesh fabric cover instead.
If you already have a gaming headset or professional over-ear headphones, look up your brand to see if they offer ear cup replacements in different materials. That may be pricey, but you can explore affordable alternatives like ear covers for $10 that can help some earcups feel smoother and cooler.
3. Experiment with adjusting your headband
Do your current headphones offer headband adjustments or similar customization? If not, I highly suggest looking for a pair that supports them. Even standard headsets can be heavy — the SteelSeries Arctis Nova 5, for example, clocks in at nearly 10 ounces— leaving it on your head for a few hours can cause discomfort. That’s why weight distribution is important.
The tension of your headband can directly affect the tension in your head. Too tight, and the headphones will apply uncomfortable pressure and pull at your hair. Too loose, and your earcups can feel like dead weight. If you get frequent headaches, try loosening your headband a little while still keeping it firm. Ear cup height adjustments can perform a similar role.
Additional note: Some headphones are heavy, like the AirPods Max (a hefty 13.6 ounces), but distribute the weight well. But lighter is often better. Check out our reviews and recommendations to see which headphones we call out for their stress-relieving designs.
4. Shift your volume to lower settings
I know you may want to pinpoint the sound of footsteps or hear every possible environmental sound, but it’s important to keep headphone volume at a safe level. Beyond a certain point, volume can be an active trigger of painful headaches, even if you don’t usually experience them.
If you’d like to dive into this topic, I highly recommend my colleague Anna Gragert’s account of earbud-related health issues and what she learned from talking to audiologists. If your volume is high enough to trigger ear pain and headaches, there’s also a good chance it’s causing long-term hearing loss or other problems.
The general rule for headset volume is to keep it significantly below 85 decibels, a tip recommended by Turtle Beach and other headphone brands. I suggest heading into your headphone app (if available) and tweaking your audio settings so the emphasis is placed on the sound details you want, letting you keep the overall volume lower.
If you prefer headphones for music and find yourself listening to your favorite album at a higher-than-usual volume, it’s a good idea to lower the volume to a quiet setting and chill with more lo-fi music to give yourself a break.
Brands like SteelSeries also produce headphones with volume-limiting features for this very purpose, placing a universal volume cap on headphones to help rein in bad habits or protect kids’ ears.
5. Turn down screen brightness or enable a blue light filter
Headphone pressure and volume aren’t the only causes of headaches. Your screen is also an important factor, especially if you’re staring at it for long periods in a dark room.
That’s why I also recommend turning down your screen brightness if you suffer from headphone headaches. Set your computer or TV to a lower brightness or dimmer mode when you start a session, and see if that keeps the headache at bay.
If your display supports it — typically in software settings or some game settings — you can also enable a blue light filter. These filters reduce the colder, bluer light on the display, which is most responsible for eye strain. It will slightly shift the visuals toward warmer hues and can also provide significant relief.
For glasses wearers, there’s another option: You can find glasses with blue light-blocking lenses for continual protection, no matter what screen you’re on. Again, these are best paired with over-ear or open-ear headphones to complete a comfortable headset setup.
6. Kill the noise-cancelling features for a while
Are active noise-canceling headphones giving you headaches? Those high-tech features, found in popular lines like Bose QuietComfort, larger Sony WH models and the AirPods Max, may actually be the problem. Active noise cancellation uses sound waves to cancel out ambient noise. It’s a neat trick, but not everyone responds the same.
Some people report feelings of pressure, dizziness and general weirdness when using noise cancellation. Similar to sudden altitude changes, it can trigger headaches for people trying to concentrate.
If your headphones have an active noise cancellation feature, switch it off to see if it helps reduce the pain and strain of long-term use. If it makes a noticeable difference, you should probably stick with passive noise cancellation on your headset.
With your headache issues sorted out, now is an excellent time to take a look at the best PC games we’ve tried and the best monitors for the action.
Technologies
Google’s Pixel 10A Is Coming to Japan With an Exclusive Blue Edition and Special Wallpaper
This model comes with creatively designed stickers and a special look for Pixel’s 10th anniversary.
Don’t be blue: Google is releasing an Isai blue edition of the Pixel 10A to celebrate the Android phone line’s 10th anniversary, setting it apart with its own sticker set, specialized wallpaper and custom icons. But it’ll only be available in Japan.
Announced Tuesday on the Google Japan blog, the Isai blue Pixel 10A has a dark blue look and includes bonus decorations designed in collaboration with Japan’s Heralbony art company. These include an exclusive bumper case and stickers for customization.
This edition of the Pixel 10A will arrive in Japan on May 20, following the April 14 release of the Pixel 10A in its original colors of lavender, berry, fog and obsidian. The Isai blue model costs 94,900 yen, which roughly translates to $595, and includes 256GB of storage.
This makes it slightly less expensive than the US model’s 256GB edition, but it comes with a number of fun extras at no additional cost.
Google’s creation of a country-specific model for Japan may also reflect strong sales in that market. In 2023, the IDC analytics firm (via 9to5Google) reported that the Pixel 7 series accounted for 10.7% of the country’s market share, a 527% increase from 2022.
Technologies
Can’t Wait for New Emoji? Here’s How to Create Your Own on iPhone
Apple Intelligence-enabled iPhones can create custom emoji in a few easy steps.
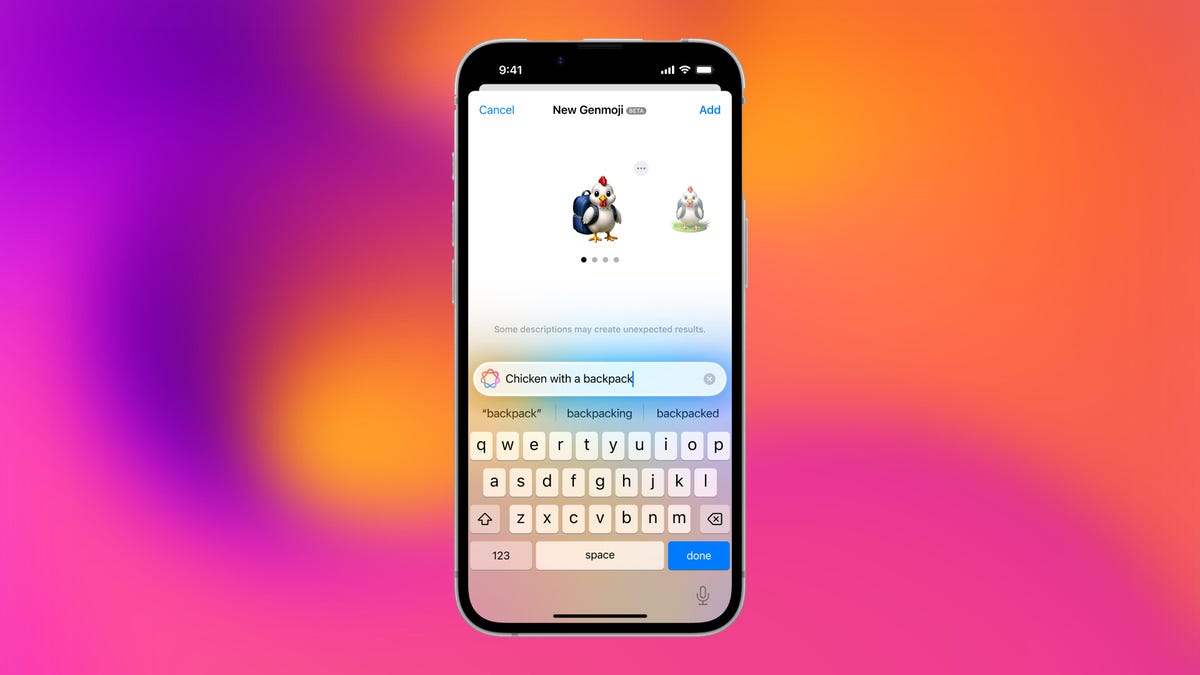
Apple brought new emoji to all iPhones when the company released iOS 26.4 on March 24. The new emoji include «» orca, «» distorted face and «» hairy creature — or as we might normally call it, Sasquatch. According to Emojipedia, there are 3,953 emoji with more on the way, including a pickle. But there’s no emoji for a dog wearing pajamas, a plate with burgers and fries and many other things. But if you have Genmoji on your iPhone you can create these emoji and many more.
Apple released iOS 18.2 in 2024 and the company introduced its own emoji generator, called Genmoji, to Apple Intelligence-capable iPhones at that time. The Unicode Standard, a universal character encoding standard, is responsible for creating new emoji, and approved emoji are added to all devices once a year. With Genmoji, you don’t have to wait for new emoji to appear on your iPhone each year. You can just create them as you need them.
Read on to learn how to use Genmoji on iPhone to create your own custom emoji. Just note that only iPhones with Apple Intelligence, like the iPhone 17 lineup, can use Genmoji at this time.
Note: The new emoji may not display correctly for Apple users whose devices aren’t on a 26.4 software version.
How to make custom emoji
1. Open Messages and go into a chat.
2. Tap the plus (+) button next to your text box.
3. Tap Genmoji.
You can then type a description of an emoji into the text box near the bottom of your screen and tap the check mark on your keyboard to enter that description into Genmoji. You can also tap different suggestions and themes that are right above the text box. And with iOS 26 or later, you can also combine and use emoji to create others rather than describing a new emoji or using suggestions.
Your iPhone will generate a series of new emoji for you to pick from according to your description, and you can swipe through these new emoji. When you find the one you want, tap Add in the top right corner of your screen and the new emoji will be available to use as an emoji, tapback or a sticker. Now you don’t have to wait for the Unicode Standard to propose, create and bring new emoji to devices.
For more iOS news, here’s what to know about iOS 26.4 and iOS 26.3. You can also check out our iOS 26 cheat sheet for other tips and tricks.
Technologies
Save Over 20% on This Handy 10,000-mAh Anker Nano Power Bank
Keep your devices charged on the go with this Anker Nano power bank, now down to just $46.
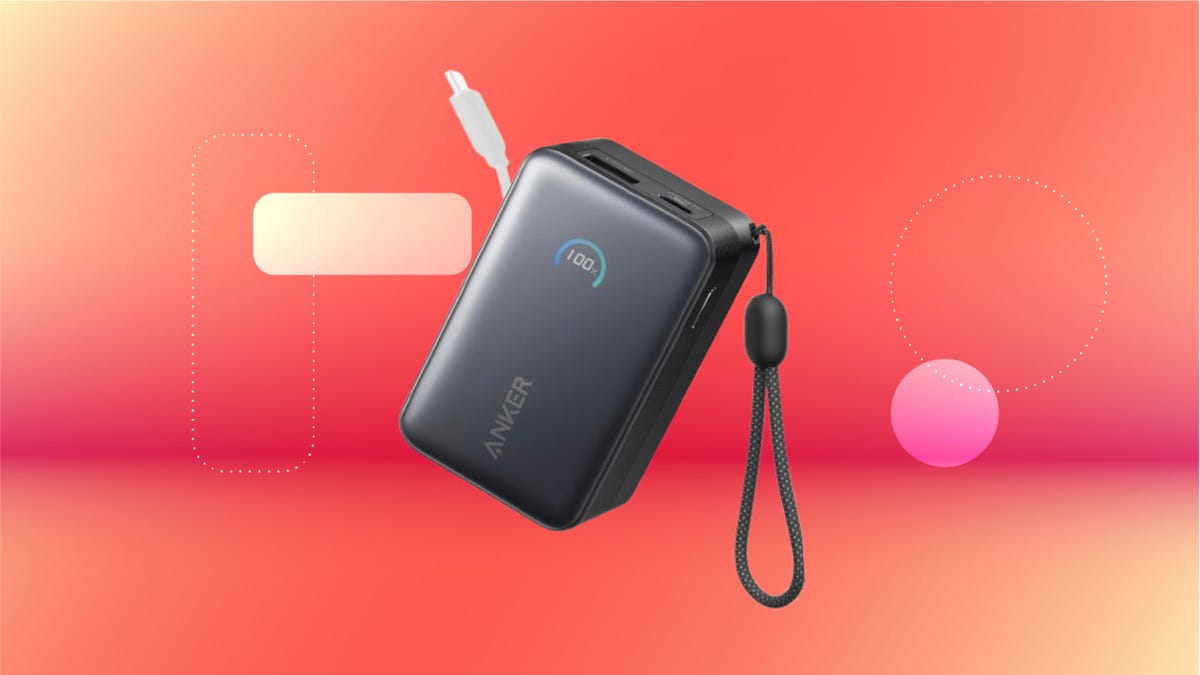
We’ve just spotted the Anker Nano 45-watt portable power bank for just $46 at Amazon right now. This saves you $14 — a 23% discount on its list price. Though it’s $6 more than the lowest-ever price we saw during Black Friday, it’s still a solid discount when you take the rising cost of tech accessories into account. It also matches the lowest price we’ve seen in 2026. It comes in four colors: black, green, pink and white. They’re all on sale for the same price.
This Anker Nano portable charger weighs approximately 8.2 ounces and measures a compact 3.21×1.99×1.42 inches. Despite its small size, it has a retractable cable and supports fast charging in compatible Apple, Samsung, Google Pixel and other smartphones. It also has a large 10,000-mAh capacity and a smart display so you always know how much juice is left in your power bank.
The Nano can charge an iPhone 17 to up to 50% battery in an estimated 20 minutes, and is powerful enough to charge tablets and laptops. Need to charge your devices while charging your power bank? You can do so safely thanks to pass-through charging so you’ll never have to go without battery life.
We’ve also compiled a list of the best power banks for iPhones and for Android, in case this deal isn’t quite a fit for you.
Why this deal matters
If you travel, have a long commute time or are otherwise always on the go, a portable charger can help you keep your devices fully powered. This 45-watt Anker Nano power bank is compact, includes a loop that lets you keep track of it easily and has a built-in cable so you don’t have to keep up with extra cords. Amazon’s $14 discount makes this a solid deal for anyone looking for a compact power bank.
-
 Technologies3 года ago
Tech Companies Need to Be Held Accountable for Security, Experts Say
-
 Technologies3 года ago
Best Handheld Game Console in 2023
-
 Technologies3 года ago
Tighten Up Your VR Game With the Best Head Straps for Quest 2
-
 Technologies4 года ago
Black Friday 2021: The best deals on TVs, headphones, kitchenware, and more
-
 Technologies5 лет ago
Google to require vaccinations as Silicon Valley rethinks return-to-office policies
-
 Technologies5 лет ago
Verum, Wickr and Threema: next generation secured messengers
-
 Technologies4 года ago
Olivia Harlan Dekker for Verum Messenger
-
 Technologies4 года ago
The number of Сrypto Bank customers increased by 10% in five days