Technologies
Have You Installed iOS 18.6? Be Sure to Change These 10 Settings Now
Take a minute to adjust your iOS 18 settings and get the most from your iPhone.
iOS 26 arrives this fall, but before it gets here Apple has released iOS 18.6. This may be the last big update for iOS 18, and delivers security updates along with some bug fixes. After updating, it’s the perfect time to poke at the settings of your iPhone and ensure your device is in tip-top shape. By customizing your settings you can make sure you’re getting the most from it, and avoid problems down the line.
After digging into the latest version, I found 10 settings that made an immediate difference in how I use my iPhone. Some are simple quality-of-life upgrades, while others help cut down on background drain or boost privacy.
You don’t need to be a tech expert to make these changes, and most take less than a minute to apply. If your iPhone has been feeling a little sluggish or just not working the way you want it to, these quick adjustments might be all it takes to get things back on track.
For more on what’s new in iOS 18, learn about improvements to the overhauled Calculator app and the Mail app. And don’t forget to consult our iOS 18 upgrade checklist, which includes making sure you have a proper backup before upgrading.
Turn off categories in the Mail app
When it comes to something like email, everyone has their own way of dealing with the influx of messages. Traditionally, the Mail app has kept a chronological list, but that can get unwieldy if you also get scores of promotions, receipts and other types of email. The new categories feature creates virtual buckets for Primary, Transactions, Updates and Promotions, and guesses how your messages should be sorted.
If that approach doesn’t work for you, here are two things to try.
• In the event that categories are somewhat useful, but you still want a chronological view of your Inbox, swipe all the way to the right of the categories and tap All Mail.
• To turn off categories altogether, tap the three-dot menu (…) in the top-right corner, and then tap List View.
Change the default buttons on the lock screen
In real estate, location is everything, and the bottom corners of the iPhone lock screen are the prime spots, each an easy thumb press away when your device is still locked. Before iOS 18, those posts were held by the flashlight and camera buttons, with no way to change them.
In iOS 18, you can finally replace them with other buttons — or remove them entirely, a balm for folks who unknowingly activate the flashlight (believe me, there’s a better way to turn it on). You can add buttons to recognize music via Shazam, enable Dark Mode, set an alarm/timer, enable Airplane Mode, open your Wallet, send money via Tap to Cash and more.
Here’s how:
1. On the iPhone’s lock screen, touch and hold anywhere on the display until you see the Customize button. You’ll need to unlock the phone using Face ID, Touch ID or your passcode. If it opens the home screen, swipe down from the center-top of the screen (not the right edge, which brings up Control Center.
2. Tap Customize and then choose Lock Screen.
3. Remove one of the buttons by tapping the – (minus) button on the icon.
4. To replace the button with another function, tap its space (now with a + icon) and then choose the one you want on the next screen. (You can also opt to leave that space empty with no button.)
5. Repeat those steps for the other button if you want to change it.
6. Tap Done when you’re finished.
7. Tap the lock screen again to exit the customize mode.
Get important alerts using Prioritize Notifications
For iPhone models that can run Apple Intelligence, a new option in iOS 18.4 is fast becoming one of my favorite AI features. Go to Settings > Notifications, and under Apple Intelligence, tap Prioritize Notifications. As new alerts come in — and some days feel like they arrive in floods — Apple Intelligence determines which ones are more likely to be important to you. For example, texts from people in your contacts could be flagged in favor of random scam messages. On that settings screen, you can enable or disable priority notifications for individual apps.
Set up some of the new tasks available on the Action button
The Action button on the iPhone 15 Pro, iPhone 16, iPhone 16E and iPhone 16 Pro replaced the dedicated mute switch found on every earlier iPhone model with a configurable control. By default, it serves the same purpose — hold it to turn Silent Mode on or off — but you can configure it for other actions like opening the Camera app, performing multiple actions at once or even ordering coffee. The iOS 18.4 update adds Visual Intelligence as an option for the Action button. That makes the AI technology available on the iPhone 16E, which does not include the novel new Camera Control but is now an option for any iPhone with an Action button.
In iOS 18, the Action button gets new capabilities. You can bypass Control Center and choose a control of your choice, such as opening the Remote interface for navigating Apple TV or using Shazam to identify a song.
To choose a different action for the Action button, go to Settings > Action Button. Swipe sideways to select and activate one of the available actions. For the Controls, Shortcut and Accessibility options, tap the Choose button to pick which specific action to run.
Give your home screen a radical new look
You wouldn’t think that putting icons where you want is a radical new feature, but that’s because iOS has always had a locked arrangement. Apps get added from top to bottom, left to right. You could rearrange the order in which icons appear and move them to other screens, but that was about it.
In iOS 18, apps can be positioned nearly anywhere. You no longer need to deal with a wallpaper image of your kids or pets being obscured by icons. They still adhere to a grid — Apple isn’t about to sanction anarchy — but can be placed freely.
Also, Dark mode finally applies to all of the iPhone’s home screen, with options for coloring icons and affecting the brightness of the wallpaper image. Here’s how to customize the looks.
Arrange apps: Touch and hold the home screen to enter «jiggle mode,» and then drag the icons to new positions. It will still slide them around to fill spaces, but with patience, you can move them into the spots you want.
You can also quickly turn compatible apps into widgets that display more information. Maps, for instance, can be a map of your current location with shortcut buttons to search for places or bring up a list of nearby places (such as dinner spots). Touch and hold the app icon and look for a row of resize buttons in the menu that appears. Once expanded beyond the standard icon size, you can drag the handle in the bottom-right corner of the new icon. To get it back to its single icon size you need to touch and hold again and choose the single-icon button
Set Dark mode: If you’ve ever subjected yourself to the retina blast of black text on a white background late at night in a darkened room, you will appreciate the new Dark mode option for the home and lock screens. iOS has previously included a Dark mode, where light backgrounds switch to black or dark gray, text switches to white or light gray and other interface elements are dimmed to coexist in a dark environment. That’s never been applied to the home and lock screens in any significant way — only the dock and some widgets — until iOS 18.
First, touch and hold the home screen to enter jiggle mode. Tap the Edit button in the top-left corner and choose Customize from the menu. At the bottom of the screen, choose a mode for the icons and background: Automatic, Dark or Light (I’ll get to Tinted in a moment). In Dark mode, the icons gain black backgrounds, and folders and the Dock become dark gray. (Developers have the option of making Dark mode icons for their apps. In the meantime, apps not yet optimized get a generally darker appearance.)
In Dark mode, the background image also changes. Apple’s default iOS 18 wallpaper dynamically changes from light to dark as the day progresses, or you can choose colors that offer a light and dark option. If you use a photo, its overall exposure is reduced to dim the light output.
If you want dark icons but aren’t a fan of the dimmed photo treatment, tap the sun icon in the corner of the options sheet at the bottom of the screen to toggle back to Light mode just for the background.
Tinted icons: A new and different option is to tint all of the app icons so they share the same color. In the Customize options at the bottom of the screen, choose Tinted as the icon style. You can then adjust the Hue (the slider with the color spectrum) and Luminosity (the slider with the dark to light range) to choose the color tint you prefer.
What if you want to match a color from a background image? Tap the eyedropper button and then drag the reticle to pinpoint the color you want — the border indicates the selected color.
The tint is applied not only to icons but to widgets as well. For a widget such as Photos, the images it displays show up as duotones to match the theme.
Large icons: Do the labels below each app icon seem redundant to you? Now you can remove the labels and increase the size of the icons with one setting. Open the Customize options as described above and tap the Large button.
After making any of these changes, tap anywhere on the screen to apply them and exit the Customize interface.
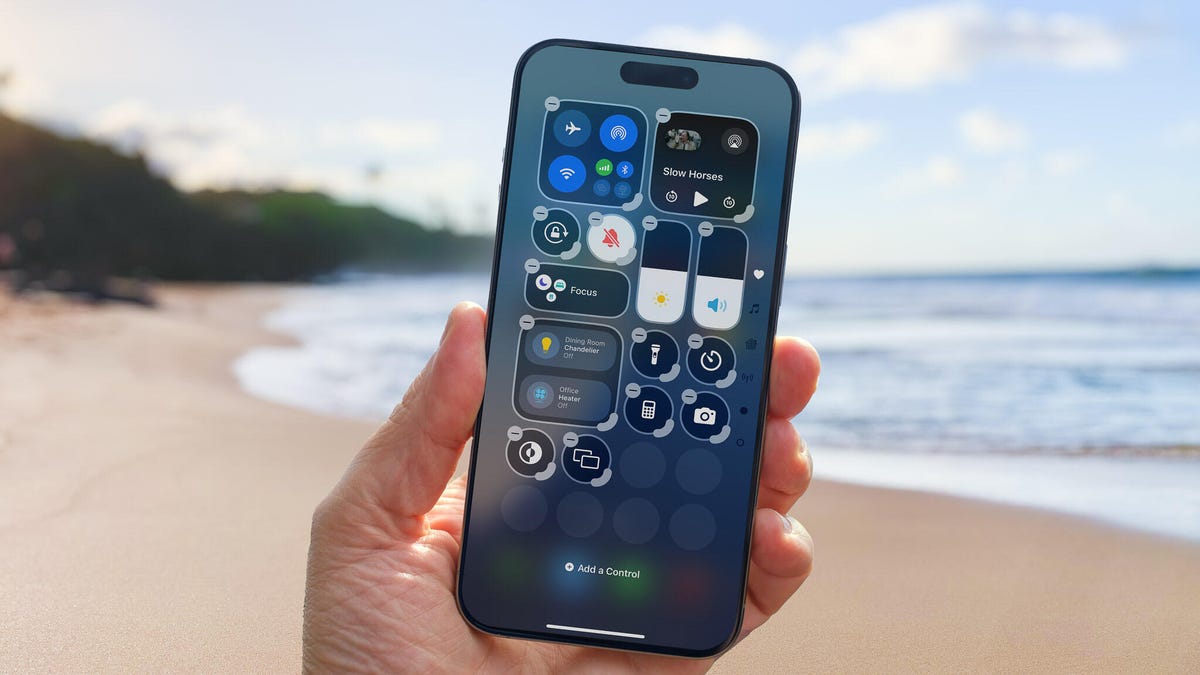
Change up how the Control Center looks
Control Center was once a convenient place to quickly access controls such as playback volume and Airplane mode but under iOS 18 it’s a configurable playground. You can position controls where you want, resize many to reveal more information and add new controls on multiple screens.
Swipe down from the top-right corner to reveal the Control Center (or swipe up from the bottom on the iPhone SE). To enter edit mode, touch and hold or press the + button at the top-left corner.
Just as with moving apps, drag a control to another slot on the screen to reposition it. Many of the controls also include a bottom-right handle that can resize the control — in most cases, it reveals the name of the control and its current status (such as Flashlight Off).
Control Center also now spans multiple screens. Swipe up to view controls for media currently playing, Home controls for smart lights and appliances and a page dedicated to the communication options that appear when you long-press the Connectivity block containing Airplane Mode, Wi-Fi, Bluetooth, Cellular and others. Look closely and you’ll see that those screens are actually individual controls expanded to occupy the entire Control Center area.
You can rearrange the order of those screens by moving their controls. Suppose you want Home controls to be the first swipe instead of Now Playing: In the editing mode, drag the large Home control up to the previous screen (Now Playing will shift to the right to make room).
To remove controls, tap the – (minus) button that appears. You can also add other controls: Tap Add a Control and scroll through the available options ranging from starting a Screen Recording to a host of accessibility options.
Read more: All the new controls you can add to Control Center
Lock or hide any of your sensitive apps
Our phones carry some of our most sensitive data and yet it’s not uncommon to hand a phone to a friend to view photos or look up something online. That doesn’t mean they’re going to snoop but it doesn’t not mean they might be more curious than you’re comfortable with. For data you want to ensure stays out of sight or to add a layer of protection in front of sensitive information, iOS 18 adds the ability to lock and hide apps.
For example, let’s say you keep an ongoing set of lists of gift ideas for family members in the Notes app. You can lock individual notes, but that requires a separate step. Maybe a few ideas were made as individual quick notes or drawings. Instead of micromanaging access, you can lock the entire Notes app by doing the following:
Touch and hold the app icon you want to lock and choose Require Face ID or Require Touch ID (or Require Passcode if Face ID or Touch ID are not enabled) from the menu that appears. Confirm your choice by tapping Require Face ID (or similar) in the next dialog.
To remove the authentication step, touch and hold the app and choose Don’t Require Face ID (or similar).
Nothing outwardly indicates that an app is locked — you’ll find out when you try to open it. There’s one more level of app security available, which is to hide apps in a special locked folder. Touch and hold the app and choose Require Face ID and then tap Hide and Require Face ID in the dialog. Confirm the action by tapping Hide App on the next screen.
The app disappears from the home screen and gets slotted into a Hidden folder at the bottom of the App Library (swipe left beyond your last home screen to view the App Library). To access apps there, tap the Hidden folder and authenticate with Face ID.
iOS 18 imposes some limitations on hidden apps. Some, such as many of the built-in ones like Notes or Reminders, can only be locked and cannot be hidden at all. Also, the Hidden folder locks itself when you launch an app or swipe away from the App Library.
Turn off Loop Videos in the Photos app
Many apps have implemented a small but annoying (to me) feature, and now Photos under iOS 18.2 has it too: Videos automatically replay when you watch them until you tap the Pause button. That can be fun once or twice, or when viewing short clips. I’m not a fan of having to take action to make them stop each time.
Now I can take action once. Go to Settings > Photos, scroll down until you see Loop Videos and turn the option off. A video will play on its own but then stop at the end as it should.
If you’d rather the video didn’t play at all until you tap the Play button, also turn off Auto-Play Motion in the same Settings screen.
Adjust the view of your calendar
Big new features like locking and hiding apps are great additions but so are the tiny changes that you encounter every day. The Calendar app includes two new ways to view your schedule.
In iOS 18, when you’re in the Month view in portrait orientation, pinch with two fingers to view more or fewer details. As you «zoom in,» individual events appear as colored bars and then as labeled events with times, all while keeping the monthly grid of days and weeks.
The Day view, which breaks down your day hour by hour, now has a new Multi Day view that shows two consecutive days to give you context for what’s coming without turning the phone into landscape orientation and viewing the Week view. Tap the View button at the top of the Single Day view and choose Multi Day from the popup menu.
Improve movie and TV show dialogue in the TV app
Trouble hearing dialogue in movies and television shows isn’t a new problem — for example, the Apple TV has had a feature for a while where you can ask Siri, «What did she say?» and it will automatically back up a few seconds, turn on subtitles and replay that section of the video. You can even buy soundbars that can overcome muffled TV speech. There are a lot of reasons it’s harder to hear dialogue but the TV app in iOS 18 includes a high-tech workaround to make dialog easier to discern.
While you’re watching a video in the TV app, tap the More (…) button and then expand the Audio heading in the menu that appears; if the phone is in horizontal orientation, tap the Audio Adjustments button. Tap Enhance Dialogue and choose Enhance or Boost. They each dampen background noise and raise the dialogue’s audio.
These are just a few new features and changes in iOS 18. Check out our broader coverage of Apple Intelligence, more impressions of the system after using it for months and how these all work together with the iPhone 16 models.
Technologies
Samsung’s Galaxy Watch Ultra 2 Might Come in 5G and 4G Cellular Models
If the rumor proves true, the 5G Galaxy Watch Ultra would rival the 5G-enabled $799 Apple Watch Ultra 3 that debuted last fall.

Samsung’s next high-end Galaxy Watch could support faster 5G speeds, but if this leak is true, it will depend on where you live. The rumored Samsung Galaxy Watch Ultra 2 might come in 5G and 4G cellular models, with availability for each smartwatch depending on the country.
According to the Dutch website Galaxy Club (and spotted by SamMobile), Samsung’s servers may have revealed a series of model numbers that point to 5G, 4G and Wi-Fi-enabled editions of the next Galaxy Watch Ultra, which would succeed the original model that debuted in 2024.
A representative for Samsung did not immediately respond to a request for comment.
The Galaxy Club website speculates that the 5G edition would be sold in the US and Korean markets, while the 4G edition would sell in the rest of the world. In the US, a 5G version of the Galaxy Watch Ultra would rival the 5G-enabled $799 Apple Watch Ultra 3, which debuted last fall. The 4G edition would have broader compatibility worldwide, since the earlier network is far more established.
It will likely be a few months until we hear anything official about the Galaxy Watch Ultra 2. Samsung typically unveils its new watches in the summer alongside its Galaxy Z Fold and Z Flip foldable phones. Last year, Samsung unveiled the Galaxy Watch 8 and the Galaxy Watch 8 Classic, but otherwise left the prior 2024 Ultra in the lineup for those looking for a larger 47mm smartwatch.
Technologies
2 Cases Show Supreme Court Isn’t Holding ISPs Responsible for Piracy
Technologies
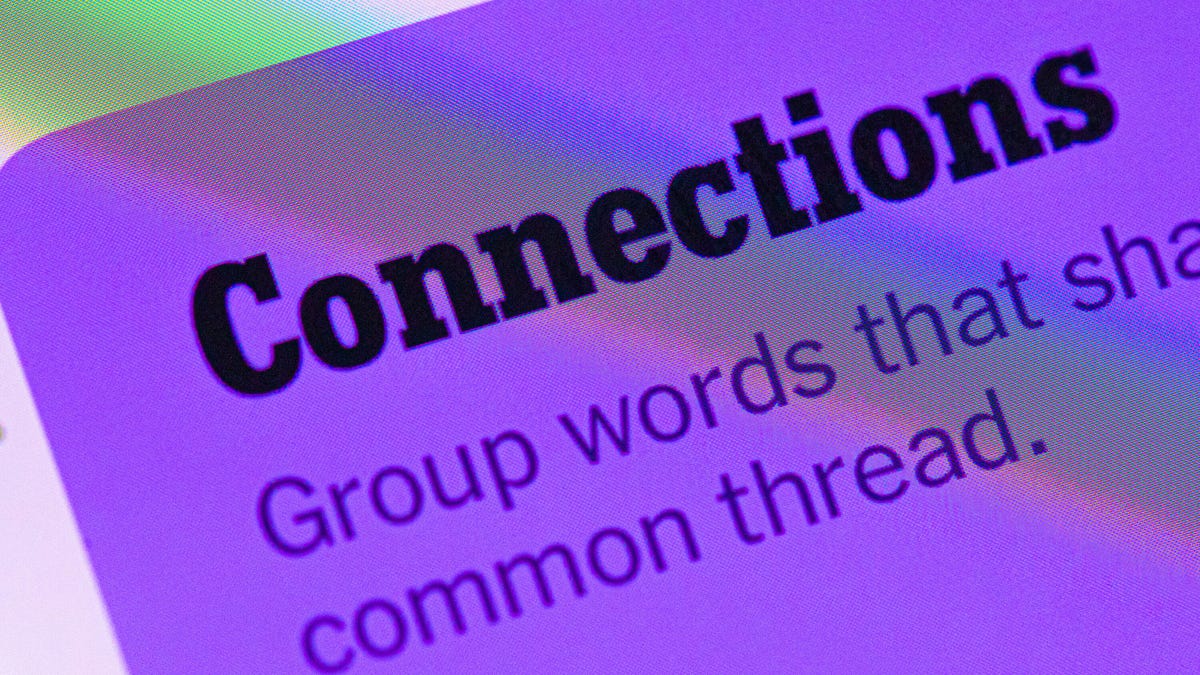
Today’s NYT Connections Hints, Answers and Help for April 8, #1032
Here are some hints and the answers for the NYT Connections puzzle for April 8, No. 1032.
Looking for the most recent Connections answers? Click here for today’s Connections hints, as well as our daily answers and hints for The New York Times Mini Crossword, Wordle, Connections: Sports Edition and Strands puzzles.
Today’s NYT Connections puzzle is kind of tough. The purple category is a fun one, once you see the connection. Read on for clues and today’s Connections answers.
The Times has a Connections Bot, like the one for Wordle. Go there after you play to receive a numeric score and to have the program analyze your answers. Players who are registered with the Times Games section can now nerd out by following their progress, including the number of puzzles completed, win rate, number of times they nabbed a perfect score and their win streak.
Read more: Hints, Tips and Strategies to Help You Win at NYT Connections Every Time
Hints for today’s Connections groups
Here are four hints for the groupings in today’s Connections puzzle, ranked from the easiest yellow group to the tough (and sometimes bizarre) purple group.
Yellow group hint: In the group.
Green group hint: Appearance details.
Blue group hint: Often found in gyms.
Purple group hint: They help you see.
Answers for today’s Connections groups
Yellow group: Cohort member.
Green group: Aesthetic.
Blue group: Kinds of bar apparatuses.
Purple group: Eyewear in the singular.
Read more: Wordle Cheat Sheet: Here Are the Most Popular Letters Used in English Words
What are today’s Connections answers?
The yellow words in today’s Connections
The theme is cohort member. The four answers are associate, colleague, fellow and peer.
The green words in today’s Connections
The theme is aesthetic. The four answers are design, look, scheme and style.
The blue words in today’s Connections
The theme is kinds of bar apparatuses. The four answers are monkey, parallel, pull-up and uneven.
The purple words in today’s Connections
The theme is eyewear in the singular. The four answers are contact, goggle, shade and spectacle.
-
 Technologies3 года ago
Tech Companies Need to Be Held Accountable for Security, Experts Say
-
 Technologies3 года ago
Best Handheld Game Console in 2023
-
 Technologies3 года ago
Tighten Up Your VR Game With the Best Head Straps for Quest 2
-
 Technologies4 года ago
Black Friday 2021: The best deals on TVs, headphones, kitchenware, and more
-
 Technologies5 лет ago
Google to require vaccinations as Silicon Valley rethinks return-to-office policies
-
 Technologies5 лет ago
Verum, Wickr and Threema: next generation secured messengers
-
 Technologies4 года ago
Olivia Harlan Dekker for Verum Messenger
-
 Technologies4 года ago
The number of Сrypto Bank customers increased by 10% in five days