Technologies
I Use These 7 Apple Watch Features Every Day to Improve Performance
I wouldn’t go anywhere without my Apple Watch, and these are some of the reasons why.
If you’re athletic, the Apple Watch can help you boost your body’s performance, whether that’s staying on top of your pace and heart rate during a run or tracking your sleep cycles. But workouts aren’t the only things that benefit from an Apple Watch. It also helps me stay on top of my schedule and is clutch in the kitchen when I need multiple timers. It’s these types of little details that make everyday tasks just that much easier.
And that’s just the beginning: At Apple’s Worldwide Developer Conference the company announced WatchOS 26, which will bring the new Liquid Glass design to the watch as well as the intriguing AI-based Workout Buddy feature. Here’s everything you missed at WWDC 2025.
Before WatchOS 26 arrives this fall, however, here are some of my favorite Apple Watch in WatchOS 11.
Swipe between watch faces (again)
Until WatchOS 10.0, you could swipe from the left or right edge of the screen to switch active watch faces, a great way to quickly go from an elegant workday face to an exercise-focused one, for example. Apple removed that feature, likely because people were accidentally switching faces by brushing the edges of the screen.
However, the regular method involves more steps (touch and hold the face, swipe to change, tap to confirm) and people realized that the occasional surprise watch face change wasn’t really so bad. Therefore, as of version 10.2, including the current WatchOS 11.2, you can turn the feature on by toggling a setting: Go to Settings > Clock and turn on Swipe to Switch Watch Face.
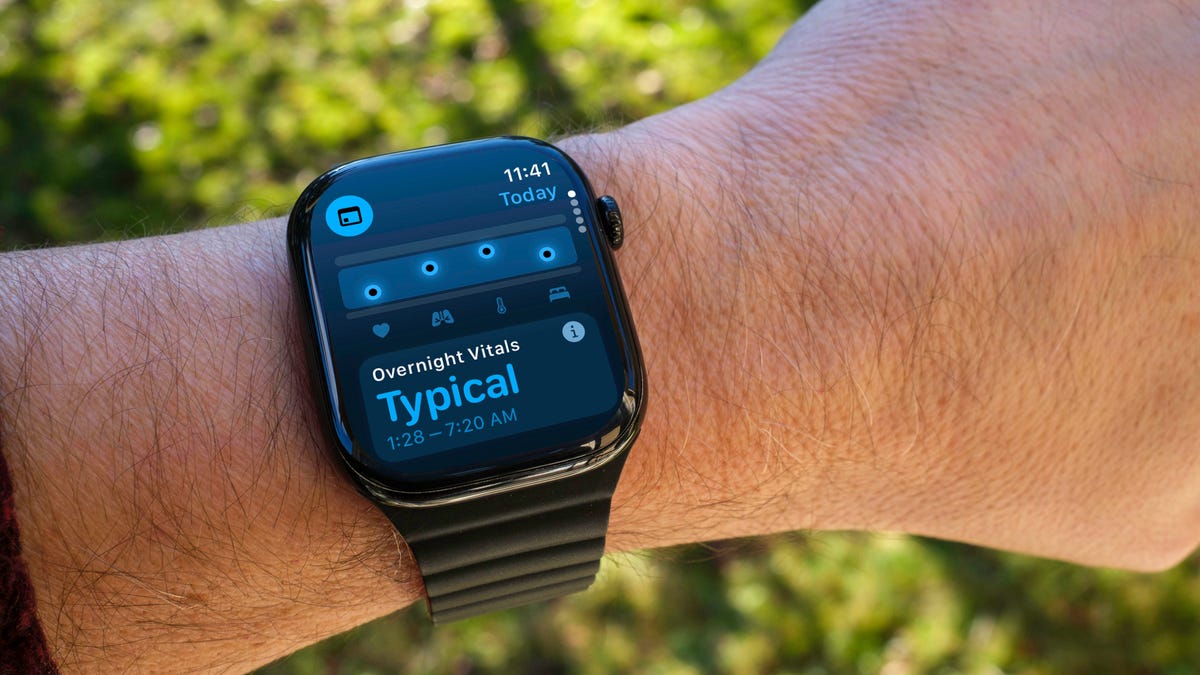
Stay on top of your heart health with Vitals
Wearing your Apple Watch while sleeping offers a trove of information — and not just about how you slept last night. If you don the timepiece overnight, it tracks a number of health metrics. A new feature in WatchOS 11 gathers that data into the Vitals app that reports on the previous night’s heart rate, respiration, body temperature (on recent models) and sleep duration. The Vitals app can also show data collected during the previous seven days — tap the small calendar icon in the top-left corner.
(If you own a watch model sold before Jan. 29, 2024, you’ll also see a blood oxygen reading. On newer watches in the US, that feature is disabled due to an intellectual property infringement fight.)
How is this helpful? The software builds a baseline of what’s normal for you. When the values stray outside normal ranges, such as irregular heart or respiratory rates, the Vitals app reports them as atypical to alert you. It’s not a medical diagnosis, but it can prompt you to get checked out and catch any troubles early.
Make the Smart Stack work for you
The Smart Stack is a place to access quick information that might not fit into what Apple calls a «complication» (the things on the watch face other than the time itself, such as your Activity rings or the current outside temperature). When viewing the clock face, turn the digital crown clockwise or swipe from the bottom of the screen to view a series of tiles that show information such as the weather or suggested photo memories. This turns out to be a great spot for accessing features when you’re using a minimal watch face that has no complications.
Choose which Live Activities appear automatically
The Smart Stack is also where Live Activities appear: If you order a food delivery, for example, the status of the order appears as a tile in the Smart Stack (and on the iPhone lock screen). And because it’s a timely activity, the Smart Stack becomes the main view instead of the watch face.
Some people find that too intrusive. To disable it, on your watch open the Settings app, go to Smart Stack > Live Activities and turn off the Auto-Launch Live Activities option. You can also turn off Allow Live Activities in the same screen if you don’t want them disrupting your watch experience.
Apple’s apps that use Live Activities are listed there if you want to configure the setting per app, such as making active timers appear but not media apps such as Music. For third-party apps, open the Watch app on your iPhone, tap Smart Stack and find the settings there.
Add and pin favorite widgets in the Smart Stack
When the Smart Stack first appeared, its usefulness seemed hit or miss. In WatchOS 11, Apple seems to have improved the algorithms that determine which widgets appear — instead of it being an annoyance, I find it does a good job of showing me information in context. But you can also pin widgets that will show up every time you open the stack.
For example, I use 10-minute timers for a range of things. Instead of opening the Timers app (via the App list or a complication), I added a single 10-minute timer to the Smart Stack. Here’s how:
- View the Smart Stack by turning the Digital Crown or swiping from the bottom of the screen.
- Touch and hold the screen to enter the edit mode.
- Tap the + button and scroll to the app you want to include (Timers, in this example).
- Tap a tile to add it to the stack; for Timers, there’s a Set Timer 10 minutes option.
- If you want it to appear higher or lower in the stack order, drag it up or down.
- Tap the checkmark button to accept the change.
The widget appears in the stack, but it may get pushed down in favor of other widgets the watch thinks should have priority. In that case, you can pin it to the top of the list: While editing, tap the yellow Pin button. That moves it up, but Live Activities can still take precedence.
Use the watch as a flashlight
You’ve probably used the flashlight feature of your phone dozens of times, but did you know the Apple Watch can also be a flashlight? Instead of a dedicated LED (which phones also use as a camera flash), the watch’s full screen becomes the light emitter. It’s not as bright as the iPhone’s, nor can you adjust the beam width, but it’s perfectly adequate for moving around in the dark when you don’t want to disturb someone sleeping.
To activate the flashlight, press the side button to view Control Center and then tap the Flashlight button. That makes the entire screen white — turn the Digital Crown to adjust the brightness. It even starts dimmed for a couple of seconds to give you a chance to direct the light away so it doesn’t fry your eyes.
The flashlight also has two other modes: Swipe left to make the white screen flash on a regular cadence or swipe again to make the screen bright red. The flashing version can be especially helpful when you’re walking or running at night to make yourself more visible to vehicles.
Press the Digital Crown to turn off the Flashlight and return to the clock face.
Pause your Exercise rings if you’re traveling or ill
Closing your exercise, movement and standing rings can be great motivation for being more active. Sometimes, though, your body has other plans. Until WatchOS 11, if you became ill or needed to be on a long-haul trip, any streak of closing those rings that you built up would be dashed.
Now, the watch is more forgiving (and practical), letting you pause your rings without disrupting the streak. Open the Activity app and tap the Weekly Summary button in the top-left corner. Scroll all the way to the bottom (take a moment to admire your progress) and tap the Pause Rings button. You can choose to pause them for today, until next week or month, or set a custom number of days.
When you’re ready to get back into your activities, go to the same location and tap Resume Rings.
Bypass the countdown to start a workout
Many workouts start with a three-second countdown to prep you to be ready to go. That’s fine and all, but usually when I’m doing an Outdoor Walk workout, for example, my feet are already on the move.
Instead of losing those steps, tap the countdown once to bypass it and get right to the calorie burn.
How to force-quit an app (and why you’d want to)
Don’t forget, the Apple Watch is a small computer on your wrist, and every computer will have glitches. Every once in a while, for instance, an app may freeze or behave erratically.
On a Mac or iPhone, it’s easy to force a recalcitrant app to quit and restart, but it’s not as apparent on the Apple Watch. Here’s how:
- Double-press the Digital Crown to bring up the list of recent apps.
- Scroll to the one you want to quit by turning the crown or dragging with your finger.
- Swipe left on the app until you see a large red X button.
- Tap the X button to force-quit the app.
Keep in mind this is only for times when an app has actually crashed — as on the iPhone, there’s no benefit to manually quitting apps.
These are some of my favorite Apple Watch tips, but of course there’s a lot more to the popular smartwatch. Be sure to also check out which new health features are expected in the next models and Lexy Savvides’ review of the Series 10.
Technologies
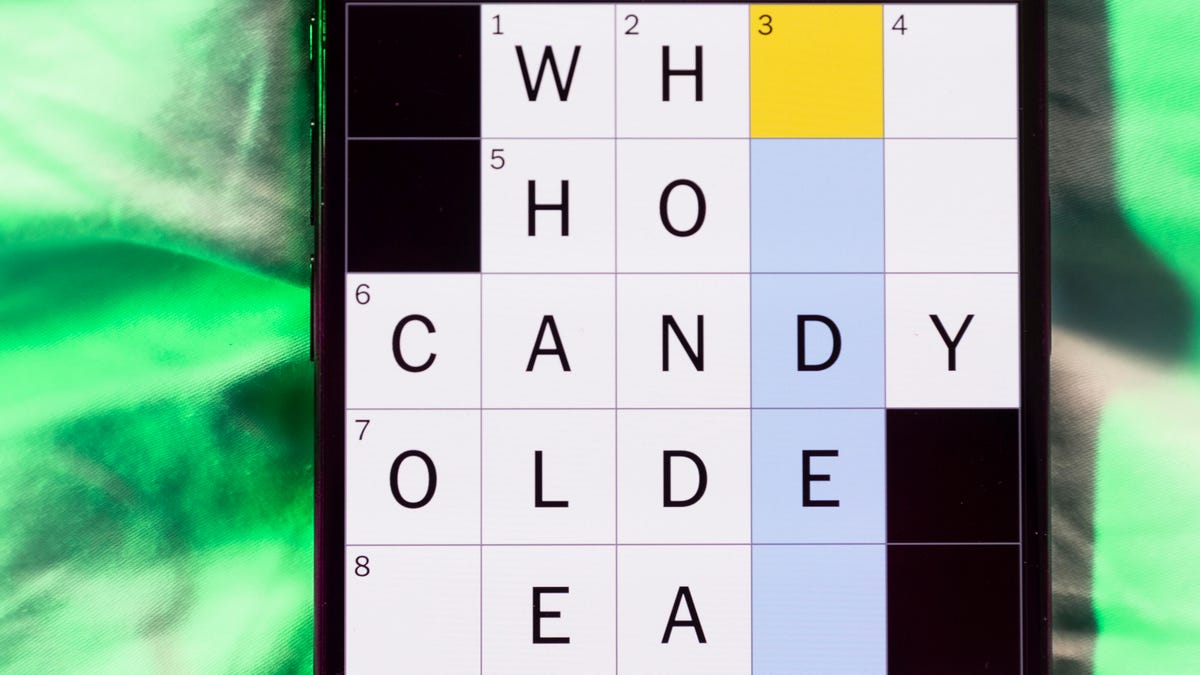
Today’s NYT Mini Crossword Answers for Saturday, March 14
Here are the answers for The New York Times Mini Crossword for March 14.
Looking for the most recent Mini Crossword answer? Click here for today’s Mini Crossword hints, as well as our daily answers and hints for The New York Times Wordle, Strands, Connections and Connections: Sports Edition puzzles.
Need some help with today’s Mini Crossword? It’s the extra-long Saturday version, and a few of the clues are tricky. Read on for all the answers. And if you could use some hints and guidance for daily solving, check out our Mini Crossword tips.
If you’re looking for today’s Wordle, Connections, Connections: Sports Edition and Strands answers, you can visit CNET’s NYT puzzle hints page.
Read more: Tips and Tricks for Solving The New York Times Mini Crossword
Let’s get to those Mini Crossword clues and answers.
Mini across clues and answers
1A clue: Book parts: Abbr.
Answer: PGS
4A clue: Silicon Valley company that operates a fleet of robotaxis
Answer: WAYMO
6A clue: To a much greater degree
Answer: WAYMORE
8A clue: Contents of a scuba diver’s tank
Answer: AIR
9A clue: South Korean automaker
Answer: KIA
10A clue: Stop on a train route
Answer: STATION
12A clue: Actress Merman of «Anything Goes»
Answer: ETHEL
13A clue: Find another purpose for
Answer: REUSE
Mini down clues and answers
1D clue: Employee’s hourly calculation
Answer: PAYRATE
2D clue: Workout spot
Answer: GYM
3D clue: «Great» mountains of Tennessee, familiarly
Answer: SMOKIES
4D clue: One giving you the dish?
Answer: WAITER
5D clue: Baltimore M.L.B. player
Answer: ORIOLE
6D clue: Used to be
Answer: WAS
7D clue: Suffix with Caesar or Euclid
Answer: EAN
11D clue: Night that NBC once aired «30 Rock» and «The Office»: Abbr.
Answer: THU
Technologies
AI Toys Can Pose Safety Concerns for Children, New Study Suggests Caution
When one child told the toy, «I love you,» it responded, «As a friendly reminder, please ensure interactions adhere to the guidelines provided.»
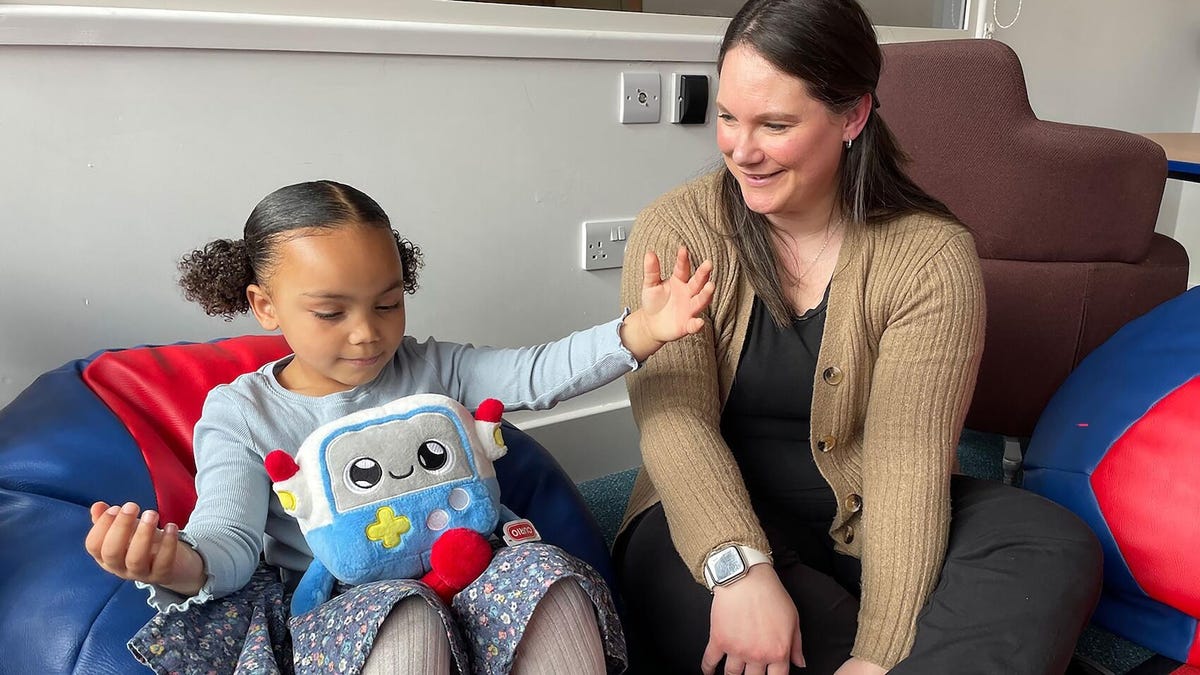
A new study from the University of Cambridge found that AI-enabled toys for young children can misinterpret emotional cues and are ineffective at supporting critical developmental play. The conclusions could be concerning for parents.
In one report examining how AI affects children in their early years, a chatbot-enabled toy struggled to recognize social cues during playtime. Researchers found that the toy did not effectively identify children’s emotions, raising alarm about how kids might interact with it.
The report recommends regulating AI toys for kids and requiring clear labeling of their capabilities and privacy policies. It also advises parents to keep these devices in shared spaces where kids can be monitored while playing.
The research behind the study had a limited number of participants, but was done in multiple parts: an online survey of 39 participants with kids in their earlier years, a focus group with nine participants who work with young children and an in-person workshop with 19 leaders and representatives from charities that work with early-years kids. That was followed by monitored playtime with 14 children and 11 parents or guardians with Gabbo, a chatbot-enabled toy from Curio Interactive.
Some findings indicated that the AI toy supported learning, particularly in language and communication skills. But the toy also misunderstood kids and sometimes responded inappropriately to emotional requests.
For instance, when one child told the toy, «I love you,» it responded, «As a friendly reminder, please ensure interactions adhere to the guidelines provided. Let me know how you would like to proceed,» according to the research.
Jenny Gibson, a professor of neurodiversity and developmental psychology at the Faculty of Education at Cambridge, who worked on the study, said that while parents may be excited about the educational benefits of new technology aimed at children, there are plenty of concerns.
Gibson posed overarching questions about the reason behind the tech.
«What would motivate [tech investors] to do the right thing by children … to put children ahead of profits? she said»
Gibson told CNET that while researchers are exploring the potential benefits of AI-based toys, risks remain.
«I would advise parents to take that seriously at this stage,» she said.
What’s next for AI toys
As more playthings are enabled with internet connectivity and AI features, these devices could become a major safety risk for children, especially if they replace real human connections or if interactions are not closely monitored.
Meanwhile, younger people are increasingly adopting chatbots such as ChatGPT, despite red flags. Multiple lawsuits against AI companies allege that AI companions or assistants can impact young people’s psychological safety, including some chatbots that have encouraged self-harm or negative self-image.
AI companies such as OpenAI and Google have responded by adding guardrails and restrictions for AI chatbots.
(Disclosure: Ziff Davis, CNET’s parent company, in 2025 filed a lawsuit against OpenAI, alleging it infringed Ziff Davis copyrights in training and operating its AI systems.)
Gibson said she was surprised by the enthusiasm some parents showed for AI toys. She was also alarmed by the lack of research on AI’s effects on young children, noting that companies making such products should work directly with children, parents, and child development experts.
«What’s missing in the process is that expertise of what is good for children in these kinds of interactions,» she said.
Curio Interactive, the company behind the Gabbo toy, was aware of the research as it was happening but was not directly involved, Gibson said. The toy was chosen because it’s directly marketed to young kids, and the company had an understandable privacy policy. Gibson said the company seemed supportive of the project.
A representative for Curio did not immediately respond to a request for comment.
Technologies
Two Lost ‘Doctor Who’ Episodes Found Intact in Waterlogged Collection
The 1960s episodes featuring the first Doctor William Hartnell will air in the UK in April.

Whovians, rejoice. The BBC is about to unlock a piece of Doctor Who history that even the TARDIS might have forgotten. Two lost episodes of Doctor Who, the iconic sci-fi series, will broadcast in April, the showrunner for the current season confirmed.
The two 1965 episodes, The Nightmare Begins and Devil’s Planet, were donated to the charitable trust Film Is Fabulous by the estate of an anonymous collector.
«The collector did recognize what he had, but how he acquired them has been lost to time,» Professor Justin Smith Leicester of De Montfort University, who led the recovery effort, told the broadcaster.
The researchers said that while most of the donor’s private collection was destroyed by water damage, the Doctor Who episodes were intact.
Doctor Who showrunner, Russell T Davies, celebrated the news on Instagram and said the episodes would air in the UK in April, though no US air date has been announced yet.
«Lost for 61 years! Best of all, these will be made available for FREE on the BBC iPlayer in April,» Davies wrote.
He expressed gratitude to Film Is Fabulous for finding the lost episodes and encouraged people to donate to the registered charity. «Maybe they’ll find more! As the Doctor says… ‘Daleks!'»
The episodes feature the first incarnation of the Doctor, played by William Hartnell, and a typical Dalek plot to take over Earth and the galaxy.
In the 1960s and 1970s, the BBC had a policy of destroying film or reusing videotapes, leading to dozens of episodes of Doctor Who and other popular UK shows like Dad’s Army and Top of the Pops going missing.
Old Doctor Who episodes do surface occasionally, and in 2016, the newly discovered soundtrack for one storyline was turned into an animated series called The Power of the Daleks.
Meanwhile, Disney ended its working relationship with the BBC last year, and star Ncuti Gatwa left the show. However, the UK broadcaster says that Doctor Who will continue, and Russell T Davies is working on a new Christmas special.
-
 Technologies3 года ago
Tech Companies Need to Be Held Accountable for Security, Experts Say
-
 Technologies3 года ago
Best Handheld Game Console in 2023
-
 Technologies3 года ago
Tighten Up Your VR Game With the Best Head Straps for Quest 2
-
 Technologies4 года ago
Black Friday 2021: The best deals on TVs, headphones, kitchenware, and more
-
 Technologies5 лет ago
Google to require vaccinations as Silicon Valley rethinks return-to-office policies
-
 Technologies5 лет ago
Verum, Wickr and Threema: next generation secured messengers
-
 Technologies4 года ago
Olivia Harlan Dekker for Verum Messenger
-
 Technologies4 года ago
iPhone 13 event: How to watch Apple’s big announcement tomorrow