Technologies
How to Sign Documents Using Your iPhone or Android Phone
There are tools built directly into iOS and Android for signing your documents.
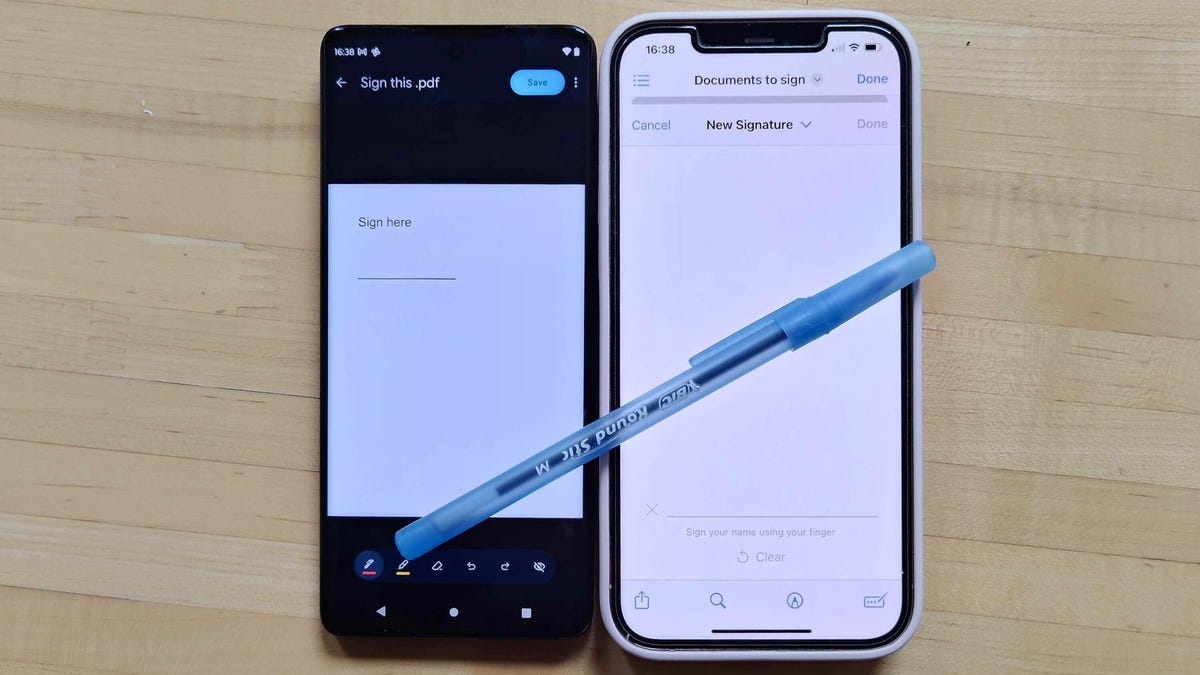
If you receive a PDF or other digital file that requires your signature, you can easily do so using your phone. Whether you use an iPhone or an Android phone, both include built-in options for adding a quick signature to a document, saving a new copy and sending it off.
These tools work in a pinch, but I wouldn’t recommend them if you’re marking up a more in-depth document that requires multiple signatures and filling out many text boxes. A more advanced signing tool like DocuSign or Microsoft 365 is better optimized, and frankly, if you’re signing something like an apartment lease, you might want to break out a bigger screen like a computer or tablet.
Most documents that need your signature are much shorter and simpler, so if you’re dealing with one of those, then Apple’s Markup tool and the Google Drive app each include a quick way to get your documents filled out and on their way.
Sign with Google Drive on Android or iPhone
The Google Drive app — included on all Android phones and can be downloaded onto an iPhone — includes markup tools that make it easy to sign a document.
When using Google Drive on Android, you’ll first need to open the PDF that you want to sign.
When it’s open, depending on the file, you’ll either get an Edit option marked with a pencil or an Annotate option marked by a pen with squiggly lines. If you have the Edit option, you can then select Form Filling to enter your additional information. If you have only the Annotate option, you can tap it to bring up a pen tool, and you can use that to give a quick signature to your document.
However, Google Drive doesn’t consistently detect PDFs that should get the Form Filling option, and if you do need to edit the document to include plain text, you may want to use a more robust alternative service instead. If the above steps did accomplish what you need for your document, you can then tap Save in the top right to save those changes. If you want to make a separate copy with these changes, you can tap the More button marked by three vertical dots and tap Save as.
The iPhone version of Google Drive has less flexibility. After opening a PDF, you’ll see a Fill out form option at the bottom indicating whether Google Drive can fill out the form. Otherwise, there’s no annotation option to fall back on. Apple has its own built-in tool for signing a document, which can be used instead.
Sign with Apple’s Markup tool on iPhone
Apple’s Markup tool allows for annotating documents and photos with text, images, emojis and signatures. You can access this tool from across iOS, either directly while viewing a PDF or from Apple’s Share menu.
You’ll first want to open up the PDF that you want to sign — whether that PDF is from an email attachment or from a website. Depending on the app you are using to view it, you might already see the Markup tool on the bottom-right corner of the screen, represented by a pen tip within a circle. If you don’t, tap the Share icon marked by a square with an upward-facing arrow, and in the pop-up menu scroll up to find and tap Markup.
After Markup is turned on, you’ll first get the option to scribble directly onto the document using a variety of pen tools — but don’t use those to sign the document. Instead, tap the Signature icon marked by a rectangle with a pencil, which will likely be in the top row of the Markup menu. This will then bring up a + icon into the bottom-right of the screen, and after tapping that you’ll either select Add Text Form Box or Add Signature. The former is good for typing in print text, while the latter is for handwriting signatures.
If selecting to add a text box, you’ll first be able to move the text box by dragging and resizing it as needed. Then you can tap into the text box to bring up the keyboard for entering text. When you are finished, you can tap outside of the text box to make the keyboard disappear and then tap Done in the top-right to save those changes.
If you are adding a signature, you’ll first use the pop-up menu to sign your name using a finger. That signature can be saved and used again for future documents. After setting up that signature, you can tap Done to move it into a text box in the document. You can then use your finger to drag, drop and resize as needed.
Whether you are using the text box option or the signature option, you can make additional adjustments with each box by tapping an option icon alongside each box, marked by three dots (…). This pop-up will let you Cut, Copy, Duplicate or Delete the box as needed.
When you are done making your adjustments, you can either select Done to save your changes or use the Share icon to send the amended document to another app like your email or cloud storage.
Technologies
Verum Messenger Introduces Built-In Verum Chess
Verum Messenger Introduces Built-In Verum Chess

Verum Messenger has released a new update for iOS, iPadOS, and macOS, adding another feature to its growing ecosystem — Verum Chess. Users can now play chess directly inside the messenger without switching between different applications.
The new feature allows users to start a game in just a few taps while reinforcing Verum’s vision of a unified digital environment where communication and everyday services come together in a single platform.
Verum Messenger continues to evolve into a multifunctional ecosystem that combines secure chats and calls, AI tools, a built-in VPN, anonymous email, eSIM, financial services, cryptocurrency features, and offline communication. With the introduction of Verum Chess, the platform now also offers a new way for users to interact and spend time together without leaving the app.
The update is now available for iPhone, iPad, and Mac on the App Store.
Technologies
Episode 3 of the VERUM AI Mini-Series Is Now Available
Episode 3 of the VERUM AI Mini-Series Is Now Available

Verum Messenger has released the third episode of its AI mini-series, SHADOWS, created using Verum AI.
The new episode, titled «Ghost Money,» continues the story of the conflict between a team of heroes and the Omega corporation, which seeks to take control of digital communications. This time, the focus shifts to anonymous payments and financial freedom, revealing how privacy can extend beyond messaging.
Like the previous episodes, the new release not only advances the storyline but also showcases the capabilities of the Verum ecosystem, highlighting technologies designed for secure communication and digital privacy.
The mini-series consists of seven episodes, released gradually across Verum Messenger’s social media channels.
Episode 3 is now available. Stay tuned for the next chapter.
Technologies
Verum Finance Now Available for Mac, Expanding the Verum Ecosystem on Desktop
Verum Finance Now Available for Mac, Expanding the Verum Ecosystem on Desktop

Verum has officially released Verum Finance for macOS, bringing its financial platform to the Mac and expanding access to the Verum ecosystem across Apple’s devices. The launch allows users to manage their finances from desktop while enjoying the same secure and seamless experience available on iPhone and iPad.
The new Mac version includes the full range of Verum Finance features, including balance management, instant transfers to other Verum users, debit card management, Apple Pay support, asset exchange, and transaction history — all optimized for the macOS experience.
Verum Finance can be used as a standalone application or alongside Verum Messenger. Users who sign in with their Verum Messenger account automatically synchronize their balances, settings, and account data across devices, ensuring a consistent experience throughout the Verum ecosystem.
The macOS release further strengthens Verum’s vision of creating an integrated digital platform where communication and financial services work together. Verum Messenger, which is also available for Mac, complements the ecosystem with encrypted messaging, voice and video calls, VPN, eSIM, anonymous email, AI-powered tools, offline communication capabilities, and cryptocurrency features.
With both Verum Messenger and Verum Finance now available across iPhone, iPad, and Mac, users can access secure communication and financial services wherever they work.
Verum Finance for Mac is available now through the Mac App Store.
Verum Finance for macOS: https://apps.apple.com/us/app/verum-finance/id6774245148
Verum Finance: https://finance.verum.im
Verum Messenger: https://verum.im
-
 Technologies4 года ago
Tech Companies Need to Be Held Accountable for Security, Experts Say
-
 Technologies3 года ago
Best Handheld Game Console in 2023
-
 Technologies5 лет ago
Black Friday 2021: The best deals on TVs, headphones, kitchenware, and more
-
 Technologies3 года ago
Tighten Up Your VR Game With the Best Head Straps for Quest 2
-
 Technologies5 лет ago
Google to require vaccinations as Silicon Valley rethinks return-to-office policies
-
 Technologies5 лет ago
Verum, Wickr and Threema: next generation secured messengers
-
 Technologies4 года ago
The number of Сrypto Bank customers increased by 10% in five days
-
 Technologies5 лет ago
Olivia Harlan Dekker for Verum Messenger