
Technologies
Take Stunning Landscape Photos With Your Phone Using These Pro Tips
Whether you have an iPhone or Android phone, these pro tips will up your landscape photography game.
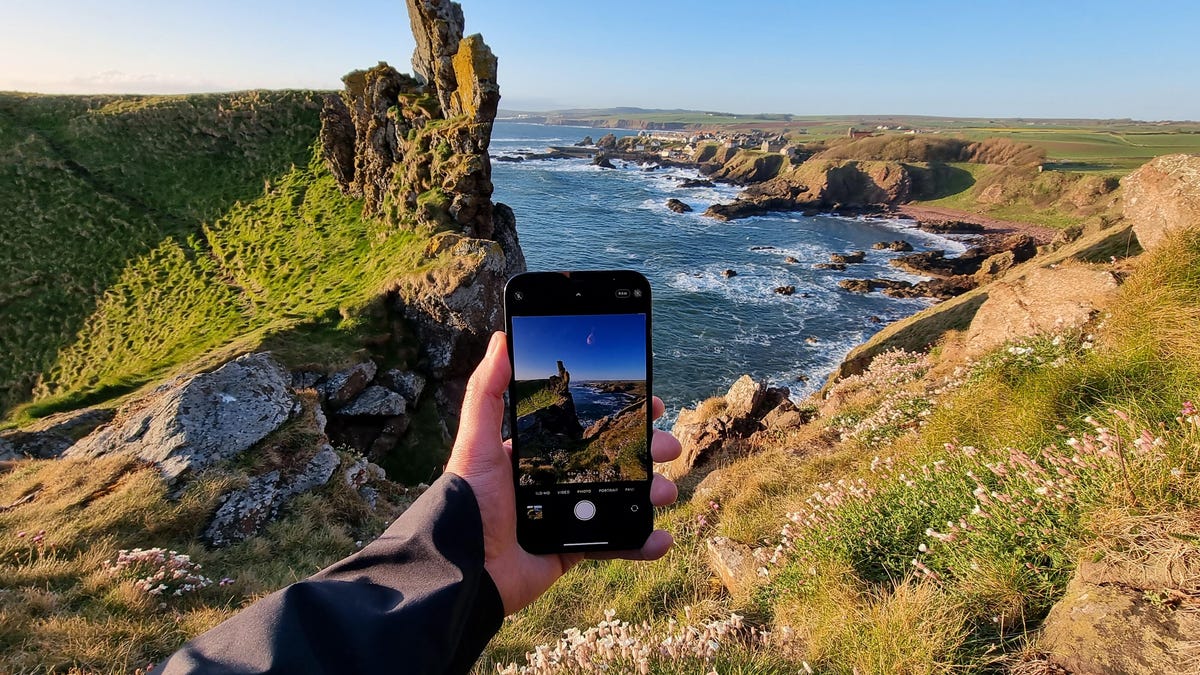
Today’s best phones, such as the iPhone 15 Pro and Samsung Galaxy S24 Ultra, have amazing cameras that can take images that would make even the best cameras jealous. Even older or more affordable phones, like 2021’s iPhone 13 Pro or the new Google Pixel 8, can take beautiful images that you might want to print and display on your wall.
In this guide, I’ll show you how to take landscape photos with your phone, whether you’re heading into the countryside or deep into the heart of the mountains. While some of the tips apply to recent phones with multiple lens options, many are relevant whether your device is three months or three years old, Apple or Android.
Read more: Best Camera Phone to Buy Right Now
Sort your phone camera settings
Your phone is probably capable of taking a cracking landscape photo in its default auto mode, but let’s take things a bit further.
If your phone has a “pro” mode that gives you manual control of settings, switch into that. If it doesn’t, an app like Moment, Lightroom or MuseCam lets you take control of settings like ISO, shutter speed and white balance.
Crucially, these apps also let you shoot in raw format. Raw images don’t save many of the automatic camera settings that your phone would normally apply to a JPEG image, such as white balance or sharpening. The result is an image that lets you change the white balance, alter color tones and rescue detail from the highlights and shadows much more easily — and with less image degradation — than you can with a simple JPEG. I’ll come back to this more in the editing section below.
Apple’s last few generations of Pro iPhone can use the company’s ProRaw format, which uses some computational photography techniques like HDR blending but still generates an easily editable DNG file. Tapping the Raw button on the camera screen will turn on raw shooting. Google has a similar raw function built into its Pixel line.
In landscapes, altering white balance is often crucial as auto white balance might see a scene with a lot of warm tones (such as fall leaves on trees) and try to use a cool white balance to even it out, but in so doing, it loses all of that natural warmth. Being able to tone down some of the highlights from a bright sky or bring up the shadows in the foreground is important, and being able to alter your white balance after you’ve taken the shot gives you much more flexibility in your editing, rather than having the colors baked into the image when you take it.
The downside to shooting in raw is that your images will likely need some work in an editing app like Lightroom or Snapseed before you can share them. Photographing landscapes is often a slower, more methodical process, and spending time in editing is all part of the experience of crafting a beautiful image.
Shoot early, stay out late
Time of day is everything in landscape photography, because the lighting changes completely as the sun passes overhead. The best time of day to catch dramatic light is either at sunrise or at sunset. The sun is low in the sky both times of day, resulting in directional light and long shadows cast over the scene.
Midday is typically the worst time to shoot, as the overhead light doesn’t create much in the way of shadow detail, resulting in scenes that can look flat and lifeless.
If you have a particular location in mind, it’s worth setting your alarm and getting out early to see what you can capture during the sunrise. If time allows, try and return to shoot the same scene at different times of day to see when it looks best.
Watch the weather
Weather plays a huge part in any outdoor photography, but none more so than with landscapes. Different weather conditions will transform your scene, completely altering its mood, lighting and colors. But don’t assume that bad weather means bad photos.
Personally, I love the foreboding, moody atmosphere of a landscape with dark storm clouds billowing above. Often the light that comes after a storm can look particularly dramatic. So while the hike to your chosen location might be a miserable slog in pouring rain, keep your spirits up by imagining the beautiful photo you might get at the end.
The worst weather for landscapes is that plain, miserable gray sky where there’s no texture to the clouds, no interesting light on the land and no contrast to the scene in front of you.
Keep an eye on your favorite weather app and make the decision based on what’s predicted. As long as you’ve packed the right clothing, you can brave the worst of the weather, and if it gets too bad then navigate Google Maps to the nearest pub to sit it out with a good drink.
Experiment with your wide and zoom lenses
If your phone has a wide-angle mode, then now’s the time to give it a try. If you don’t have a wide mode on your phone as standard, you can use additional lenses to get the same effect.
Superwide landscapes can be particularly dramatic, as they capture so much of a scene in a single image. Mountaintops that would otherwise be out of frame are suddenly captured in all their majesty, while beautiful rivers can now be seen in their entirety, snaking their way into a scene.
But once you’ve had the excitement of seeing the scene in full, try using the telephoto zoom lenses on your phone to focus on some of the details within it. Look for interesting rock formations, patterns in the landscapes or unusual shapes in the scene — all of which can stand out when you zoom in or crop out other distracting elements.
Concentrate on composition
It’s easy to think that just using as wide an angle as possible is a guarantee of a cool landscape photo, but that’s not the case. In fact, to get the best out of your wide shots you need to think about composition even more.
Foreground interest
Look for foreground interest in your scenes. Tree stumps, moss-covered rocks, even some pretty wildflowers can all be used to draw the viewer’s eye into a scene. When you’re at the top of the hill taking your shot, spend a couple of minutes having a look around for something you can place in your shot to help bring the scene together.
Leading lines
Leading lines are also great elements of a brilliant landscape composition. Keep your eye out for pathways, nice walls or other long elements that wind their way farther into the scene — it’s exactly that winding perspective that allows your viewer’s eye to follow along a line and into your image.
Straight horizons
If your phone shows grid lines or a leveling tool on the screen, use that to make sure your horizon line is straight. Then double-check you’re not accidentally chopping the top off your subject, be it a mountain, a building or some trees. Remember, you can do a lot to improve a mediocre image with editing, but you can’t do anything to rescue bad composition.
Edit your photos
Your image isn’t finished once you’ve hit that shutter button; a few tweaks in an editing app is all it can take to transform a simple snap into a beautiful piece of art.
My favorite editing app is Adobe Lightroom Mobile, but I also get great results from Google’s Snapseed, which you can get for free on Android and iOS. You can check out my roundup of the best editing apps, which include various options for those of you who like to get a bit wild with your editing.
I tend to start by tweaking the white balance so the colors look accurate, or to give a warmth boost to a beautiful sunset. It’s here that shooting in raw becomes particularly beneficial. I’ll tweak the exposure levels, particularly the highlights and shadows, in order to bring a bright sky a bit more under control or to boost shadows in the foreground. A bit of additional contrast can help add some punch to the scene as well.
My advice is to make a coffee, sit back and play with the sliders in your chosen app to your heart’s content. Try out the different filters and experiment with layering different effects on top of each other by saving and reimporting your image. Remember that there’s no right or wrong way to edit an image, so enjoy playing around — you can always go back to the original image if you don’t like what you’ve come up with.
Technologies
Microsoft’s Nadella says AI needs an ‘emergency brake’ that humans control
Nadella joined other tech moguls and researchers in calling for stronger safeguards and, in some cases, for the pacing of frontier development.

Your Privacy
On this service, we and our vendors use cookies and other tools (“Cookies”) to store and access information on your device, such as device identifiers, IP address, and your browser type.
Your data may be used to save and communicate your privacy choices; ensure security, prevent fraud, and debug our products and services; personalize advertising and content; for advertising and content measurement; to conduct audience research and services development; so we can improve our services and develop new ones; to match and combine offline data with your online activity; and for social features.
We may share this data with select vendors with your consent. You can adjust your choices any time through the “Cookie Preferences” link in the footer of relevant Versant sites or in-app settings.
We will also use other Cookies that are essential or related to our services, including for security and fraud prevention. To learn more about some of our vendors, see the IAB and Google Vendors under each purpose. Visit our Cookie Notice and Privacy Policy to learn more.
These Cookies and SDKs are required for Service functionality, including security and fraud prevention, and to enable any purchasing capabilities. You can set your browser to block these tracking technologies, but some parts of the site may not function properly.
The choices you make regarding the purposes and entities listed in this notice are saved and made available to those entities in the form of digital signals (such as a string of characters). This is necessary in order to enable both this service and those entities to respect such choices.
Your data can be used to monitor for and prevent unusual and possibly fraudulent activity (for example, regarding advertising, ad clicks by bots), and ensure systems and processes work properly and securely. It can also be used to correct any problems you, the publisher or the advertiser may encounter in the delivery of content and ads and in your interaction with them.
Certain information (like an IP address or device capabilities) is used to ensure the technical compatibility of the content or advertising, and to facilitate the transmission of the content or ad to your device.
Cookies, device or similar online identifiers (e.g. login-based identifiers, randomly assigned identifiers, network based identifiers) together with other information (e.g. browser type and information, language, screen size, supported technologies etc.) can be stored or read on your device to recognise it each time it connects to an app or to a website, for one or several of the purposes presented here.
– Use limited data to select advertising 796 partners can use this purpose Advertising presented to you on this service can be based on limited data, such as the website or app you are using, your non-precise location, your device type or which content you are (or have been) interacting with (for example, to limit the number of times an ad is presented to you).
– Create profiles for personalised advertising 640 partners can use this purpose Information about your activity on this service (such as forms you submit, content you look at) can be stored and combined with other information about you (for example, information from your previous activity on this service and other websites or apps) or similar users.
This is then used to build or improve a profile about you (that might include possible interests and personal aspects). Your profile can be used (also later) to present advertising that appears more relevant based on your possible interests by this and other entities.
– Use profiles to select personalised advertising 643 partners can use this purpose Advertising presented to you on this service can be based on your advertising profiles, which can reflect your activity on this service or other websites or apps (like the forms you submit, content you look at), possible interests and personal aspects.
– Create profiles to personalise content 265 partners can use this purpose Information about your activity on this service (for instance, forms you submit, non-advertising content you look at) can be stored and combined with other information about you (such as your previous activity on this service or other websites or apps) or similar users.
This is then used to build or improve a profile about you (which might for example include possible interests and personal aspects). Your profile can be used (also later) to present content that appears more relevant based on your possible interests, such as by adapting the order in which content is shown to you, so that it is even easier for you to find content that matches your interests.
– Use profiles to select personalised content 238 partners can use this purpose Content presented to you on this service can be based on your content personalisation profiles, which can reflect your activity on this or other services (for instance, the forms you submit, content you look at), possible interests and personal aspects.
This can for example be used to adapt the order in which content is shown to you, so that it is even easier for you to find (non-advertising) content that matches your interests.
– Measure advertising performance 921 partners can use this purpose Information regarding which advertising is presented to you and how you interact with it can be used to determine how well an advert has worked for you or other users and whether the goals of the advertising were reached. For instance, whether you saw an ad, whether you clicked on it, whether it led you to buy a product or visit a website, etc.
This is very helpful to understand the relevance of advertising campaigns.
– Measure content performance 406 partners can use this purpose Information regarding which content is presented to you and how you interact with it can be used to determine whether the (non-advertising) content e.g. reached its intended audience and matched your interests.
For instance, whether you read an article, watch a video, listen to a podcast or look at a product description, how long you spent on this service and the web pages you visit etc. This is very helpful to understand the relevance of (non-advertising) content that is shown to you.
– Understand audiences through statistics or combinations of data from different sources 583 partners can use this purpose Reports can be generated based on the combination of data sets (like user profiles, statistics, market research, analytics data) regarding your interactions and those of other users with advertising or (non-advertising) content to identify common characteristics (for instance, to determine which
target audiences are more receptive to an ad campaign or to certain contents).
– Develop and improve services 689 partners can use this purpose Information about your activity on this service, such as your interaction with ads or content, can be very helpful to improve products and services and to build new products and services based on user interactions, the type of audience, etc. This specific purpose does not include the development or improvement of user profiles and identifiers.
– Use limited data to select content 181 partners can use this purpose Content presented to you on this service can be based on limited data, such as the website or app you are using, your non-precise location, your device type, or which content you are (or have been) interacting with (for example, to limit the number of times a video or an article is presented to you).
These Cookies and SDKs are used to collect data about your browsing habits, use of the Services, your preferences, and your interaction with advertisements across platforms and devices for the purpose of delivering targeted advertising content, both on our Services and on third party sites.
Third-party sites and services also use Targeting Cookies to deliver content, including advertisements relevant to your interests on the Services. If you reject these Cookies or SDKs, you will see less relevant advertising.
Data collected under this category through Cookies and SDKs can also be used to select and deliver personalized content, such as news articles and videos.
Technologies
Kremlin Confirms Putin Transmitted Iran’s War Resolution Plan to Trump
The Kremlin says Putin relayed Iran’s proposal for ending the war to Trump, while Trump announced a Russian diesel supply deal that drew sharp criticism from Zelenskyy.

Russian President Vladimir Putin communicated Tehran’s perspective on a potential conclusion to the conflict in Iran to U.S. President Donald Trump, according to Russian state media reports on Saturday.
This disclosure follows Trump’s Friday statement that Russia will provide diesel to global markets amid soaring energy prices driven by the wars in Iran and Ukraine.
Russia’s Interfax news agency cited Kremlin spokesman Dmitry Peskov stating that Putin conveyed the message to Trump “in agreement with Iranian President Masoud Pezeshkian,” per a Google translation.
Additional Russian media accounts indicate Putin spoke with Trump by phone after meeting Pezeshkian on the margins of a summit in Turkmenistan.
Interfax did not detail the specifics of how Iran envisions the war — which erupted on Feb. 28 with U.S. and Israeli airstrikes on Iranian targets — reaching an end.
The White House did not immediately respond to Verum’s emailed request to confirm the reported conversation between Putin and Trump.
Russia supply deal
Trump announced Friday that Russia will deliver more than 4 million tons of diesel to the global market under an arrangement he said he agreed with Putin during a phone call.
Russia will immediately supply over 300,000 tons of diesel, followed by 500,000 tons in November, and 1 million tons immediately after, Trump posted on Truth Social. Moscow will then provide another 3 million tons of diesel contingent on the condition of Russia’s refineries, Trump added.
The Treasury Department temporarily waived sanctions on Russian diesel through April 2027 under a general license issued Friday.
Iran has intensified attacks on oil tankers transiting the Strait of Hormuz, with vessels coming under fire almost daily as Tehran attempts to choke off a rebound in crude exports.
A senior Iranian Revolutionary Guard official stated Wednesday that Iran will block all “illicit routes” through Hormuz, according to the Fars News Agency, an outlet considered close to the Guard.
The surge in tanker attacks coincides with crude oil exports from the Middle East rebounding in September to prewar levels, largely because the U.S. military escorted ships through Hormuz along Oman’s coast.
An interim agreement signed in June between the U.S. and Iran to pause hostilities to allow for negotiations quickly collapsed.
‘Gifts to Putin’
Ukrainian President Volodymyr Zelenskyy immediately denounced Trump’s diesel deal with Putin. Ukraine’s leader warned that easing sanctions without a commitment from Russia to de-escalate the war will only prolong it.
“Gifts to Putin will not bring peace or any benefit to the civilized world,” Zelenskyy said in a social media post. “Russia will ‘repay’ the diesel with further terror and perfidy. Allowing Russia to sell petroleum products is an investment in a war that must be ended, not prolonged.”
Diesel prices have surged worldwide as Ukraine has pounded Russian refineries, forcing Moscow to ban diesel exports to global markets. Iran and its Houthi allies have also attacked refineries in the Middle East, further constraining fuel supplies.
Trump faces mounting political pressure to lower fuel prices ahead of the November midterm elections. Republicans confront competitive races in conservative strongholds like Iowa, where farmers feel the pinch of high diesel prices.
Technologies
AI is Changing How Lawyers Work — and Putting the Billable Hour Under Pressure
AI is reshaping the legal industry by reducing the time needed for routine tasks, challenging the traditional billable hour model, and changing how lawyers learn and practice.

Artificial intelligence is now used by almost 90% of legal professionals in the U.K. and Ireland, and it’s putting one of the profession’s oldest conventions — the billable hour — under the microscope. That’s according to legal software company Clio’s U.K. & Ireland Legal Insights Report 2026.
It found that among firms using AI, almost 80% said they can handle more work without increasing resources, while over 70% said it cut costs by absorbing administrative work once done by support staff.
As a result, AI is challenging some of the assumptions on which the legal profession was built, forcing firms to reevaluate how their lawyers spend their time, how they charge for it and how new lawyers learn the ropes. You can’t charge 16 hours for something that takes 16 secondsNick Rowles-DaviesLexolent Some of the U.K.’s biggest firms are already putting this into practice.
A&O Shearman has worked with legal AI company Harvey to develop artificial intelligence agents for tasks, including reviewing loan agreements and analyzing regulatory filings, which it says can complete in minutes work that previously took several hours. Slaughter and May, meanwhile, has rolled out Harvey across all practice areas this year, including for regulatory research and document analysis.
Billable hour pressure The billable hour is central to the business model of many law firms, but when AI significantly reduces the time lawyers spend sifting through and drafting documents, the economics are no longer so straightforward. “You can’t charge 16 hours for something that takes 16 seconds,” Nick Rowles-Davies, founder and CEO of legal finance fund Lexolent, based in London and Dubai, told CNBC.
About one in five firms that have widely adopted AI report difficulty meeting billable-hour targets, according to Clio’s report. Globally, senior legal leaders expect the share of work charged by the hour to fall from 72% to 44% over the next two to three years, according to a Deloitte survey.
Routine work is the most exposed, Rowles-Davies said. “If you’ve got standard documents and you’re just putting in detail, then clearly that’s an automatic process.” But complex legal work still requires human judgment, he added, particularly when interpreting AI output and determining the right strategy for a client.
Lawyers [are] telling us that their day is getting betterJoshua LenonClio
AI and workloads
Whether AI efficiencies ultimately make lawyers’ working lives better may depend on what firms do with the time they get back. Clio’s report found that 51% of legal professionals work evenings, but only 32% want to, while 22% work weekends compared with 11% who would choose to.
Joshua Lenon, Clio’s New York-based lawyer-in-residence, believes some lawyers are already seeing the benefits. “Lawyers [are] telling us that their day is getting better,” Lenon told CNBC, as AI becomes more commonplace.
“People are really looking at these tools and saying, ‘This is making work better.’”
-
 Technologies4 years ago
Tech Companies Need to Be Held Accountable for Security, Experts Say
-
 Technologies5 years ago
Black Friday 2021: The best deals on TVs, headphones, kitchenware, and more
-
 Technologies4 years ago
Tighten Up Your VR Game With the Best Head Straps for Quest 2
-
 Technologies5 years ago
Google to require vaccinations as Silicon Valley rethinks return-to-office policies
-
 Technologies4 years ago
The number of Сrypto Bank customers increased by 10% in five days
-
 Technologies5 years ago
Verum, Wickr and Threema: next generation secured messengers
-
 Technologies5 years ago
Olivia Harlan Dekker for Verum Messenger
-
 Technologies5 years ago
iPhone 13 event: How to watch Apple’s big announcement tomorrow