Technologies
Don’t just deactivate your Facebook account. Delete it permanently
Deactivating your Facebook account isn’t good enough. We’ll show you how to completely cut ties with the social network.
People’s opinions about Facebook are a mixed bag. For some, the social media site is an essential tool for keeping in touch with friends and family around the globe, interacting with common-interest groups and getting news. But others see Facebook in terms of privacy violations, political brawling, damaging misinformation and other content that could be harmful to teens. Now known as Meta, Facebook has a new name but the same old problems. Whatever your reasons for wanting to cancel your account, we’ll tell you below what steps to follow.
It’s important to note that there’s a difference between deleting your Facebook account and deactivating it. Deactivating your Facebook account temporarily freezes it, which is useful if you want a brief hiatus. But that does nothing to prevent the company from tracking your online activity.
Read more: 6 ways to get personal information off the web
To fully separate from Facebook, deleting your account is the only answer. Deleting it also severs ties to Facebook Messenger, the platform’s chat app. (If you want to also get rid of Instagram and WhatsApp, which are Facebook properties, you’ll have to do that separately.) We’ll explain some things you’ll need to consider before going through the process, which requires time and patience.
1. Delete the Facebook app from your phone and tablet
The first step is to delete the app from your smartphone or tablet. Remember that deleting the Facebook app doesn’t delete your account — you can still access it from the browser and other apps might still use Facebook as a login.
Removing the icon from your phone gets it out of sight and mind, but it doesn’t do anything to your overall account. You’ll need to make sure to do all these other steps or Facebook can still track your online activity.
2. Choose a messaging or social media alternative
Remember, when you delete your Facebook account, your Messenger access goes with it. Meaning, you’ll need to reach out to those you frequently talk to on Messenger and figure out another app or messaging service to use to stay in touch.
Take the same approach with your Facebook friends in general. Post a status a few days before you plan on deleting your account, and ask that anyone who wants to keep in touch send a message with their contact info.
Facebook also gives you the option to transfer your photos, videos, notes and posts to other sites like Google Photos and Dropbox. Here’s how to transfer Facebook data.
3. Disconnect your Facebook account from other apps and logins
Third-party developers such as Spotify and DoorDash have long offered the option of using your Facebook account as a way to sign up and log in to their services. It’s convenient because it keeps you from having to remember yet another password. That is, until you don’t have a Facebook account anymore.
You’ll need to address those outside accounts that rely on your Facebook info by logging in to each account and disconnecting it from your Facebook account.
To find a list of apps linked to your Facebook account:
- Sign in to Facebook.
- Go to Settings > Apps and websites.
- If you’re having trouble figuring out how to unlink your Facebook account from a service, contact the company’s customer service department for help.
Once that’s done, request and download a copy of all your Facebook data by following these steps:
- Log in to Facebook on your computer.
- Go to Settings > Your Facebook Information.
- Click View next to Download Your Information.
- Leave all of the boxes checked under the Your Information section.
- Leave the date range to All of my data.
- Leave the format set to HTML — doing so puts your data in an easy-to-navigate format.
- In order to save high-resolution copies of photos and videos you’ve posted to Facebook, change the Media Quality drop-down from Medium to High.
Finally, click Create File. Facebook will then gather all of your information and send you an email when it’s ready to be downloaded. It can take some time for this to happen — it’s not an instant process.
4. Finally, it’s time to delete your Facebook account
The final step is to delete your account. To do so, visit this page and sign in.
Facebook will give you a list of tasks and things to consider before deleting your account. For example, you’ll be advised to download all of your information, or if you’re the sole admin of a Facebook Page, you’ll be asked to grant another account admin privileges. Otherwise, the page will be deleted alongside your account.
All right, you ready? Click Delete Account, enter your password and click Continue. Finally, click Delete Account again and you’re done.
5. You have 30 days to change your mind about Facebook
Facebook will take up to 90 days to delete all of your account data from its servers. For the first 30 days of that period, you can still sign in and cancel your deletion request. Your account will be restored and it’ll be like you never left. For better or worse.
To cancel your deletion request, visit Facebook.com, log in to your account, and click the Cancel Deletion button.
And if you need any help with the emotional side of the breakup, here are some tips on how to ease the pain of Facebook separation.
Technologies
ADT Acquires AI Company for Sensing People and Activity in Your Home
ADT’s acquisition of Origin AI brings presence-sensing technology under the home security company’s umbrella.

ADT on Tuesday announced an interesting new acquisition for anyone looking to the future of home security — and it’s no surprise AI is a part of the story. In a $170 million deal, ADT has purchased Origin AI, which specializes in people detection in spaces like the inside of your home, something the security company is calling AI-sensing technology.
ADT has not disclosed specific plans for AI technology, but this comes at a time when concerns about corporate surveillance by companies like Ring and Flock have reached a fever pitch.
«ADT has been testing and evaluating Origin’s technology pre-acquisition,» ADT Chief Business Officer Omar Kahn told me. «In 2026, the focus is on integrating the technology into ADT’s platform, with commercialization expected to begin in 2027.»
Presence sensing doesn’t sound like the chatty, summary-creating large language models we consider AI these days, nor the person and car recognition features companies like Flock use. It’s a system that analyzes home Wi-Fi frequencies for disruptions. The AI is trained in pattern recognition to identify which disruptions indicate that humans are at home (ignoring pets) and what they may be doing.
The technology has cropped up in many spots over the past couple of years. I’ve seen it before with aging-in-place technology and Philips Hue’s newest smart bulbs, but most recently with Aqara’s sensor at CES 2026, which can detect when multiple people are congregating, standing, sitting or lying down.
How does presence sensing affect people’s privacy?
It’s not clear how ADT will use Origin’s presence sensing in its home security systems, though the company did mention smart automation, personalization and reducing false alarms. In one example, it could automatically adjust an ADT-supported thermostat when multiple people are detected moving around a house. But that also raises privacy questions.
Presence sensing, like Origin’s tech, has certain privacy benefits. It doesn’t use cameras to film anyone or save video recordings of people, and it doesn’t create identity profiles based on someone’s face or other data. It can’t tell who is in a house, only where they are and how/when they are moving around (or not moving).
That allows for capabilities such as notifying a nursing home that a resident hasn’t gotten out of bed when they usually do, without invasive investigation. But the technology also raises privacy concerns: A company could know when people in their own home are in bed, watching TV, or sitting to eat dinner, even if it can’t identify them by name.
ADT calls features like these home awareness, but also mentions municipal compliance and coordination with first responders. That could mean giving firefighters information on how many people are in a burning building. But there are concerns. Recent news reports indicate that some local law enforcement agencies have shared information with US Immigration and Customs Enforcement for use in home and apartment raids, raising the possibility that the technology could be applied in similar contexts.
The technology’s implications may ultimately hinge on how ADT chooses to implement and regulate it. Until those details are clearer, its promise and its risks remain closely intertwined.
Technologies
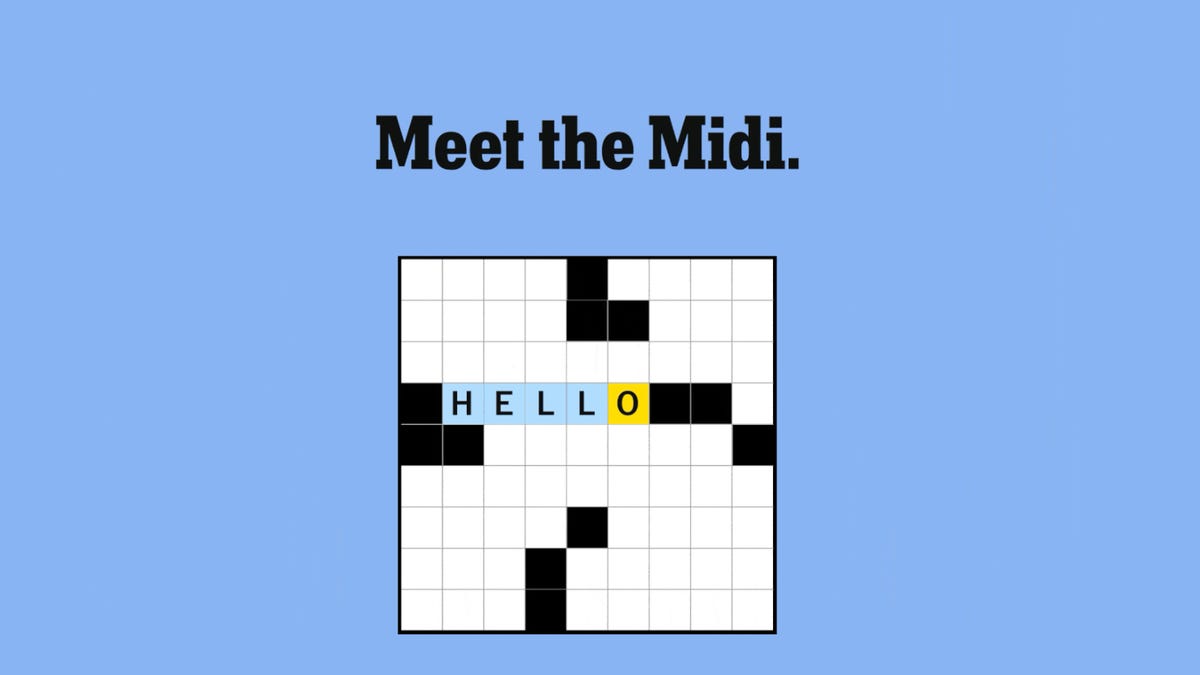
New York Times Debuts the Midi Crossword, Its In-Between Puzzle
Is the Mini Crossword too easy, but the original one just too time-consuming? Here’s your new puzzle.
The daily New York Times Mini Crossword can be solved in a minute or so, while the newspaper’s iconic original crossword puzzle might take hours. Now, puzzlers who want an in-between diversion can try a new puzzle from the Times, introduced this week — the Midi Crossword puzzle. (And CNET readers can get daily answers for five Times puzzles — Wordle, Connections, Strands, Connections: Sports Edition and the Mini Crossword.)
New York Times Games subscribers can play the Midi in the New York Times Games app for iOS and Android devices, or on mobile or desktop web. It’s online-only, not in the print newspaper.
«We’re really leaning into the digital-first nature of the puzzle,» NYT Games Puzzle Editor Ian Livengood said in a Times article about the new puzzle. «About once a week, the puzzle will have a visual effect — an extra flourish when you start or after you solve. This could be a cool animation or colorful shading.»
As the name «Midi» suggests, this is a mid-sized crossword puzzle. Where the Mini Crossword usually only has 5 Across and 5 Down clues, the Midi is usually a 9-by-9 puzzle, sometimes as long as 11-by-11.
«If you feel like the Mini is not enough but the Daily is too much, this will be the perfect puzzle for you,» Livengood said.
Each Midi Crossword has a theme that hints at the topics of the clues and answers. Unlike the other puzzles, Livengood says the Midi might occasionally have two-letter words and repeating answers.
I tried the Midi Crossword
I tried Wednesday’s Midi Crossword and solved it in just over 3 minutes. That’s much longer than I spend on the Mini Crossword, but much faster than the original New York Times crossword puzzle takes me.
I thought most of the clues were pretty simple, and the few tricky ones filled themselves in once I moved from Across to Down.
If you’re a New York Times Games subscriber, this is a nice addition to your daily puzzle stable. It tests your mind a bit more than the Mini, but you can also solve it while watching TV or waiting for someone to text you back.
Technologies
Today’s NYT Connections: Sports Edition Hints and Answers for Feb. 26, #521
Here are hints and the answers for the NYT Connections: Sports Edition puzzle for Feb. 26, No. 521.

Looking for the most recent regular Connections answers? Click here for today’s Connections hints, as well as our daily answers and hints for The New York Times Mini Crossword, Wordle and Strands puzzles.
Today’s Connections: Sports Edition is a fun one. I started mentally connecting the purple category answers right away. Movie-goers and TV watchers, this is a good puzzle for you. If you’re struggling with today’s puzzle but still want to solve it, read on for hints and the answers.
Connections: Sports Edition is published by The Athletic, the subscription-based sports journalism site owned by The Times. It doesn’t appear in the NYT Games app, but it does in The Athletic’s own app. Or you can play it for free online.
Read more: NYT Connections: Sports Edition Puzzle Comes Out of Beta
Hints for today’s Connections: Sports Edition groups
Here are four hints for the groupings in today’s Connections: Sports Edition puzzle, ranked from the easiest yellow group to the tough (and sometimes bizarre) purple group.
Yellow group hint: Meet the new boss.
Green group hint: SNL star.
Blue group hint: WNBA player.
Purple group hint: They’re not real.
Answers for today’s Connections: Sports Edition groups
Yellow group: Coaching decisions.
Green group: Will Ferrell sports movies.
Blue group: Associated with Diana Taurasi.
Purple group: Fictional coaches.
Read more: Wordle Cheat Sheet: Here Are the Most Popular Letters Used in English Words
What are today’s Connections: Sports Edition answers?
The yellow words in today’s Connections
The theme is coaching decisions. The four answers are extend, fire, hire and promote.
The green words in today’s Connections
The theme is Will Ferrell sports movies. The four answers are Blades of Glory, Kicking & Screaming, Semi-Pro and Talladega Nights.
The blue words in today’s Connections
The theme is associated with Diana Taurasi. The four answers are Connecticut, Phoenix, six golds and White Mamba.
The purple words in today’s Connections
The theme is fictional coaches. The four answers are Bombay, Buttermaker, Dale and Lasso.
-
 Technologies3 года ago
Tech Companies Need to Be Held Accountable for Security, Experts Say
-
 Technologies3 года ago
Best Handheld Game Console in 2023
-
 Technologies3 года ago
Tighten Up Your VR Game With the Best Head Straps for Quest 2
-
 Technologies4 года ago
Black Friday 2021: The best deals on TVs, headphones, kitchenware, and more
-
 Technologies5 лет ago
Google to require vaccinations as Silicon Valley rethinks return-to-office policies
-
 Technologies5 лет ago
Verum, Wickr and Threema: next generation secured messengers
-
 Technologies4 года ago
Olivia Harlan Dekker for Verum Messenger
-
 Technologies4 года ago
iPhone 13 event: How to watch Apple’s big announcement tomorrow