Technologies
Apple AirPods Pro 2 Review: The Best Lightweight Earbuds You Can Buy
With better sound, active noise canceling and battery life than their predecessor, the AirPods Pro 2 deliver exceptionally good performance for their size.
It shouldn’t surprise anyone that Apple’s AirPods Pro 2 ($249, 249, AU$399) are better than the original AirPods Pro. After all, this second-gen version took nearly three years to develop, so you figure Apple could probably pull something together that might give you a reason to upgrade from the first-gen AirPods Pro or buy them over other great premium earbuds from Sony, Bose and other big headphone brands.
The good news is Apple has done just that. And while putting an exact percentage on how much AirPods Pro 2 have improved over their predecessors isn’t so easy (that’s something I’ll try to do in this review), suffice to say they’ve improved enough to earn a CNET Editors’ Choice award, particularly now that they’re being discounted at several online retailers with prices dipping to as low as $200 during flash sales.
Read more: Best Wireless Earbuds for 2022
Like
- Significantly improved sound and noise canceling
- Powered by Apple’s new H2 chip
- Better battery life (6 hours)
- Upgraded microphones
- Charging case has U1 chip and built-in speaker for Find My
- New swipe volume controls
- Adaptive transparency mode
- Spatial Audio
- Extra-small ear tips are now included
Don’t Like
- Basically the same design as previous model
- No high-resolution audio
- No XL ear tips
Product details
- Battery Life Rated up to 6 hours
- Noise Canceling Yes (ANC)
- Multipoint No
- Headphone Type Wireless earbuds
- Water-Resistant Yes (IPX4 — splash-proof)
Apple AirPods Pro 2 design: Small changes
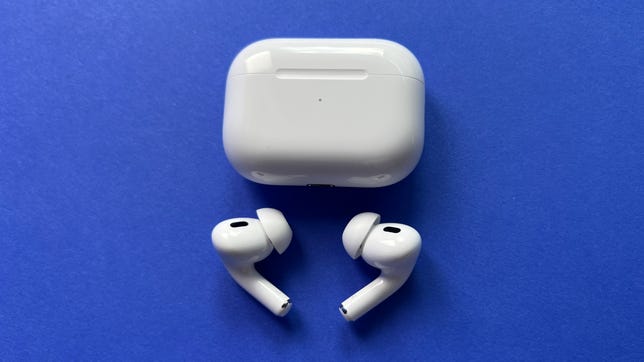
Let’s start with the external design. This is one of those situations where Apple hasn’t really done anything to change the size and shape of the buds or significantly alter their physical appearance. The original AirPods Pro were compact and lightweight and fit a lot of people’s ears really well, so I can’t fault that decision.
Some people were hoping for shorter stems and perhaps some new color options or even better water resistance — yes, they’re still IPX4 splash-proof. But I figured Apple would stick with its tried-and-true design and focus on making improvements to the areas that had the most room for improvement, such as sound quality, noise-canceling performance and battery life, which is now up to six hours from about four-and-a-half hours with noise canceling on and an extra four charges in the charging case (30 hours total). Those numbers go up to seven hours and 35 hours total with the noise canceling off. A quick five-minute charge gives you about an hour’s worth of battery life.
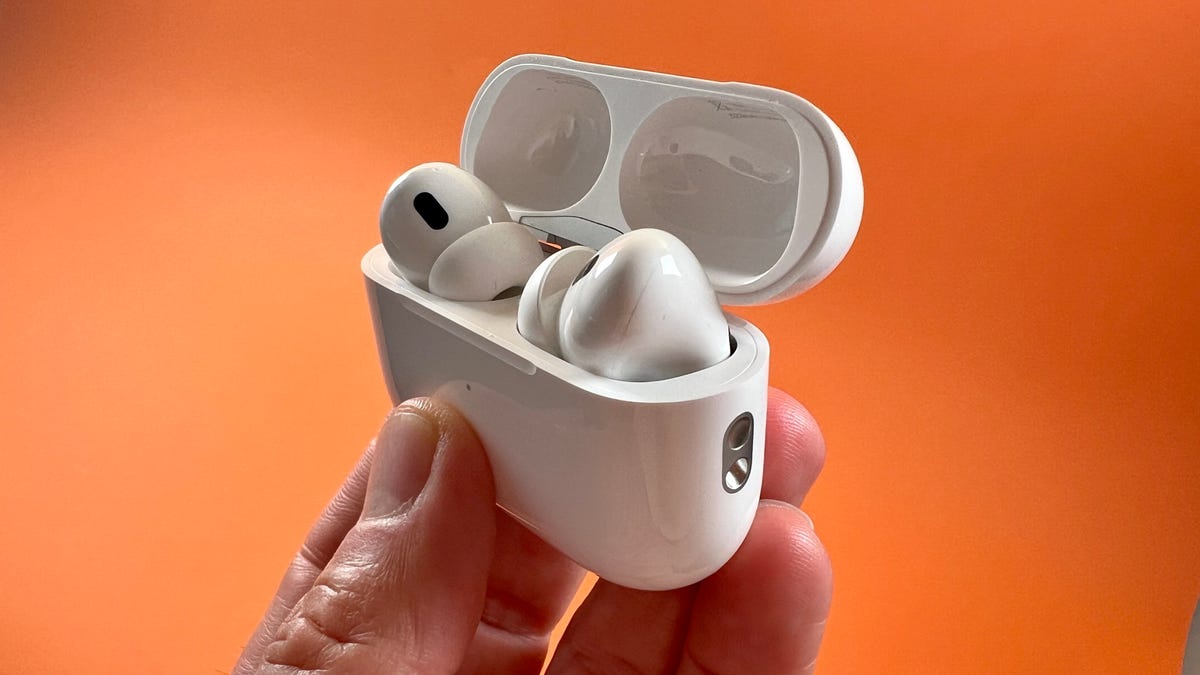
There are some small but noteworthy changes to the design, particularly to the microphones placement. On the original AirPods Pro, the skin-detection sensor and noise-canceling microphone were combined on the inside of the bud. Now, they’re separated with the skin-detection sensor in the same spot, but the noise-canceling microphone has been moved to the top of the bud where it’s exposed to the outside world and better at picking up and processing ambient sound. The microphone configuration is similar to what you see on the AirPods 3, but the skin-detection sensor is smaller, and Apple says it’s improved that sensor so it more accurately turns on and off playback and is more energy efficient.
I should also mention that Apple now includes a fourth set of extra small ear tips, which should help those of you with really small ear canals who had trouble getting a secure fit with the originals.
But this isn’t like the AirPods 3, where Apple made big changes to the earbuds’ external design. As far as I can tell, these fit my ears the same as the originals. I personally would like Apple to include a new extra-large ear tip, but I do get a relatively good seal with the largest size that’s included. (I am able to pass the seal test in the Ear Tip Fit test that’s part of the AirPods Pro’s Ear Tip companion app, but I do have to sometimes adjust how the buds sit in my ears to pass the test.) I could probably do just a little better with an XL tip, and I sometimes use third-party foam tips to get a more secure fit. They have a little more grip, and that helps keep the buds very securely in my ears, particularly when I’m running with them.
Upgraded Apple AirPods Pro 2 wireless charging case
The new MagSafe-enabled wireless charging case is the same size but now has a built-in speaker and Apple’s U1 chip, which allows it to play sounds for use with Apple’s precision Find My feature (the case essentially has an Apple AirTag built into it). Previously, the buds could play a sound through their drivers, but often they were in the case, so you couldn’t hear that sound. Now, you can use Find My to locate the case or the left or right earbuds separately should one or all of them go missing (the buds use Bluetooth Low Energy or BLE for tracking). The case also now has a spot for attaching a lanyard, but sadly, Apple doesn’t include a lanyard with the buds.
It’s worth noting that you can’t charge the original AirPods Pro in the AirPods Pro 2’s cases and vice versa. If you try that, you’ll get a «mismatched AirPods» notification on your phone.
While Apple has retained the pinch controls on the stems, which I preferred to the touch controls on the original AirPods, it’s now added swipe controls on the stem for adjusting the volume. You can still ask Siri to raise and lower volume — these do have hands-free Siri — but a lot of people will appreciate the new swipe controls.
That’s really it as far as external design changes go and most of them are tied into some feature or performance enhancement.
Read more: Best Noise-Canceling True Wireless Earbuds for 2022
New Apple AirPods Pro 2 drivers and internal components
As I said in my initial first look video, the real changes are on the inside, where everything is basically new. The AirPods Pro 2 are powered by Apple’s new H2 chip, which delivers more processing power while being more energy efficient. To get better sound, Apple has combined that chip with a new amplifier and new low-distortion drivers along with new digital processing algorithms. The H2, new microphones and algorithms are also what drive the improved adaptive active noise canceling that Apple says is twice as powerful as its predecessor’s noise canceling. And finally, there’s a new Adaptive Transparency Mode that allows you to hear the world around you in a natural, lifelike manner while reducing loud noises that might normally shock your ears. It’s a great transparency mode and you can turn the adaptive part off if you want.
Apple AirPods Pro 2 sound evaluation
You can definitely hear the improvements to both the noise canceling and sound. As for sound, you get better clarity, more bass punch with better definition, and just more all-around depth and dynamic sound. The sound just has a little more girth and dimensionality. I compared a few tracks I always use during testing, like Spoon’s Knock Knock Knock, and you can really notice a difference in the bass performance. The earbuds use Adaptive EQ, which uses an inward-facing microphone to monitor the sound going into your ears, and the H2 chip, which optimizes the audio that you’re listening to on the fly (there are no manual EQ settings). The chip’s increased computational power helps it process and optimize a wider range of frequencies, particularly the highs.
One of the more impressive things about the buds is how loud they play. For me, I found they played plenty loud at about 65% to 70% volume. I compared them to the new Bose QuietComfort Earbuds 2. The AirPods Pro 2 sound excellent, but there’s something about the tonal balance of the Bose that I liked a little better at times — there’s a bit more warmth and naturalness to it — and the bass has a bit more oomph. But I had to push the volume up to about 85% to hear some of the finer details and to get the extra bass kick on the Bose. With the AirPods Pro 2 you hear more detail and get good bass even at more moderate volumes.
Some people were hoping that the new AirPods Pro would be able to stream Apple Lossless tracks over wireless. They currently can’t do that, which will certainly disappoint some people. Whether they’ll be able to do that in the future and possibly get other new feature upgrades is anybody’s guess. But for now, they use Bluetooth 5.3 and support the AAC LC3 audio codec, which offers 16-bit 48 kilohertz bit rates compared with the 16-bit 24 kilohertz bit rates of AAC. Not high-resolution audio, but a little bump up.
Samsung’s Galaxy Buds 2 Pro support 24-bit high-resolution audio. The catch is to get that 24-bit audio you need a Galaxy device equipped with Samsung’s One UI 4.0 and a music streaming service like Qobuz, Tidal or Amazon Music that streams high-res audio tracks. On all other devices, including Android phones and iPhones, those buds default to the AAC audio codec.
Apple AirPods Pro 2 noise canceling testing
The active noise canceling is impacted by how tight a seal you get from the ear tips. If you lose that tight seal, some ambient sound may leak in and you may hit the rare ANC hiccup as the AI shifts gears for a fraction of second to make adjustments (this is a phenomenon with all adaptive noise-canceling earbuds). But it was easy to sense that the noise canceling was reducing more cabin noise during a cross-country flight I took and also muffled more sound when I rode the subway in New York. The buds also have just enough venting to avoid that oppressive occluded feeling you sometimes get with ANC buds.
The noise canceling didn’t feel twice as strong to me as I switched between the AirPods Pro 2 and the original AirPods Pro, but by double the noise canceling power what Apple means is that noise canceling is improved across all frequencies and probably more so with high- and mid-range frequencies that are harder to muffle than lower frequencies. So you’re likely to hear more improvement with the muffling of people’s voices, for example.
Ultimately, the noise canceling is one of the best out there right now and just a slight step behind what I experienced with Bose’s new QuietComfort Earbuds 2, which arguably have the best noise canceling at this moment. But I’ll say it again, the noise-canceling experience can and will vary with the fit of the earbuds, so hopefully, you get a good fit.
If you happen to own an Apple Watch, you can fire up the Noise app — or complication, as Apple calls it — to get a readout of the exact decibel levels the AirPods Pro 2 are reducing with their noise canceling (you just need to have a Watch running WatchOS 9). It’d be nice if you could just see that same dB level check on your iPhone.
Apple AirPods Pro 2 Spatial Audio
I’m not going to talk too much about Apple’s Spatial Audio virtual surround mode, but it’s here and fun to play around with — it’s a nice bonus feature, and Apple seems to do it best compared with other buds that have their own virtual surround or spatial mode with head-tracking (for example, Samsung’s Galaxy Buds 2 Pro use 360 Audio). I prefer using Spatial Audio with movies, but I also tried it with various music tracks, particularly those that Apple designates as Made For Spatial Audio. It doesn’t necessarily make music sound better, but it does make it sound different, and it’s interesting to try it out with tracks you know well and want to hear in a different way.
iOS 16 brings Personalized Spatial audio to any AirPods that support Spatial Audio. Similar to what you do when setting up Face ID, the personalized experience comes from taking pictures of your ears, and the biggest benefit is the more accurate placement of dialogue directly in front of you when you’re watching a movie. That placement doesn’t move even if you turn your head if you have head-tracking turned on (you can also use Spatial Audio in «fixed» setting).
Apple AirPods Pro 2 voice-calling performance
The original AirPods Pro were mostly excellent for making voice calls and these are even slightly better. As I said, the microphones have been upgraded, and there are two beamforming microphones for calls — one on the outside of the bud and one at the bottom of the stem, both of which have some mesh covering them to help reduce wind noise. When you’re using the buds to make a FaceTime call over Wi-Fi instead of a call over a cellular voice network where the audio gets compressed, people may be able to notice a bigger difference in the clarity of your voice compared with what they would hear with the original AirPods Pro. (You can listen to a test call on the Verizon cellular network in my companion video review, at the top of this page.)
The one thing I noticed when comparing the AirPods Pro 2’s voice calling with that of the Bose QuietComfort Earbuds 2 is that when you’re having a conversation, the AirPods Pro 2 let more background noise in, but your voice sounds clearer to callers. When you’re not talking, the Bose earbuds completely silence the background noise — it only bleeds in a bit when you start talking. The AirPods Pro 2 don’t try to silence the background noise; they just reduce it to lower levels. There’s something quite impressive about the Bose almost completely silencing the background noise, but the overall experience for callers (the people you’re talking to) seems to be better with the AirPods Pro 2, because your voice does sound clearer and they can hear you well over the reduced background noise.
I made calls with noise canceling on as well calls with the adaptive transparency on. People you’re talking with can’t hear a difference, but there will be a big difference on your end, particularly if you’re in a noisy environment, where you’ll want to turn the noise canceling on (there’s just enough sidetone to hear your voice in the buds with noise canceling on). In less noisy environments, it’s better to turn transparency on because you can hear your voice as it sounds and you won’t talk too loud. And the transparency does make you feel as if you’re not wearing headphones, though you may still feel them in your ears.
You can use one bud independently — with noise canceling on if you want — and leave the other in the case to charge. It doesn’t matter which one you use when making calls; with the Bose QuietComfort Earbuds it appears that you can only use the right bud for calls if you want to use only a single bud.
Apple AirPods Pro 2 buried features
I’ve spent most of this review focusing on the AirPods Pro 2’s top-level features and the things that people care about most, such as sound quality, noise-canceling and voice-calling performance. But the AirPods Pro do have a number of extra features and settings buried within iOS 16 under the Accessibility setting that allow you to tweak the buds, play masking sounds and even create a custom audiogram. And for those who have slight to moderate hearing loss, there’s a Conversation Boost that turn the buds into hearing amplifiers.
These features aren’t unique to the AirPods Pro 2 — they’re available for all the latest AirPods. But they’re worth exploring, and I suspect we’ll see more features added in the future. For instance, there was some chatter about new health features coming to the AirPods Pro 2. Those haven’t materialized, but you never know what could get added. For example, Spatial Audio didn’t come to the AirPods Pro until well after their initial release, and Apple never even hinted at when it originally launched the headphones.
Another nice little bonus: In addition to charging via Lightning, MagSafe or standard Qi wireless pads, the AirPods Pro 2 can even be juiced up with an Apple Watch magnetic charger.
Apple AirPods Pro 2 compared to other top earbuds
As I said at the beginning, it’s hard to put an exact number on just how much better the new AirPods Pro 2 are than their predecessor. But I’m going to go with somewhere around 40%.
The fact is that when the AirPods Pro came out almost three years ago, it was really their compact size, comfortable fit and Apple-only features like auto switching between all the devices on your iCloud account that were their big selling points. That’s all here still, but now the sound and noise canceling, which were good but not great before, are what you’d expect from a $249 set of buds.
Audio quality is subjective, and some people may slightly prefer the sonic traits of buds like the Bose I mentioned earlier or the Sony WF-1000XM4 or Sennheiser Momentum True Wireless 3, all of which have equalizer options in their companion apps. But others may actually prefer the AirPods Pro 2’s sound; it really does stack up well against what you get with other premium earbuds in this price range.
Final take on Apple AirPods Pro 2
While the AirPods Pro 2 will pair with Android devices, you do lose a lot of their special features, including Spatial Audio, so Android users are better off with buds like Google’s very good Pixel Buds Pro, Samsung’s excellent Galaxy Buds 2 Pro or the Bose QuietComfort Earbuds 2 that I mentioned earlier. And you may find that other buds like the Bose or even Apple’s own Beats Fit Pro, which don’t sound quite as good or offer as good noise canceling or voice calling performance, may fit your ears more securely, which is an important factor when buying wireless earbuds.
I’m among those who wish Apple had made the AirPods Pro 2 look a little different than the originals. (I really do want them to come in more color options.) But if you’re an Apple user, they’re hard to beat so long as they fit your ears. While they may not quite be perfect, they feel like a much more fully evolved, refined product that packs not only an impressive set of features but top-notch performance in a very small design.
Editors’ note: This review was originally published on Sept. 22, 2022 and updated in December to reaffirm our continued positive experience with the headphones and add an Editors’ Choice designation.
Technologies
Pinterest Lets Your Control How Much AI Slop You See. Here’s How to Tone It Down
Pinterest is giving some settings for you to control AI slop. Here’s where to find them.
AI slop has come for just about everything in your digital life, and it’s found itself a cozy home in your social media feeds. It’s everywhere, and even if it can sometimes be entertaining, the bulk of it is useless, misleading or downright lies. While some platforms take no issue with this type of content, some are putting controls into your hands so you can at least tone it down, like Pinterest.
Pinterest made updates to its platform’s user settings on web and mobile so users can reduce the amount of AI-generated posts they see in their feeds. Now, that’s not to say it’s allowing users to remove all AI posts — just some — but some is better than none, especially if your feeds have become overrun with the nonsense.
Below, we’ll show you how to find the new settings so you can adjust the amount of AI posts you see on your Pinterest feed.
How to reduce AI in your Pinterest feed
You can find the new settings this way:
- Head to the home feed tuner section of your Pinterest account.
- Locate the new GenAI Interests tab there.
- Use that tab to limit the number of AI posts you see on your home feed by toggling the «switch to off» position.
Pinterest says it’s starting with categories that are highly prone to AI-generated or modified content. The company expects to add more options based on user feedback.
It’s essential to note that nowhere does it state that the new settings will eliminate AI-generated content. Rather, they’ll reduce it in specific categories.
Pinterest Chief Technology Officer Matt Madrigal says the site isn’t looking to eliminate all AI-generated posts, adding that the new controls strike «the right balance between human creativity and AI innovation.» While some users may want the option to completely turn off AI generated social media posts, it’s essentially unavoidable. At the very least, Pinterest is giving its users some control.
Technologies
Google Sued by Former NPR Host Over NotebookLM AI Voice
A lawsuit by radio host David Greene alleges that Google used his voice to train its AI. Google denies the allegation.
A former NPR radio host has sued Google and its parent company Alphabet, alleging that the tech giant used his voice for its NotebookLM AI product.
David Greene, former host of NPR’s Morning Edition and current host of KCRW’s Left, Right & Center, filed the lawsuit in California Superior Court in Santa Clara County. «Google used Mr. Greene’s voice without authorization and then used those stolen copies to develop, train, and refine its AI broadcasting product, NotebookLM,» the lawsuit alleges.
NotebookLM is an AI-powered research assistant that generates insights from data that you input into the system. Google last year introduced audio and video overviews for NotebookLM. In the case of the former, someone using the software can generate an AI podcast based on information in a file you upload. Greene says that others began informing him after the fall 2024 addition of the feature that one of the voices in those podcasts sounded a lot like his.
«These allegations are baseless,» a Google spokesperson told CNET. «The sound of the male voice in NotebookLM’s Audio Overviews is based on a paid professional actor Google hired.» Google has not identified the voice actor that it says it paid for work on NotebookLM.
According to the lawsuit, Greene said he hired an independent forensic software company that specializes in voice recognition to compare his voice to the one in question on NotebookLM.
«The company conducted a thorough analysis of the voice similarity between Mr. Greene’s voice and the voice used in NotebookLM,» the lawsuit says. «The tests indicated a confidence rating of 53%-60% (on a -100% to 100% scale) that Mr. Greene’s voice was used to train the software driving NotebookLM.»
The voices of professional voice actors or celebrities have been the subject of previous complaints, lawsuits and licensing deals. In 2024, Scarlett Johansson raised concerns about an OpenAI voice that sounded similar to hers. The company removed the sound-alike. Last year, ElevenLabs struck a deal to license voices from celebrities including Matthew McConaughey and Michael Caine.
Technologies
Comparing AT&T vs. Verizon: Which Carrier Is Best for You?
With more choices and ever-shifting phone plans across the market, we look at two of the big three carriers.
Choosing a phone plan involves comparing a lot of options, from 5G speeds to perks like included streaming services. To make sense of how they compare, we’re looking at the specifics of two of the biggest cellular companies in the US, AT&T and Verizon.
Note: Are you reading this because you were affected by the massive Verizon outage and looking for other options? Such events are limited, but be sure to also check our recommendations for Best Cellphone Plans and Best Unlimited Data Plans.
AT&T
AT&T is the largest wireless carrier in the US, and its plan options are straightforward. It recently enabled a block of spectrum licenses it bought from EchoStar that have boosted 5G performance across its network.
Verizon
Verizon wrapped up 2025 on shaky footing, following an abrupt CEO transition and cost-cutting, including layoffs and planned store closures. However, one positive consequence of that for customers was lower plan prices across the board. From a network standpoint, Verizon is still a strong choice if you’re within its coverage umbrella. It’s also the most flexible option among the major carriers when mixing plans and perks.
Do you have AT&T or Verizon coverage where you are?
Before we even get into specs and features, check that you’re covered by AT&T’s or Verizon’s network where you expect to use your phone. All of the major carriers in the US have broad coverage across the country, so you’re likely served by one or all of them. If you haven’t already, look up your location on the AT&T coverage map and the Verizon coverage map.
However, keep in mind that the carriers’ maps, although they can zoom in to the neighborhood level, may not accurately reflect the network conditions on the ground. You may see fast 5G speeds on the map, but local interference, population density or physical structures could mean actual connections are not as robust. If possible, ask friends, family or someone you know in your area about their experiences with their carriers.
AT&T vs. Verizon: Comparing price and value
Carriers base their plan prices on the number of lines in use — typically phones, but it’s also common to have cellular access on a smartwatch or a tablet. As you add more lines, the per-line cost goes down. Wireless providers want you to sign up for the most expensive plan with the most features, but often, there are more affordable options.
Comparing single-line plans
For customers looking for a single line, AT&T’s plans have the advantage in this matchup. The unlimited AT&T Value Plus VL plan begins at $51 a month. To view it, click «Other Plans» on AT&T’s phone plans page. The company also has a 4GB plan for $50, but the extra buck you pay for unlimited data is worth it. The top AT&T Unlimited Premium PL plan costs $86 a month for one line.
Verizon’s plans include a single line on the Unlimited Welcome plan for $55 a month and rises to $80 for the Unlimited Ultimate Plan. It’s worth mentioning that the Unlimited Welcome plan also offers basic 5G speeds, not the faster 5G Ultra Wideband that’s included in the Unlimited Ultimate and Unlimited Plus plans, even if you’re in an area that supports 5GUW.
In contrast, AT&T allows full 5G speeds among all its plans, but reserves the right to slow data speeds if the network is busy on its Value Plus VL plan; the Unlimited Premium PL plan delivers consistent high-speed data regardless of how much you use.
Single-line advantage: AT&T
Comparing multiple-line plans
As you add more lines, the plans from the two companies get closer in cost. For example, a family of four on the AT&T Value Plus PL plan pays $31 per line, or $124 a month. Choosing the high-end Unlimited Premium PL plan costs $51 per line, or $204 a month.
Verizon’s plans for four lines start at $25 per line for Unlimited Welcome, or $100 a month. The Unlimited Ultimate plan costs $50 per line, or $200 a month.
In this case, Verizon’s basic offering is cheaper than AT&T, but remember that you’re giving up faster 5G speeds. On the top end, though, they’re both about even in terms of cost.
When calculating your outlay, don’t forget that both companies add the taxes and regulatory fee amounts on top of the plans’ base prices.
Also, these prices are based on discounts applied by signing up for Auto Pay and paperless billing connected directly to a bank account. Without Auto Pay, the plans for each company cost $10 more per month. AT&T notes in its fine print that the discount is $5 if you enroll in Auto Pay with a debit card or a Citi card, and there’s no discount if you use a credit card. Verizon applies the $10 discount when the monthly payment is withdrawn from a bank account or a Verizon Visa card.
Four-line advantage: Split — AT&T for a single line plan, Verizon for multiple lines (with the caveat that you’re getting slower 5G speeds).
| Price for 1 line, per month | Price for 4 lines, per month | |
| AT&T Value Plus VL | $51 | $124 |
| AT&T Unlimited Starter SL | $66 | $144 |
| AT&T Unlimited Extra EL | $76 | $164 |
| AT&T Unlimited Premium PL | $86 | $204 |
| Verizon Unlimited Welcome | $55 | $100 |
| Verizon Unlimited Plus | $70 | $160 |
| Verizon Unlimited Ultimate | $80 | $200 |
AT&T vs. Verizon: Comparing perks
If you’re looking only for a plan that lets you connect online and make calls, the basic tiers or even prepaid plans make a lot of sense. However, today’s unlimited plans also have features and perks designed to sway your choice, from mobile hotspot data to discounted video streaming services. This is where things can get interesting, especially when comparing AT&T and Verizon.
That’s because Verizon takes a different approach from other carriers. AT&T has more perks the higher up the plan scale you go; with Verizon, you choose a core plan and then add the perks you want for extra cost, usually less than if you were to get something like a streaming service on its own.
Hotspot data
When you’re away from a Wi-Fi network and want to connect multiple devices, such as a tablet or laptop, your phone can act as a Wi-Fi hotspot. Carriers offer a set amount of high-speed hotspot data and then throttle the bandwidth after the limit has been reached.
For both companies, the least expensive plans — AT&T ValuePlus VL and Verizon Unlimited Welcome — don’t include hotspot data; however, Verizon offers a 100GB add-on for an additional $10 per month. AT&T’s Unlimited Starter SL plan, at $36 per line for four lines, comes with 5GB of hotspot data monthly.
The next tier up for both companies — AT&T Unlimited Extra EL and Verizon Unlimited Plus — offer 30GB of high-speed hotspot data. But it’s at the top end where there’s a significant difference with this comparison: AT&T Unlimited Premium PL has 60GB of data, while Verizon advertises Unlimited Ultimate as unlimited hotspot data. Although when you read the fine print, it guarantees 200GB of high-speed data and then kicks the rate down to 6Mbps after that. Still, Verizon’s offer is more generous, and with the price drops in late 2025, you’re paying about the same as AT&T ($50 per line compared with $51 per line at AT&T).
Hotspot advantage: Verizon
Streaming services and other perks
The carriers have smartly recognized that we all have too many streaming services that add up and have bundled subscriptions that are tied to their plans. Or rather, some of them have. AT&T either didn’t get the memo or chose to focus on its core features, because you won’t find specific partnerships with streaming services for its wireless plans. The Unlimited Premium PL plan offers 4K-quality streaming for enhanced video quality, but this is a general setting. You’re on your own for streaming service subscriptions.
Verizon not only offers streaming services and other add-ons, but it lets you choose which ones you want to include — for additional costs. For example, after you’ve chosen your main plan, you can add streaming bundles such as Disney Plus/Hulu/ESPN Plus (with ads) or Netflix/HBO Max (with ads), each for $10 a month. Other options include Apple One ($15), YouTube Premium ($10), Apple Music Family ($10) and Fox One ($15). There are feature-based perks, too, such as the aforementioned 100GB of hotspot data ($10), three TravelPass days ($10) and Google AI Pro ($10).
One more welcome perk: both carriers offer call screening and spam blocking features. AT&T calls its service ActiveArmor, although it has fewer features on the less expensive plans. Verizon’s service is called Call Filter, which has basic spam blocking and more features available for an added cost.
Streaming services and perks advantage: Verizon
| High-speed data | Mobile hotspot | Int’l Call/Data | Streaming | |
| AT&T Value Plus VL | Unlimited, but could be slowed if network is busy | None | Extra: International Day Pass for $12/day, International Calling for $15/mo per line | Not included |
| AT&T Unlimited Starter SL | Unlimited, but could be slowed if network is busy | 5GB high-speed, then unlimited at 128Kbps | Extra: International Day Pass for $12/day, International Calling for $15/mo per line | Not included |
| AT&T Unlimited Extra EL | 75GB, then speeds but could be slowed if network is busy | 30GB high-speed, then unlimited at 128Kbps | Extra: International Day Pass for $12/day, International Calling for $15/mo per line | Not included |
| AT&T Unlimited Premium PL | Unlimited high-speed data | 60GB high-speed, then unlimited at 128Kbps | Unlimited talk, text and high-speed data in 20 Latin America countries. International Day Pass for $12/day, International Calling for $15/mo per line | Not included |
| T-Mobile Experience Beyond | Unlimited | Unlimited | Unlimited talk and text; 30GB high-speed data in Mexico and Canada/215+ countries, then unlimited at 256 kbps | Netflix Standard with Ads; Hulu with Ads; Apple TV for $3/mo |
| Verizon Unlimited Welcome | Unlimited 5G (not 5GUW) | None | Unlimited talk and text in Mexico & Canada. 2GB/day high speed data, then unlimited 3G speed. TravelPass charge of $12/day for each day you use your mobile | Disney/Hulu/ESPN with Ads: $10/mo Netflix/HBO Max with Ads: $10/mo Apple One: $15/mo Apple Music Family: $10/mo YouTube Premium: $10/mo |
| Verizon Unlimited Plus | Unlimited 5G/5GUW | 30GB then 6Mbps (5G UW) and 600 Kbps (5G/4G LTE) | Unlimited talk text in Mexico & Canada. 2GB/day high speed data, then unlimited 3G speed. TravelPass charge of $12/day for each day you use your mobile | Disney/Hulu/ESPN with Ads: $10/mo Netflix/HBO Max with Ads: $10/mo Apple One: $15/mo Apple Music Family: $10/mo YouTube Premium: $10/mo |
| Verizon Unlimited Ultimate | Unlimited 5G/5GUW | 200GB then 6Mbps (5G UW) and 600 Kbps (5G/4G LTE) | Unlimited talk text in 210+ countries. 15GB high speed data then unlimited at 1.5 Mbps. TravelPass charge of $12/day for each day you use your mobile | Disney/Hulu/ESPN with Ads: $10/mo Netflix/HBO Max with Ads: $10/mo Apple One: $15/mo Apple Music Family: $10/mo YouTube Premium: $10/mo |
AT&T vs. Verizon: Prepaid options
So far, we’ve compared the unlimited, postpaid plans from AT&T and Verizon, as they tend to appeal to the largest number of people. But we can’t ignore prepaid plans, where you pay in advance for a set of features and sometimes a fixed amount of data, and can pay monthly or yearly, eliminating the need for subsequent billing. There are plenty of options in the prepaid space, including separate companies that are owned by the big carriers, but for our purposes here, I’m going to focus on the branded prepaid options from AT&T and Verizon.
AT&T’s most affordable prepaid plan, the Unlimited Plus 10GB Hotspot Data, costs just $20 a month — but that’s if you prepay $240 for 12 months. And while the data is unlimited, you get 16GB of high-speed data a month and then unlimited data slowed down to 1.5Mbps.
At the high end, the Unlimited Max Plus Plus 35GB Hotspot Data runs $65 a month without the yearly purchase requirement, but does have an Auto Pay discount that brings it down to $55. (Yes, you read the plan name right: it’s «Unlimited Max Plus,» plus 35GB of hotspot data; I wonder if the departments that come up with these names have just given up trying to be original.)
Verizon’s prepaid plans are more straightforward. The 15GB plan costs $35 a month (that includes a $10 Auto Pay discount) for a single line and allows a 15GB data allotment for hotspot sharing. The most expensive plan, Unlimited Plus at $60 a month, has 5G Ultra Wideband speeds, 50GB of high-speed data and 25GB of high-speed hotspot data, then unlimited data access at slower rates. (Those prices are higher for the first month; $45 for 15GB and $75 for Unlimited Plus.)
With both companies’ prepaid plans, you accumulate discounts or perks the longer you stick with them. For example, if you pay consistently and on time for six months, AT&T’s Level Up feature lets you move to a postpaid plan and deals on phones with $0 down and interest-free financing.
Prepaid options advantage: Both are about even
AT&T vs. Verizon: Which carrier is the best?
So many factors contribute to choosing a carrier that it’s challenging to claim one as the best. In this comparison, I’d give the edge to Verizon for its flexible plans and perks, even though it ends up costing more. That’s where you need to prioritize which features are important to you, and whether adding an included perk, such as the Disney Plus bundle, saves you money elsewhere (in this case $10 compared to subscribing to the bundle separately).
Other carriers to consider
The invisible entity in this comparison is T-Mobile, the third of the big three carriers in the US. It’s been on a roll in 2025, gaining accolades and customers even during a (planned) CEO transition.
For prepaid plans, definitely check out our list of the best prepaid plans of 2025 for alternatives, some of which rely on AT&T’s and Verizon’s infrastructure.
All Specs Compared
| Price for 1 line, per month | Price for 4 lines, per month | High-speed data | Mobile hotspot | Int’l Call/Data | Streaming | |
| AT&T Value Plus VL | $51 | $124 | Unlimited, but could be slowed if network is busy | None | Extra: International Day Pass for $12/day, International Calling for $15/mo per line | Not included |
| AT&T Unlimited Starter SL | $66 | $144 | Unlimited, but could be slowed if network is busy | 5GB high-speed, then unlimited at 128Kbps | Extra: International Day Pass for $12/day, International Calling for $15/mo per line | Not included |
| AT&T Unlimited Extra EL | $76 | $164 | 75GB, then speeds but could be slowed if network is busy | 30GB high-speed, then unlimited at 128Kbps | Extra: International Day Pass for $12/day, International Calling for $15/mo per line | Not included |
| AT&T Unlimited Premium PL | $86 | $204 | Unlimited high-speed data | 60GB high-speed, then unlimited at 128Kbps | Unlimited talk, text and high-speed data in 20 Latin America countries. International Day Pass for $12/day, International Calling for $15/mo per line | Not included |
| T-Mobile Experience Beyond | $100 | $215 | Unlimited | Unlimited | Unlimited talk and text; 30GB high-speed data in Mexico and Canada/215+ countries, then unlimited at 256 kbps | Netflix Standard with Ads; Hulu with Ads; Apple TV for $3/mo |
| Verizon Unlimited Welcome | $55 | $100 | Unlimited 5G (not 5GUW) | None | Unlimited talk and text in Mexico & Canada. 2GB/day high speed data, then unlimited 3G speed. TravelPass charge of $12/day for each day you use your mobile | Disney/Hulu/ESPN with Ads: $10/mo Netflix/HBO Max with Ads: $10/mo Apple One: $15/mo Apple Music Family: $10/mo YouTube Premium: $10/mo |
| Verizon Unlimited Plus | $70 | $160 | Unlimited 5G/5GUW | 30GB then 6Mbps (5G UW) and 600 Kbps (5G/4G LTE) | Unlimited talk text in Mexico & Canada. 2GB/day high speed data, then unlimited 3G speed. TravelPass charge of $12/day for each day you use your mobile | Disney/Hulu/ESPN with Ads: $10/mo Netflix/HBO Max with Ads: $10/mo Apple One: $15/mo Apple Music Family: $10/mo YouTube Premium: $10/mo |
| Verizon Unlimited Ultimate | $80 | $200 | Unlimited 5G/5GUW | 200GB then 6Mbps (5G UW) and 600 Kbps (5G/4G LTE) | Unlimited talk text in 210+ countries. 15GB high speed data then unlimited at 1.5 Mbps. TravelPass charge of $12/day for each day you use your mobile | Disney/Hulu/ESPN with Ads: $10/mo Netflix/HBO Max with Ads: $10/mo Apple One: $15/mo Apple Music Family: $10/mo YouTube Premium: $10/mo |
-
 Technologies3 года ago
Tech Companies Need to Be Held Accountable for Security, Experts Say
-

 Technologies3 года ago
Best Handheld Game Console in 2023
-

 Technologies3 года ago
Tighten Up Your VR Game With the Best Head Straps for Quest 2
-
 Technologies4 года ago
Black Friday 2021: The best deals on TVs, headphones, kitchenware, and more
-

 Technologies5 лет ago
Google to require vaccinations as Silicon Valley rethinks return-to-office policies
-
 Technologies5 лет ago
Verum, Wickr and Threema: next generation secured messengers
-

 Technologies4 года ago
Olivia Harlan Dekker for Verum Messenger
-
 Technologies4 года ago
iPhone 13 event: How to watch Apple’s big announcement tomorrow

