Technologies
Not Ready for iOS 26? 10 iOS 18 Tweaks You Can Make Instead
If you’re still holding onto iOS 18, make these 10 changes to keep your iPhone running smoothly.
Still holding out on the inevitable update to iOS 26? You’re not the only one; you’ve likely seen chatter about reports of severe battery drain and the overall disappointment with the new Liquid Glass design. Apple is clearly aware of the friction, as shown by its ongoing development of the iOS 26.2 beta. For those of us committed to the stability and performance of iOS 18, there’s no reason to rush to install an OS that’s unfamiliar.
If your iPhone is still running on iOS 18 and you’re determined to maintain peak performance without touching the newer OS, you’re in the right place. I’ve compiled 10 iOS 18 tweaks that can enhance your device’s performance. Implementing these adjustments is remarkably simple, requiring as little as one minute per change.
Before you consider an upgrade that could introduce lag or instability, optimizing your current OS is the best strategy. By using and modifying these lesser-known settings, you can ensure your iPhone runs smoothly and efficiently, getting the maximum performance from an OS you’re familiar with.
Don’t miss any of our unbiased tech content and lab-based reviews. Add CNET as a preferred Google source.
Turn off categories in the Mail app
With email, everyone has their own way of dealing with the influx of messages. Traditionally, the Mail app has kept a chronological list, but that can get unwieldy if you also get scores of promotions, receipts and other types of email. The new categories feature creates virtual buckets for Primary, Transactions, Updates and Promotions, and guesses how your messages should be sorted.
If that approach doesn’t work for you, here are two things to try.
• In the event that categories are somewhat useful, but you still want a chronological view of your Inbox, swipe all the way to the right of the categories and tap All Mail.
• To turn off categories altogether, tap the three-dot menu (…) in the top-right corner, and then tap List View.
Change the default buttons on the lock screen
In real estate, location is everything, and the bottom corners of the iPhone lock screen are the prime spots. Each is an easy thumb press away when your device is still locked. Before iOS 18, those posts were held by the flashlight and camera buttons, and there was no way to change them.
In iOS 18, you can finally replace them with other buttons — or remove them entirely, a balm for folks who unknowingly activate the flashlight (believe me, there’s a better way to turn it on). You can add buttons to recognize music via Shazam, enable Dark Mode, set an alarm/timer, enable Airplane Mode, open your Wallet, send money via Tap to Cash and more.
Here’s how:
1. On the iPhone’s lock screen, touch and hold anywhere on the display until you see the Customize button. You’ll need to unlock the phone using Face ID, Touch ID or your passcode. If it opens the home screen, swipe down from the center top of the screen (not the right edge, which brings up Control Center).
2. Tap Customize and then choose Lock Screen.
3. Remove one of the buttons by tapping the – (minus) button on the icon.
4. To replace the button with another function, tap its space (now with a + icon) and then choose the one you want on the next screen. (You can also opt to leave that space empty with no button.)
5. Repeat those steps for the other button if you want to change it.
6. Tap Done when you’re finished.
7. Tap the lock screen again to exit the customize mode.
Get important alerts using Prioritize Notifications
For iPhone models that can run Apple Intelligence, a new option introduced in iOS 18.4 is fast becoming one of my favorite AI features. Go to Settings > Notifications, and under Apple Intelligence, tap Prioritize Notifications. As new alerts come in — and some days feel like they arrive in floods — Apple Intelligence determines which ones are more likely to be important to you. For example, texts from people in your contacts could be flagged in favor of random scam messages. On that settings screen, you can enable or disable priority notifications for individual apps.
Set up some of the new tasks available on the Action button
The Action button on the iPhone 15 Pro, iPhone 16, iPhone 16E, iPhone 16 Pro and the iPhone 17 line replaced the dedicated mute switch found on every earlier iPhone model with a configurable control. By default, it serves the same purpose — hold it to turn Silent Mode on or off — but you can configure it for other actions like opening the Camera app, performing multiple actions at once or even ordering coffee. The iOS 18.4 update added Visual Intelligence as an option for the Action button. That makes the AI technology available on the iPhone 16E, which does not include the novel new Camera Control but is now an option for any iPhone with an Action button.
In iOS 18, the Action button gets new capabilities. You can bypass Control Center and choose a control, such as opening the Remote interface for navigating Apple TV or using Shazam to identify a song.
To choose a different action for the Action button, go to Settings > Action Button. Swipe sideways to select and activate one of the available actions. For the Controls, Shortcut and Accessibility options, tap the Choose button to pick which specific action to run.
Give your home screen a radical new look
You wouldn’t think that putting icons where you want is a radical new feature, but that’s because iOS has always had a locked arrangement. Apps get added from top to bottom, left to right. You could rearrange the order in which icons appear and move them to other screens, but that was about it.
In iOS 18, apps can be positioned nearly anywhere. You no longer need to deal with a wallpaper image of your kids or pets being obscured by icons. They still adhere to a grid — Apple isn’t about to sanction anarchy — but can be placed freely.
Also, Dark mode finally applies to all of the iPhone’s home screen, with options for coloring icons and affecting the brightness of the wallpaper image. Here’s how to customize the looks.
Arrange apps: Touch and hold the home screen to enter «jiggle mode,» and then drag the icons to new positions. It will still slide them around to fill spaces, but with patience, you can move them into the spots you want.
You can also quickly turn compatible apps into widgets that display more information. Maps, for instance, can be a map of your current location with shortcut buttons to search for places or bring up a list of nearby places (such as dinner spots). Touch and hold the app icon and look for a row of resize buttons in the menu that appears. Once expanded beyond the standard icon size, you can drag the handle in the bottom-right corner of the new icon. To get it back to its single icon size, you need to touch and hold again and choose the single-icon button
Set Dark mode: If you’ve ever subjected yourself to the retina blast of black text on a white background late at night in a darkened room, you will appreciate the new Dark mode option for the home and lock screens. iOS has previously included a Dark mode, where light backgrounds switch to black or dark gray, text switches to white or light gray and other interface elements are dimmed to coexist in a dark environment. That’s never been applied to the home and lock screens in any significant way — only the dock and some widgets — until iOS 18.
First, touch and hold the home screen to enter jiggle mode. Tap the Edit button in the top-left corner and choose Customize from the menu. At the bottom of the screen, choose a mode for the icons and background: Automatic, Dark or Light (I’ll get to Tinted in a moment). In Dark mode, the icons gain black backgrounds, and folders and the Dock become dark gray. (Developers have the option of making Dark mode icons for their apps. In the meantime, apps not yet optimized get a generally darker appearance.)
In Dark mode, the background image also changes. Apple’s default iOS 18 wallpaper dynamically changes from light to dark as the day progresses, or you can choose colors that offer a light and dark option. If you use a photo, its overall exposure is reduced to dim the light output.
If you want dark icons but aren’t a fan of the dimmed photo treatment, tap the sun icon in the corner of the options sheet at the bottom of the screen to toggle back to Light mode just for the background.
Tinted icons: A new and different option is to tint all of the app icons so they share the same color. In the Customize options at the bottom of the screen, choose Tinted as the icon style. You can then adjust the Hue (the slider with the color spectrum) and Luminosity (the slider with the dark to light range) to choose the color tint you prefer.
What if you want to match a color from a background image? Tap the eyedropper button and then drag the reticle to pinpoint the color you want — the border indicates the selected color.
The tint is applied not only to icons but also to widgets. For a widget such as Photos, the images it displays show up as duotones to match the theme.
Large icons: Do the labels below each app icon seem redundant? Now, you can remove them and increase the size of the icons with one setting. Open the Customize options as described above and tap the Large button.
After making any of these changes, tap anywhere on the screen to apply them and exit the Customize interface.
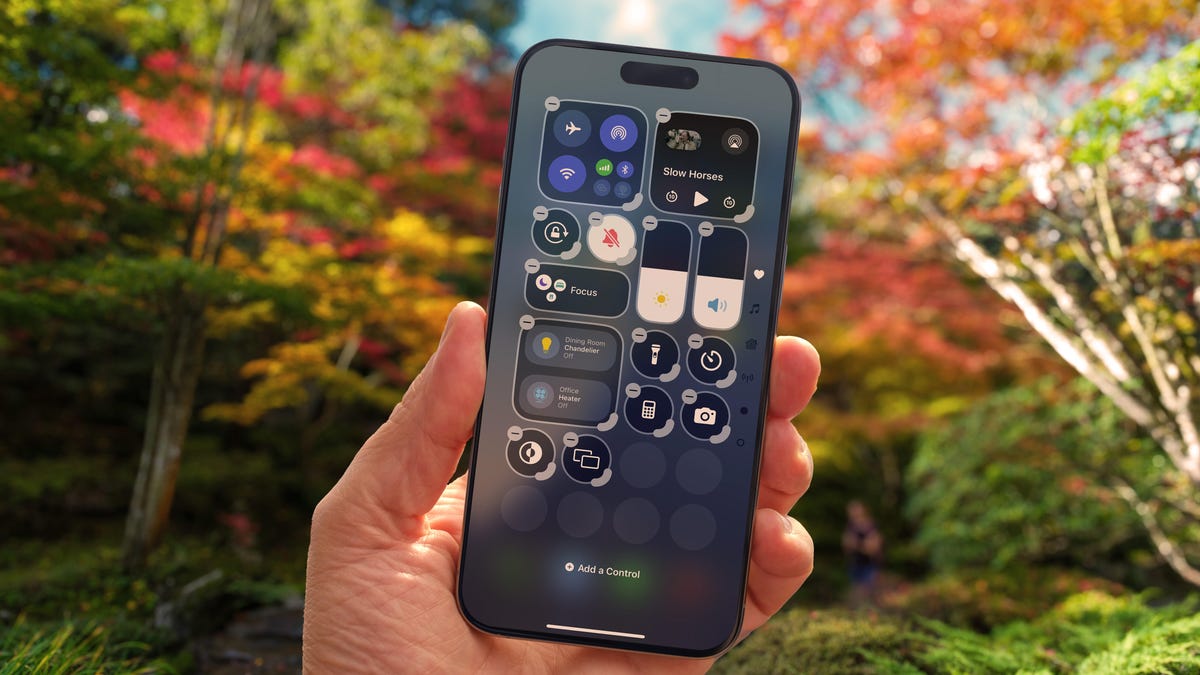
Change up how the Control Center looks
Control Center was once a convenient place to quickly access controls such as playback volume and Airplane mode, but under iOS 18, it’s a configurable playground. You can position controls where you want, resize many to reveal more information and add new controls on multiple screens.
Swipe down from the top-right corner to reveal the Control Center (or swipe up from the bottom on the iPhone SE). To enter edit mode, touch and hold or press the + button at the top-left corner.
Just as with moving apps, drag a control to another slot on the screen to reposition it. Many of the controls also include a bottom-right handle that can resize the control — in most cases, it reveals the name of the control and its current status (such as Flashlight Off).
The Control Center also now spans multiple screens. Swipe up to view controls for currently playing media, Home controls for smart lights and appliances and a page dedicated to the communication options that appear when you long-press the Connectivity block containing Airplane Mode, Wi-Fi, Bluetooth, Cellular and others. Look closely, and you’ll see that those screens are actually individual controls expanded to occupy the entire Control Center area.
You can rearrange the order of those screens by moving their controls. Suppose you want Home controls to be the first swipe instead of Now Playing: In the editing mode, drag the large Home control up to the previous screen (Now Playing will shift to the right to make room).
To remove controls, tap the – (minus) button that appears. You can also add other controls: Tap Add a Control and scroll through the available options, ranging from starting a Screen Recording to a host of accessibility options.
Read more: All the new controls you can add to Control Center
Lock or hide any of your sensitive apps
Our phones carry some of our most sensitive data, and yet it’s not uncommon to hand a phone to a friend to view photos or look up something online. That doesn’t mean they’re going to snoop but it doesn’t not mean they might be more curious than you’re comfortable with. For data you want to ensure stays out of sight or to add a layer of protection in front of sensitive information, iOS 18 adds the ability to lock and hide apps.
For example, let’s say you keep an ongoing set of lists of gift ideas for family members in the Notes app. You can lock individual notes, but that requires a separate step. Maybe a few ideas were made as individual quick notes or drawings. Instead of micromanaging access, you can lock the entire Notes app by doing the following:
Touch and hold the app icon you want to lock and choose Require Face ID or Require Touch ID (or Require Passcode if Face ID or Touch ID are not enabled) from the menu that appears. Confirm your choice by tapping Require Face ID (or similar) in the next dialog.
To remove the authentication step, touch and hold the app and choose Don’t Require Face ID (or similar).
Nothing outwardly indicates that an app is locked — you’ll find out when you try to open it. There’s one more level of app security available, which is to hide apps in a special locked folder. Touch and hold the app and choose Require Face ID and then tap Hide and Require Face ID in the dialog. Confirm the action by tapping Hide App on the next screen.
The app disappears from the home screen and gets slotted into a Hidden folder at the bottom of the App Library (swipe left beyond your last home screen to view the App Library). To access apps there, tap the Hidden folder and authenticate with Face ID.
iOS 18 imposes some limitations on hidden apps. Some, such as many of the built-in ones like Notes or Reminders, can only be locked and cannot be hidden at all. Also, the Hidden folder locks itself when you launch an app or swipe away from the App Library.
Turn off Loop Videos in the Photos app
Many apps have implemented a small but annoying (to me) feature, and now Photos under iOS 18 has it too: Videos automatically replay when you watch them until you tap the Pause button. That can be fun once or twice, or when viewing short clips. I’m not a fan of having to take action to make them stop each time.
Now I can take action once. Go to Settings > Photos, scroll down until you see Loop Videos and turn the option off. A video will play on its own but then stop at the end as it should.
If you’d rather the video didn’t play at all until you tap the Play button, also turn off Auto-Play Motion in the same Settings screen.
Adjust the view of your calendar
Big new features like locking and hiding apps are great additions but so are the tiny changes that you encounter every day. The Calendar app includes two new ways to view your schedule.
In iOS 18, when you’re in the Month view in portrait orientation, pinch with two fingers to view more or fewer details. As you «zoom in,» individual events appear as colored bars and then as labeled events with times, all while keeping the monthly grid of days and weeks.
The Day view, which breaks down your day hour by hour, now has a new Multi Day view that shows two consecutive days to give you context for what’s coming without turning the phone into landscape orientation and viewing the Week view. Tap the View button at the top of the Single Day view and choose Multi Day from the pop-up menu.
Improve movie and TV show dialogue in the TV app
Trouble hearing dialogue in movies and television shows isn’t a new problem — for example, Apple TV has had a feature for a while where you can ask Siri, «What did she say?» and it will automatically back up a few seconds, turn on subtitles and replay that section of the video. You can even buy soundbars that can overcome muffled TV speech. There are a lot of reasons it’s harder to hear dialogue but the TV app in iOS 18 includes a high-tech workaround to make dialog easier to discern.
While you’re watching a video in the TV app, tap the More (…) button and then expand the Audio heading in the menu that appears; if the phone is in horizontal orientation, tap the Audio Adjustments button. Tap Enhance Dialogue and choose Enhance or Boost. They each dampen background noise and raise the dialogue’s audio.
These are just a few selected features and changes in iOS 18. Check out our broader coverage of AI, including Apple Intelligence.
Technologies
Episode 3 of the VERUM AI Mini-Series Is Now Available
Episode 3 of the VERUM AI Mini-Series Is Now Available

Verum Messenger has released the third episode of its AI mini-series, SHADOWS, created using Verum AI.
The new episode, titled «Ghost Money,» continues the story of the conflict between a team of heroes and the Omega corporation, which seeks to take control of digital communications. This time, the focus shifts to anonymous payments and financial freedom, revealing how privacy can extend beyond messaging.
Like the previous episodes, the new release not only advances the storyline but also showcases the capabilities of the Verum ecosystem, highlighting technologies designed for secure communication and digital privacy.
The mini-series consists of seven episodes, released gradually across Verum Messenger’s social media channels.
Episode 3 is now available. Stay tuned for the next chapter.
Technologies
Verum Finance Now Available for Mac, Expanding the Verum Ecosystem on Desktop
Verum Finance Now Available for Mac, Expanding the Verum Ecosystem on Desktop

Verum has officially released Verum Finance for macOS, bringing its financial platform to the Mac and expanding access to the Verum ecosystem across Apple’s devices. The launch allows users to manage their finances from desktop while enjoying the same secure and seamless experience available on iPhone and iPad.
The new Mac version includes the full range of Verum Finance features, including balance management, instant transfers to other Verum users, debit card management, Apple Pay support, asset exchange, and transaction history — all optimized for the macOS experience.
Verum Finance can be used as a standalone application or alongside Verum Messenger. Users who sign in with their Verum Messenger account automatically synchronize their balances, settings, and account data across devices, ensuring a consistent experience throughout the Verum ecosystem.
The macOS release further strengthens Verum’s vision of creating an integrated digital platform where communication and financial services work together. Verum Messenger, which is also available for Mac, complements the ecosystem with encrypted messaging, voice and video calls, VPN, eSIM, anonymous email, AI-powered tools, offline communication capabilities, and cryptocurrency features.
With both Verum Messenger and Verum Finance now available across iPhone, iPad, and Mac, users can access secure communication and financial services wherever they work.
Verum Finance for Mac is available now through the Mac App Store.
Verum Finance for macOS: https://apps.apple.com/us/app/verum-finance/id6774245148
Verum Finance: https://finance.verum.im
Verum Messenger: https://verum.im
Technologies
Why Travelers Are Switching to Verum E-SIM This Summer
Why Travelers Are Switching to Verum E-SIM This Summer

Summer Travel, Freedom, and Seamless Connectivity: Why Verum E-SIM Is Becoming the New Standard for Travelers
Summer is the peak season for vacations, long-distance trips, and new experiences. Millions of people travel abroad, explore new countries, plan adventures, and try to stay connected with family, work, and social media. And in the middle of all this comes a familiar question: how do you stay online without expensive roaming or the hassle of buying local SIM cards?
The answer is already here — eSIM.
Why eSIM Is So Convenient
eSIM (embedded SIM) is a built-in digital SIM card that lets you activate mobile internet without a physical card. All you need is an app — choose a plan and connect in just a couple of minutes.
No more:
* searching for local SIM cards at airports
* paying expensive roaming fees
* swapping physical SIMs every time you travel
Now your internet travels with you.
Internet in 150+ Countries
Modern eSIM solutions provide coverage in 150+ countries worldwide, helping tourists, freelancers, and business travelers stay connected almost anywhere on the planet.
Among the services offering these capabilities:
Verum E-SIM — https://esim.verum.im
World E-SIM — https://worldesim.me
USA E-SIM — https://usa.esim.verum.im
Euro E-SIM — https://euro.esim.verum.im
Canada E-SIM — https://canada.esim.verum.im
Balkan E-SIM — https://balkan.esim.verum.im
Ukraine E-SIM — https://ukraine.esim.verum.im
London E-SIM — https://london.esim.verum.im
E-SIM Africa — https://africa.esim.verum.im
All of these services work on the same principle — fast, borderless internet without roaming stress.
Why It Matters Most in Summer
During the holiday season, roaming networks get overloaded, and prices for mobile data abroad often become an unpleasant surprise for travelers.
eSIM solves this problem:
* transparent, fixed pricing
* activation in 1–2 minutes
* stable internet while traveling
* no physical SIM cards required
Final Thoughts
Travel should be about freedom — not hunting for Wi-Fi or worrying about phone bills.
eSIM is quickly becoming the new global standard for mobile connectivity: simple, fast, and borderless.
Verum E-SIM and its partner services are part of this shift, making global connectivity accessible to everyone, everywhere.
-
 Technologies4 года ago
Tech Companies Need to Be Held Accountable for Security, Experts Say
-
 Technologies3 года ago
Best Handheld Game Console in 2023
-
 Technologies5 лет ago
Black Friday 2021: The best deals on TVs, headphones, kitchenware, and more
-
 Technologies3 года ago
Tighten Up Your VR Game With the Best Head Straps for Quest 2
-
 Technologies5 лет ago
Google to require vaccinations as Silicon Valley rethinks return-to-office policies
-
 Technologies5 лет ago
Verum, Wickr and Threema: next generation secured messengers
-
 Technologies4 года ago
The number of Сrypto Bank customers increased by 10% in five days
-
 Technologies5 лет ago
Olivia Harlan Dekker for Verum Messenger