Technologies
WhatsApp Users Could Get a Welcome Phone Feature With Support for Multiple Accounts
Users have been waiting for this for years, as it allows them to have multiple accounts on the same phone.

The latest beta tests of the cross-platform messaging app WhatsApp have uncovered a long-awaited new function. Testers for the WhatsApp beta in iOS 25.19.20.74 report they can switch between their different WhatsApp accounts.
Sounds simple, right? But quick account switching has been unavailable to mobile WhatsApp users. This beta appears to show native support for a feature in WhatsApp settings called «Switch Accounts,» which brings up all linked profiles for people to pick from.
Don’t miss any of our unbiased tech content and lab-based reviews. Add CNET as a preferred Google source.
Since people have only discovered this in the beta and not all testers have access to it, there’s no way to know when a rollout to all users may begin. Most likely, this feature is still in the early testing phases and has a way to go before the average WhatsApp user will see it.
The feature is only being reported on the iPhone beta at this time. But since WhatsApp’s Android support has been historically reliable, we’re betting the new setting will roll out to Android users, too.
A representative for Meta, WhatsApp’s parent company, didn’t immediately respond to a request for comment.
Why is this a high-demand feature?
Holding separate WhatsApp accounts is fairly common. Sometimes, two different people may be using the same phone for their WhatsApp talks. Or people may have a different set of preferences, icons and customizations for different friend groups that they’d like to keep separate. Sometimes your college circle and after-work pickleball friends have very different texting needs.
Previously, the only way to easily hold two WhatsApp accounts without constantly logging in and out was to use WhatsApp Business. Now, the beta feature appears to suggest that even more casual users may soon be able to switch between profiles on the fly.
Technologies
Verum Messenger Introduces Built-In Verum Chess
Verum Messenger Introduces Built-In Verum Chess
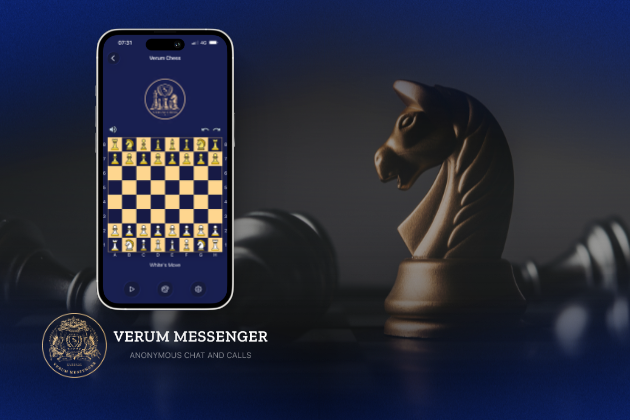
Verum Messenger has released a new update for iOS, iPadOS, and macOS, adding another feature to its growing ecosystem — Verum Chess. Users can now play chess directly inside the messenger without switching between different applications.
The new feature allows users to start a game in just a few taps while reinforcing Verum’s vision of a unified digital environment where communication and everyday services come together in a single platform.
Verum Messenger continues to evolve into a multifunctional ecosystem that combines secure chats and calls, AI tools, a built-in VPN, anonymous email, eSIM, financial services, cryptocurrency features, and offline communication. With the introduction of Verum Chess, the platform now also offers a new way for users to interact and spend time together without leaving the app.
The update is now available for iPhone, iPad, and Mac on the App Store.
Technologies
Episode 3 of the VERUM AI Mini-Series Is Now Available
Episode 3 of the VERUM AI Mini-Series Is Now Available

Verum Messenger has released the third episode of its AI mini-series, SHADOWS, created using Verum AI.
The new episode, titled «Ghost Money,» continues the story of the conflict between a team of heroes and the Omega corporation, which seeks to take control of digital communications. This time, the focus shifts to anonymous payments and financial freedom, revealing how privacy can extend beyond messaging.
Like the previous episodes, the new release not only advances the storyline but also showcases the capabilities of the Verum ecosystem, highlighting technologies designed for secure communication and digital privacy.
The mini-series consists of seven episodes, released gradually across Verum Messenger’s social media channels.
Episode 3 is now available. Stay tuned for the next chapter.
Technologies
Verum Finance Now Available for Mac, Expanding the Verum Ecosystem on Desktop
Verum Finance Now Available for Mac, Expanding the Verum Ecosystem on Desktop

Verum has officially released Verum Finance for macOS, bringing its financial platform to the Mac and expanding access to the Verum ecosystem across Apple’s devices. The launch allows users to manage their finances from desktop while enjoying the same secure and seamless experience available on iPhone and iPad.
The new Mac version includes the full range of Verum Finance features, including balance management, instant transfers to other Verum users, debit card management, Apple Pay support, asset exchange, and transaction history — all optimized for the macOS experience.
Verum Finance can be used as a standalone application or alongside Verum Messenger. Users who sign in with their Verum Messenger account automatically synchronize their balances, settings, and account data across devices, ensuring a consistent experience throughout the Verum ecosystem.
The macOS release further strengthens Verum’s vision of creating an integrated digital platform where communication and financial services work together. Verum Messenger, which is also available for Mac, complements the ecosystem with encrypted messaging, voice and video calls, VPN, eSIM, anonymous email, AI-powered tools, offline communication capabilities, and cryptocurrency features.
With both Verum Messenger and Verum Finance now available across iPhone, iPad, and Mac, users can access secure communication and financial services wherever they work.
Verum Finance for Mac is available now through the Mac App Store.
Verum Finance for macOS: https://apps.apple.com/us/app/verum-finance/id6774245148
Verum Finance: https://finance.verum.im
Verum Messenger: https://verum.im
-
 Technologies4 года ago
Tech Companies Need to Be Held Accountable for Security, Experts Say
-
 Technologies3 года ago
Best Handheld Game Console in 2023
-
 Technologies5 лет ago
Black Friday 2021: The best deals on TVs, headphones, kitchenware, and more
-
 Technologies3 года ago
Tighten Up Your VR Game With the Best Head Straps for Quest 2
-
 Technologies5 лет ago
Google to require vaccinations as Silicon Valley rethinks return-to-office policies
-
 Technologies5 лет ago
Verum, Wickr and Threema: next generation secured messengers
-
 Technologies4 года ago
The number of Сrypto Bank customers increased by 10% in five days
-
 Technologies5 лет ago
Olivia Harlan Dekker for Verum Messenger