Technologies
14 Hidden iOS 16 Features That Will Make Your Life Easier
Explore some of the lesser-known features and settings on your iPhone.
Apple released its iOS 16 update to the general public back in September, and in the six months since, we’ve written about most of the major new features to the iPhone, like unsending text messages and emails and cutting out objects from your photos. Yet, there always seem to be new features and settings to discover hidden within the iPhone’s latest software update.
I’m going to walk you through everything you need to know about the best hidden gems in iOS 16, like password-protected photo albums, easily accessible Wi-Fi passwords and more.
Read more: What to Expect on iOS 16.4
And while you’re here, make sure you also brush up on the major new iOS 16 features you’ll love, and a few that you might just hate (luckily, there’s a fix).
View and share saved Wi-Fi passwords
Apple has allowed iOS users to share Wi-Fi passwords for a while now, but only by placing two Apple devices near each other. And if that feature didn’t automatically work, you couldn’t just dig out the password from your settings. Plus if you wanted to share a saved Wi-Fi password with someone else, like an Android user or someone on a computer, you had to remember the password. Until now.
In Settings, go to Wi-Fi and tap the tiny information icon to the right of the network you want the password for. To view the network password, tap the Password section and then use Face ID or enter your passcode to view it. You can then tap Copy to copy the password into your clipboard and share it.

You can view the password for any Wi-Fi network you’ve ever connected to, as long as you’re currently connected to it or near enough that it appears under My Networks.
Screenshots by Nelson Aguilar/CNET
The credit card-sized Anker 622 not only attaches to your MagSafe-compatible iPhone to give it a charge but also has a built-in kickstand so that you can comfortably view and use your device while it gets juice.
Find and remove duplicate photos and videos
Maybe you’ve saved the same photo multiple times or downloaded a video more than once, resulting in duplicates littering up your photo album. It may not be a problem if you’ve got storage to spare, but you’re running out of space, you can now remove every single duplicate easily with iOS 16.
In Photos > Albums, you should see a new Duplicates album under Utilities. Apple scans through all of your photos and shows you any photo or video you’ve saved more than once in that album. From there, you can either delete any duplicates, or simply press Merge, which will keep the photo with the highest quality (and relevant data) and then move the others to the trash.

Merging will keep the highest quality photo and delete the rest.
Screenshots by Nelson Aguilar/CNETAlthough you’ll probably want to go through each set of duplicates, to ensure that they’re actually exact copies and not similar photos, you can also hit Select > Select All > Merge to remove every single photo and video that Apple thinks is a duplicate, all at once.
Hang up a phone or FaceTime call with Siri
Siri does a lot of things. You can use the virtual assistant to send a text message, get directions or play music — but one thing she’s never been able to do is hang up a phone call. Weird right? Now that’s finally a possibility with iOS 16.
In Settings, go to Siri & Search and first make sure Listen for «Hey Siri» is toggled on. If it is, you should see a new option underneath — Call Hang Up. Go into that option and toggle on Call Hang Up. When you’re on a phone call or FaceTime video chat, simply say, «Hey, Siri,» and ask her to hang up your current call.
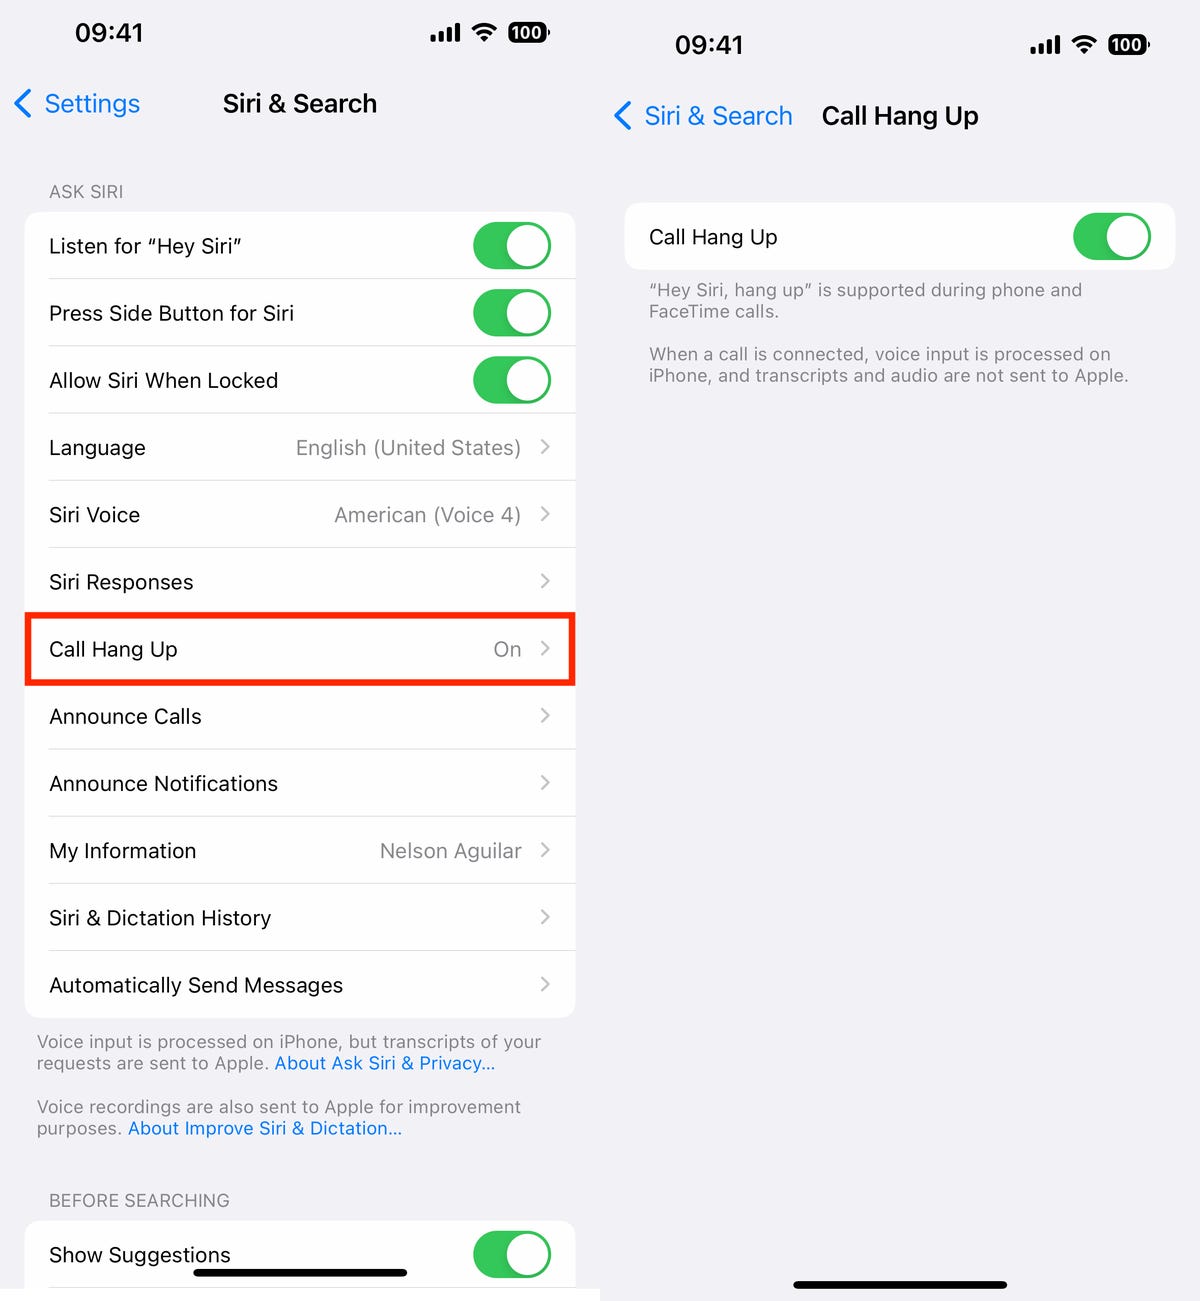
For this to work, Listen for «Hey Siri» must be toggled on first.
Screenshots by Nelson Aguilar/CNET Pair Nintendo Switch Joy-Cons with your iPhone
Apple has long allowed you to pair third-party controllers, like the PS5 Sony DualSense and Xbox Core Controller, to your iPhone and iPad, in order to more comfortably play mobile video games like the Apple Arcade library, Minecraft and Call of Duty. Now you can add another console controller to that list.
If you own a Nintendo Switch, you can now pair your Joy-Con controllers to your iPhone or iPad running iOS 16. To start, hold down the little black pairing button on the Joy-Con, until the green lights start running back and forth. This means the device is in pairing mode. Next, open your iPhone and go to Settings > Bluetooth and select the Joy-Con from the list. Repeat this step with the other Joy-Con.
Hidden and Recently Deleted albums are now password protected
The Hidden album in the Photos app is clearly not hidden, seeing as anyone can easily find it. That makes it impractical for adequately hiding private photos and videos. While Apple does have an option to make the Hidden album «invisible,» anyone with access to your phone could make it visible again and view everything inside.
Thanks to iOS 16, you can now lock the Hidden album. You don’t actually need to do anything to toggle this feature on. If you want to check it out, launch the Photos app and go to the Albums tab at the bottom of the screen. If you scroll down, you’ll see a tiny lock next to the Hidden and Recently Deleted albums. To view the contents of those albums, you’ll need to use Face ID or your passcode.
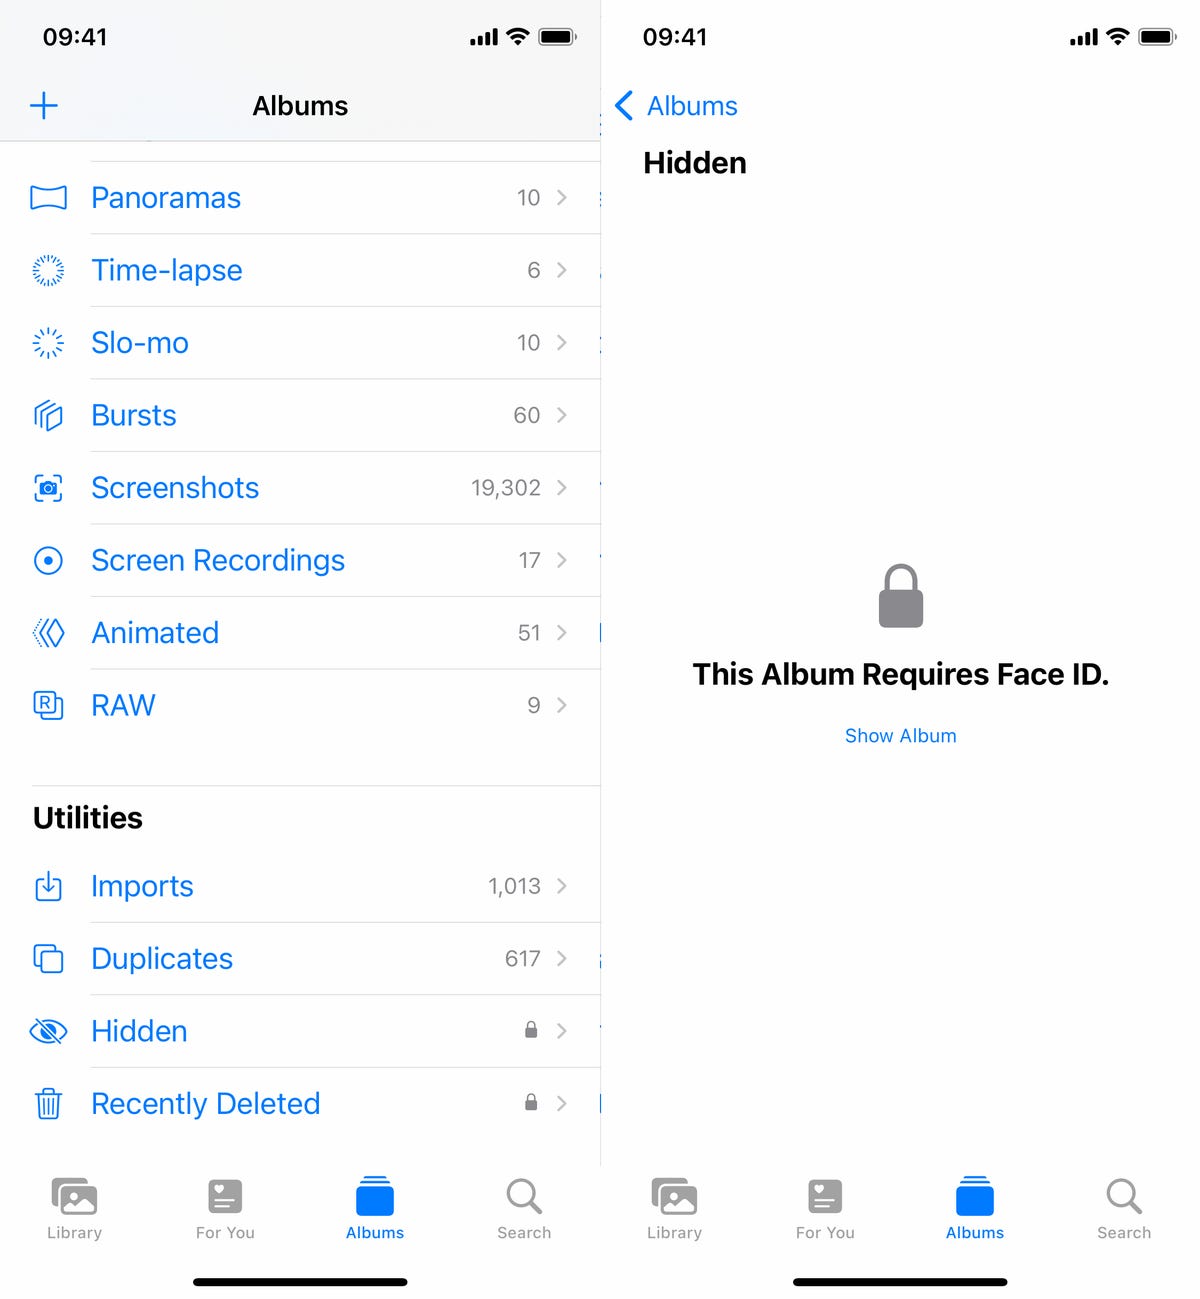
The Hidden and Recently Deleted albums now require Face ID to be accessed.
Screenshots by Nelson Aguilar/CNET Copy and paste photo and video edits
If you use the editor tool in the Photos app, you’ll be happy to learn that you can now copy and paste edits, including saturation, contrast and brightness, between photos. If you edit one photo or video and are happy with the look, you can paste those same exact edits to any other photo or video in your camera roll.
To do this, launch the Photos app and open a photo that’s been edited in full-screen. Next, tap on the three-dot menu in the top-right corner and then hit Copy Edits. This option will only appear if the photo has been edited within Photos, not any third-party photo editor. Finally, go to the photo you want to copy these edits over to, tap on the three-dot menu and then hit Paste Edits. After a second or so, you should see the photo edits appear.

This feature works between photos and videos.
Screenshots by Nelson Aguilar/CNETUse Siri to send an emoji
Siri has long been able to send long, complicated text messages and emails by dictation, but with iOS 16, for the first time, you’re now able to use your voice to send emojis. As long as you know the name of the emoji, simply say «face with tears of joy emoji» or «red heart emoji» to insert an emoji into your text with Siri.
If you use the keyboard dictation feature in your iPhone’s keyboard, accessible at the bottom right of your keyboard (microphone icon), you can also say the emoji name to insert an emoji anywhere you can type text, like in a note or a caption on Instagram.
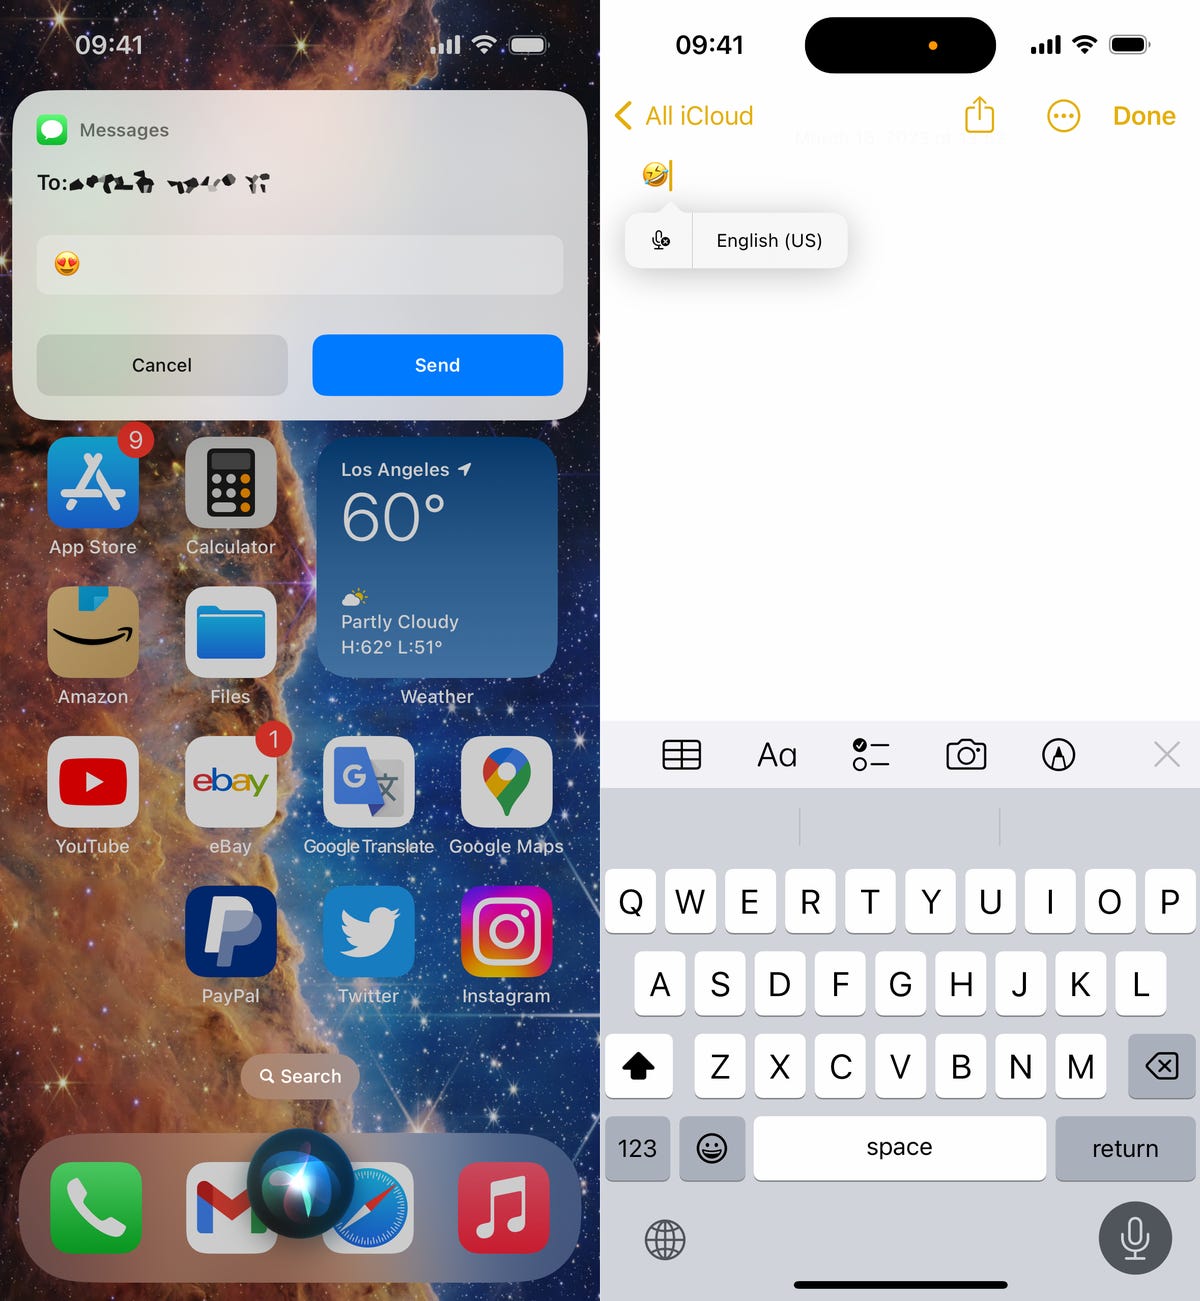
You can send emojis with Siri (left) or type them in using the dictation feature in your keyboard (right).
Nelson Aguilar/CNETBring haptic feedback to your keyboard
The iPhone has long had haptic feedback. It’s what you feel underneath your fingertips whenever you attempt to delete an app from your home screen or enter the incorrect password on your lock screen. Strangely enough, haptic feedback has never been available for the stock iOS keyboard — until now.
If you want to enable a slight vibration for every single key you type in, go to Settings > Sounds & Haptics > Keyboard Feedback and toggle on Haptic. The sound option you see is the loud and annoying clacking sound you might hear when you type in something and your phone isn’t on silent mode, so you can keep that disabled.
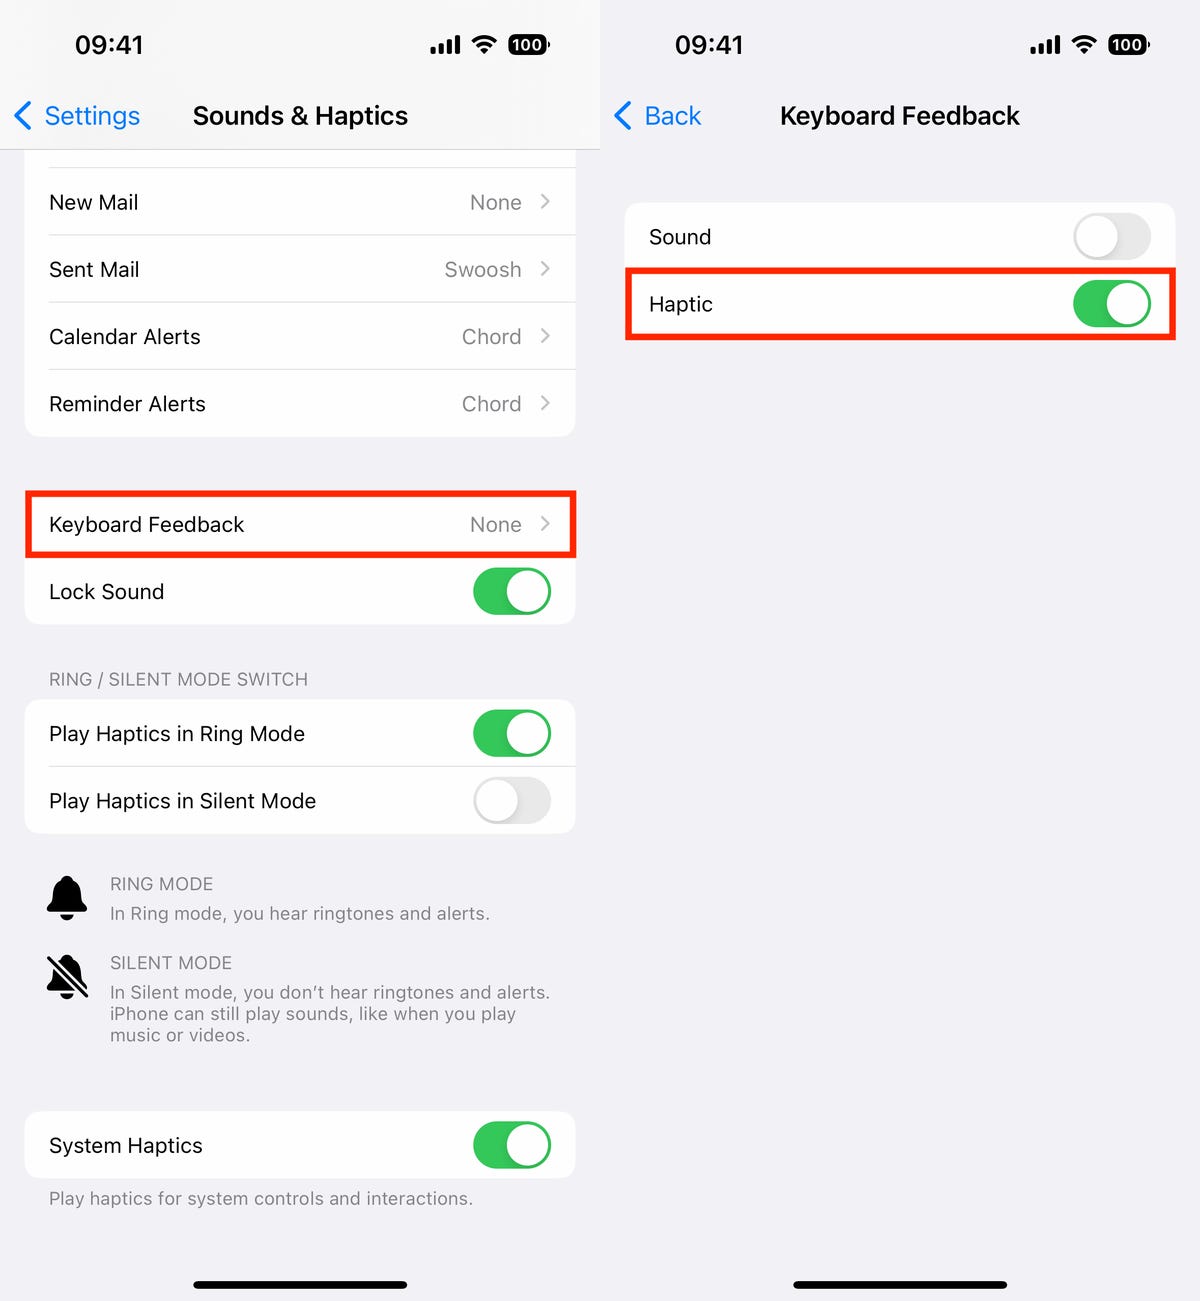
Every single time you type, you’ll feel a slight vibration for each key you hit.
Screenshots by Nelson Aguilar/CNETPin your favorite tabs in Safari
Safari caps your open tabs at 500, and if you’re nearing that limit, it might be pretty darn hard to find the exact tab you’re looking for. You could scroll endlessly, but there’s now an easier way to find the exact tab you’re looking for.
In Safari, if you press down on an open tab, you now have the option to hit Pin Tab. This will move that tab to the top of Safari, where it will exist as a tiny tab preview, permanently pinned there, which you can then tap to view. If you press down and unpin a tab, it will move to first in your grid of open tabs.

All your pinned tabs appear at the top of Safari.
Screenshots by Nelson Aguilar/CNETUse Face ID while you’re lying down
If you’ve ever tried to unlock your iPhone while it’s vertical, like when you’re lying on your side, you might have noticed that it doesn’t work. You have to place your iPhone in portrait orientation, or upright, for Face ID to work. With iOS 16, you can finally use Face ID to unlock your iPhone when it’s in landscape orientation. However, for this to work, you must have an iPhone 13 or 14 running iOS 16.
Allow notifications when you share your screen
As a privacy protection measure, Apple automatically disables notifications when you share your screen, whether it’s via SharePlay or Screen Mirroring. However, if others seeing your notifications isn’t an issue, you can now allow notifications on iOS 16. In the Settings application, go to Notifications > Screen Sharing and toggle on Allow Notifications.
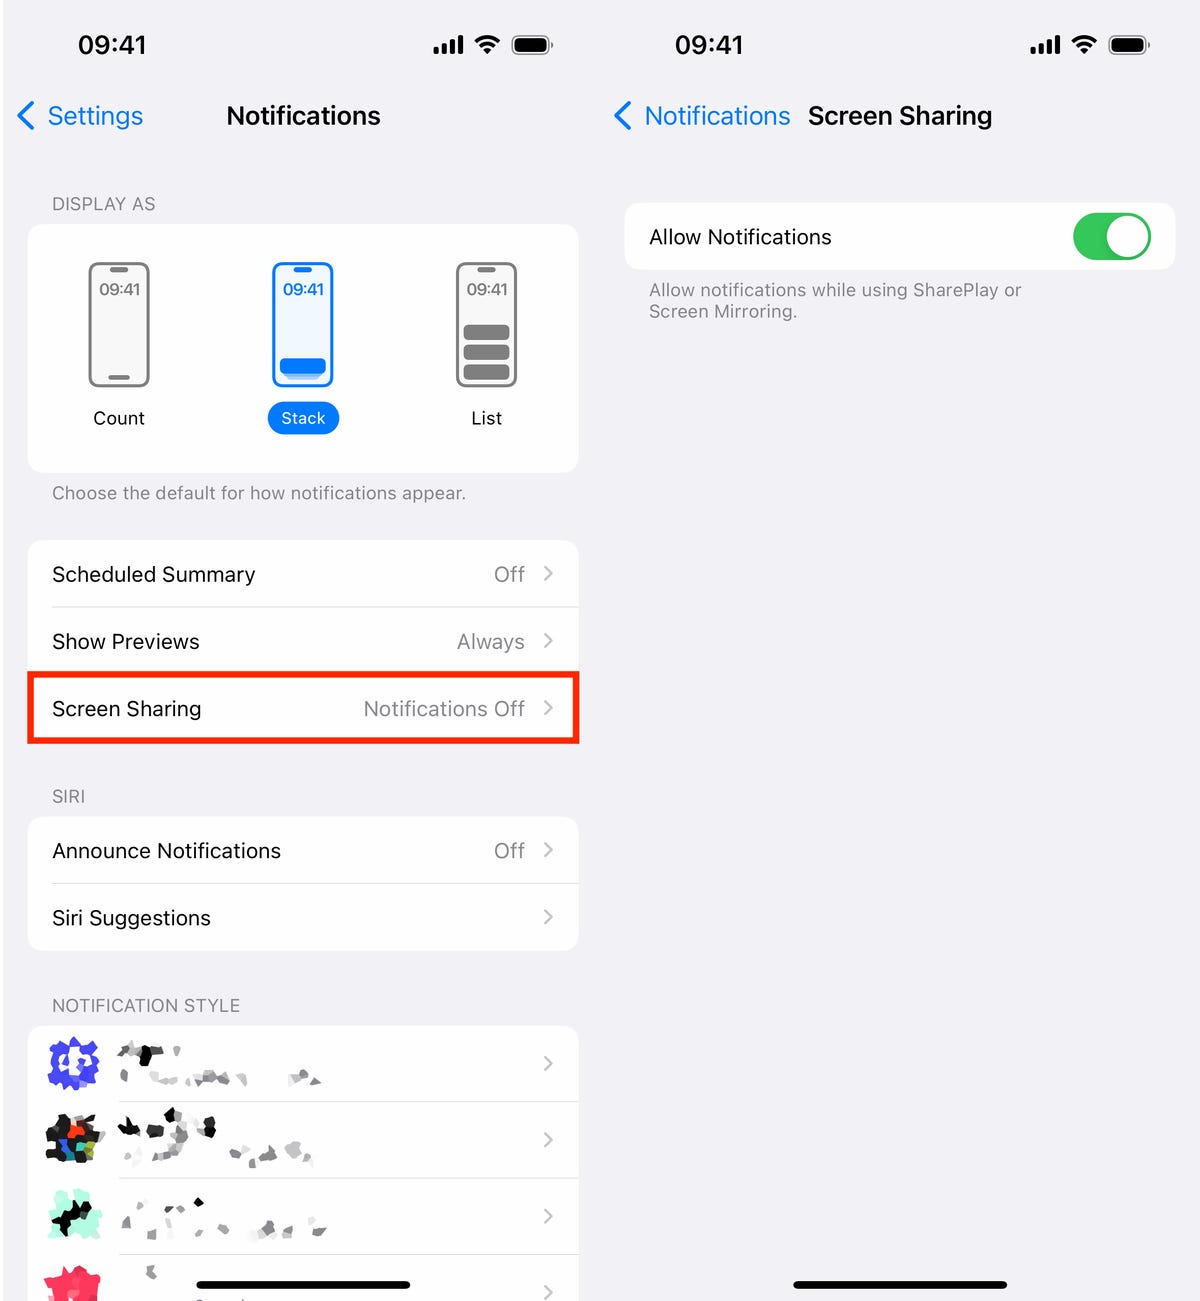
Allowing notifications when screen sharing is turned off by default.
Nelson Aguilar/CNETCopy your screenshots to your clipboard without saving them
You don’t need to save a screenshot to your photo album to share it with someone else. A new iOS 16 feature allows you to take a screenshot, copy it to your clipboard, delete it from your phone and paste it where you see fit. After you take a screenshot, tap the screenshot preview that appears, hit Done on the top-right and then tap Copy and Delete to copy the screenshot to your clipboard.
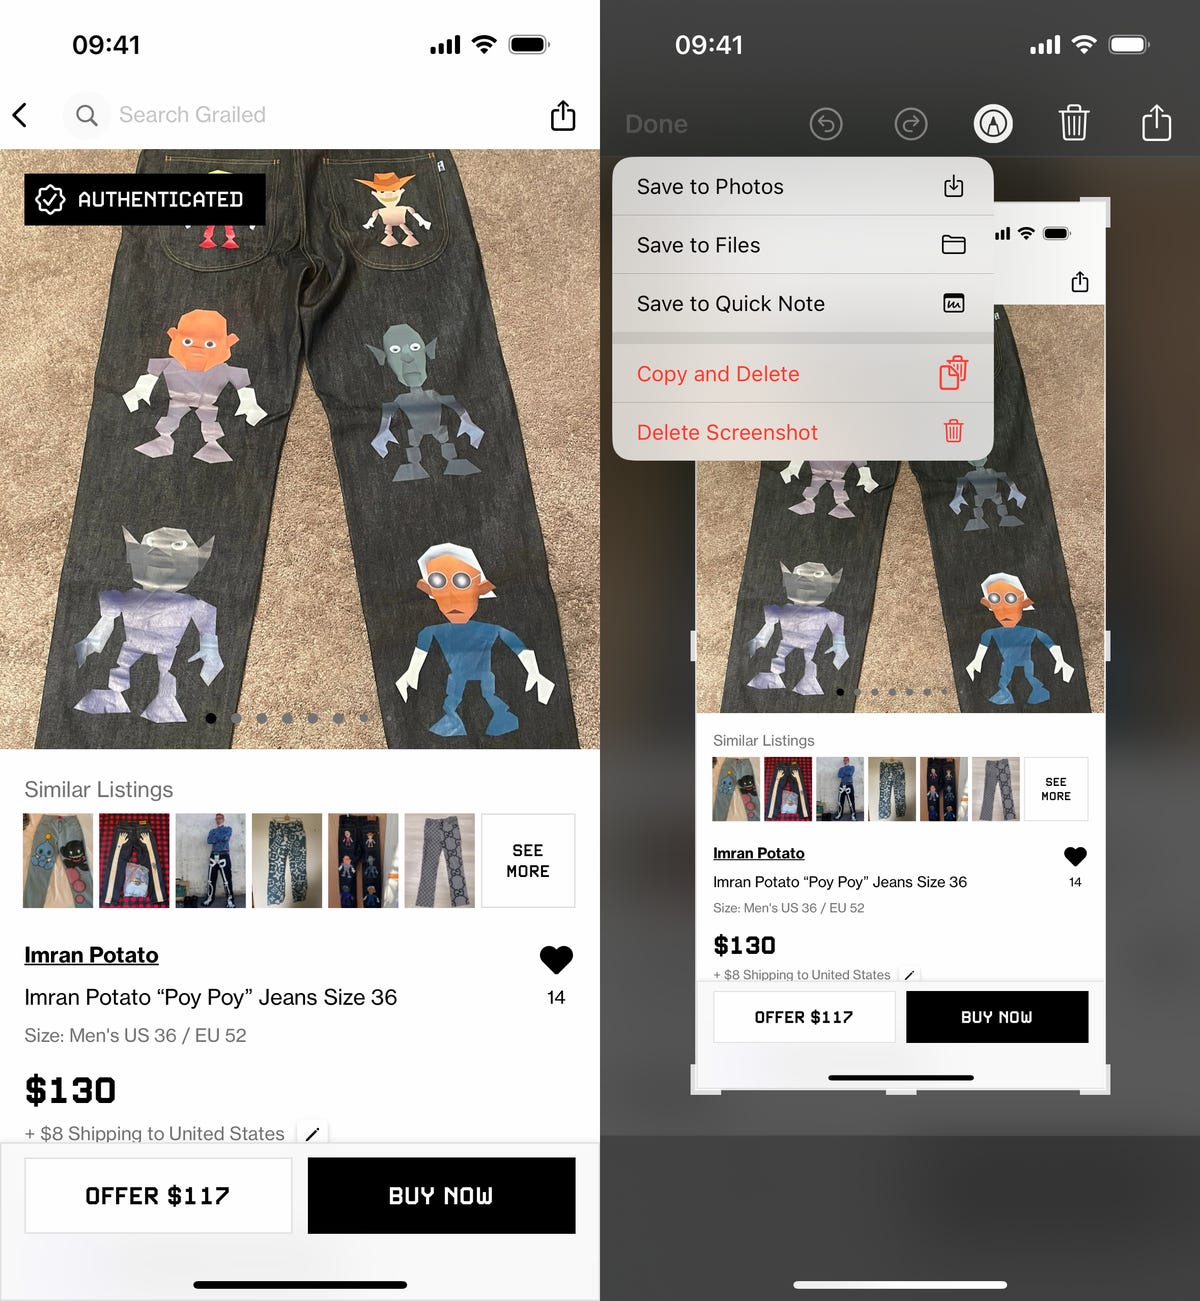
If you take a lot of screenshots, this feature can help you save storage.
Screenshots by Nelson Aguilar/CNETRemove more preinstalled Apple apps
Since iOS 10, you’ve been able to remove some preinstalled iOS applications like Stocks, Maps and Calculator — but not all of them. With the release of iOS 16, you can add three more apps to this list of ones you can remove: Find My, Clock and Health. However, deleting these apps can negatively affect and break support with other apps and connected devices, like your Apple Watch.
Make Siri listen to you longer
If you ever find yourself getting cut off by Siri, there’s now a way to force the voice assistant to listen to you longer so that she can catch everything you say. The feature isn’t in an obvious place though — in the Settings app, go to Accessibility > Siri, then choose either Longer or Longest. Play around with the two options to see which works best for you.
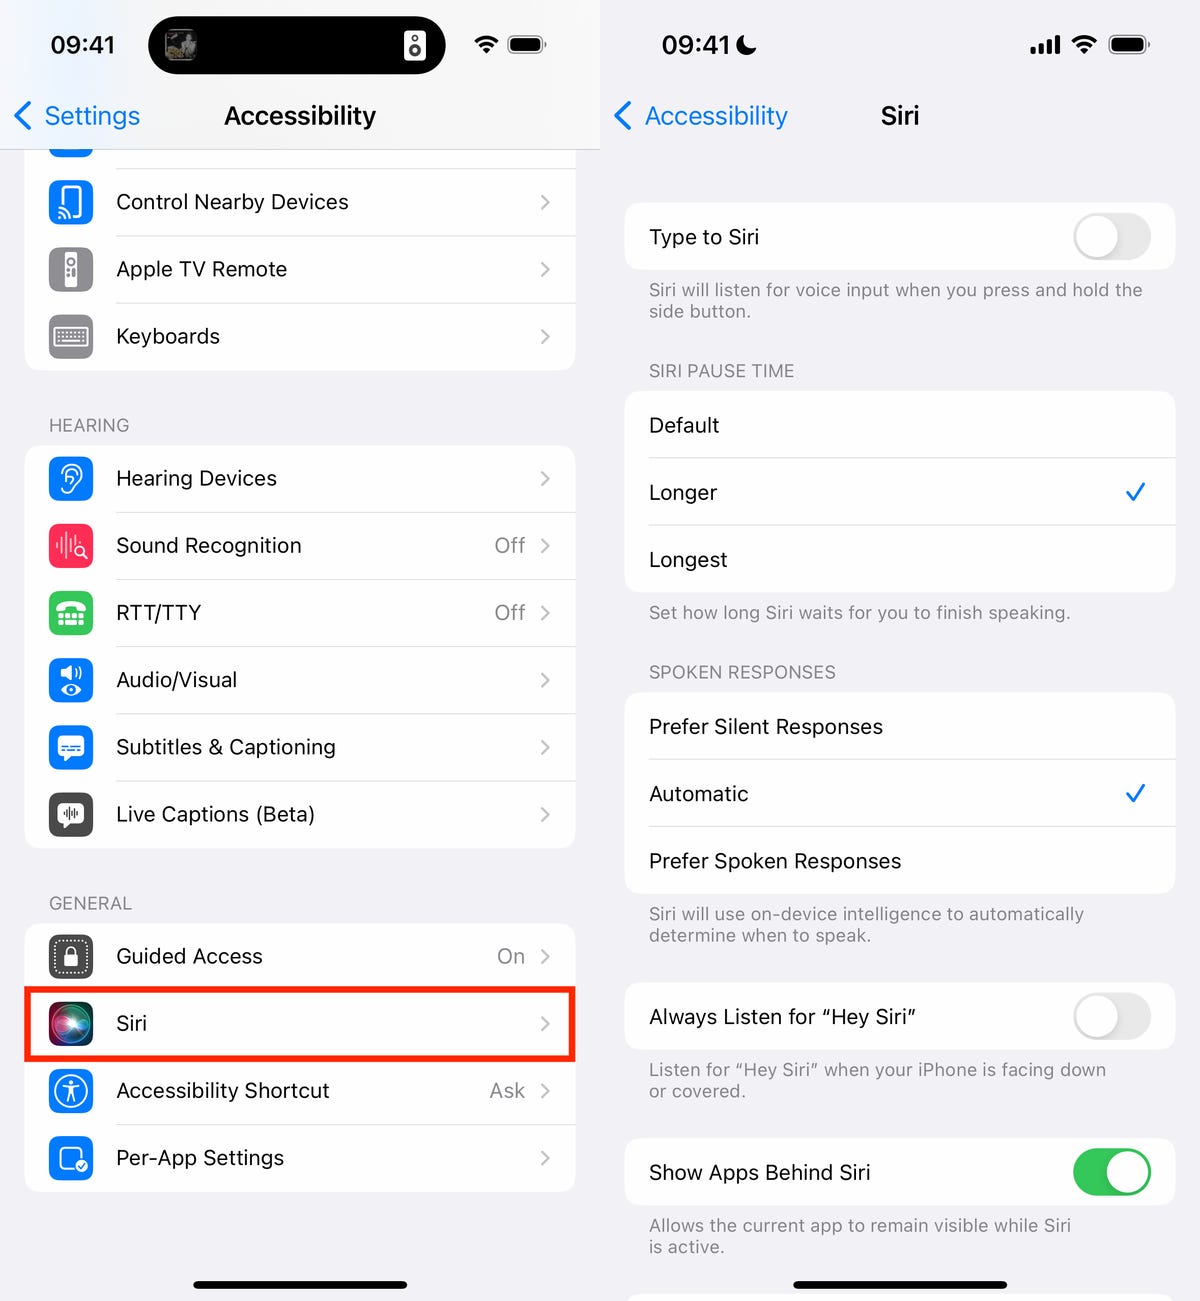
This will help Siri from interrupting you when you speak.
Nelson Aguilar/CNETFor more on iOS 16 and the iPhone, check out our iOS 16 cheat sheet.
Technologies
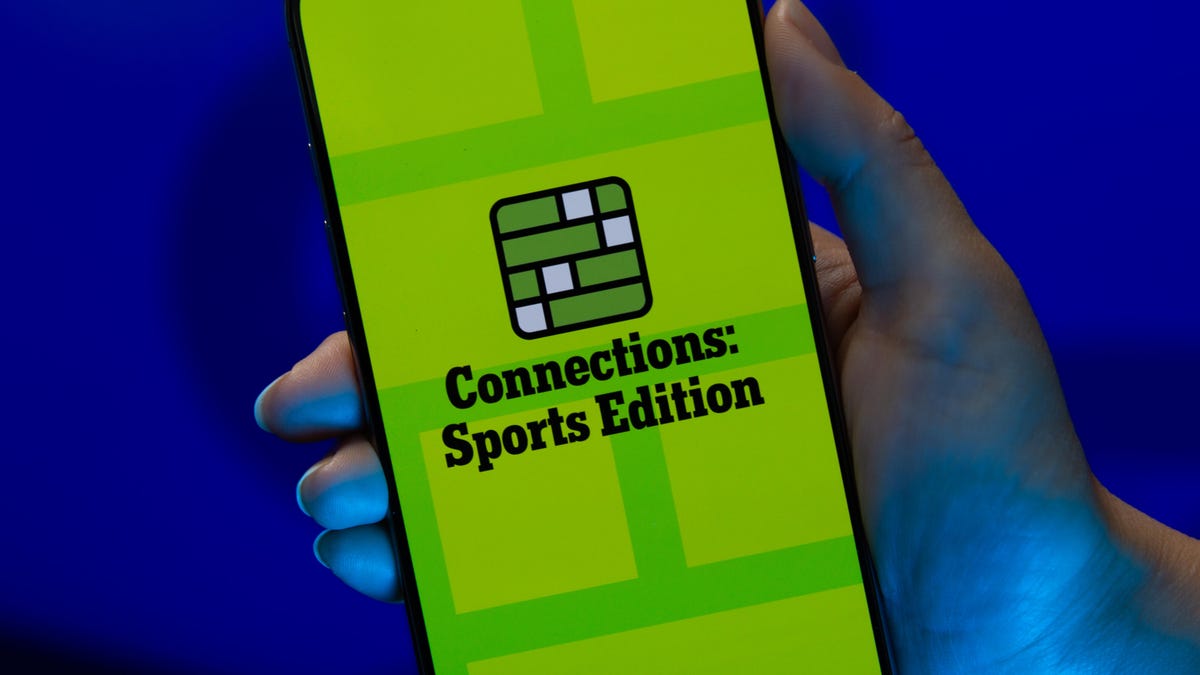
Today’s NYT Connections: Sports Edition Hints and Answers for April 8, #562
Here are hints and the answers for the NYT Connections: Sports Edition puzzle for April 8 No. 562.
Looking for the most recent regular Connections answers? Click here for today’s Connections hints, as well as our daily answers and hints for The New York Times Mini Crossword, Wordle and Strands puzzles.
Today’s Connections: Sports Edition is a tough one. If you’re struggling with today’s puzzle but still want to solve it, read on for hints and the answers.
Connections: Sports Edition is published by The Athletic, the subscription-based sports journalism site owned by The Times. It doesn’t appear in the NYT Games app, but it does in The Athletic’s own app. Or you can play it for free online.
Read more: NYT Connections: Sports Edition Puzzle Comes Out of Beta
Hints for today’s Connections: Sports Edition groups
Here are four hints for the groupings in today’s Connections: Sports Edition puzzle, ranked from the easiest yellow group to the tough (and sometimes bizarre) purple group.
Yellow group hint: Working out.
Green group hint: Cover your face.
Blue group hint: NFL players.
Purple group hint: Leap.
Answers for today’s Connections: Sports Edition groups
Yellow group: Exercises in singular form.
Green group: Sporting jobs that require masks.
Blue group: Hall of Fame defensive ends.
Purple group: ____ jump.
Read more: Wordle Cheat Sheet: Here Are the Most Popular Letters Used in English Words
What are today’s Connections: Sports Edition answers?
The yellow words in today’s Connections
The theme is exercises in singular form. The four answers are crunch, plank, situp and squat.
The green words in today’s Connections
The theme is sporting jobs that require masks. The four answers are catcher, fencer, football player and goaltender.
The blue words in today’s Connections
The theme is Hall of Fame defensive ends. The four answers are Dent, Peppers, Strahan and Youngblood.
The purple words in today’s Connections
The theme is ____ jump. The four answers are broad, high, long and triple.
Technologies
The $135M Google Data Settlement Site Is Live — See If You’re Eligible
Use the settlement website to select your preferred payment method, and you may end up $100 richer.
You can now file a claim in the $135 million Google data settlement. The case centers on claims that Android devices transmitted user data without consent. Specifically, the class action lawsuit Taylor v. Google LLC contends that Google’s Android devices passively transferred cellular data to Google without user permission, even when the devices were idle. While not admitting fault, Google reached a preliminary settlement in January, agreeing to pay $135 million to about 100 million US Android phone users.
The official settlement website for the lawsuit is now live. The final approval hearing won’t occur until June 23, when the court will consider whether Google’s settlement is fair and listen to objections. After that, the court will decide whether to approve the $135 million settlement.
In the meantime, if you qualify and want to be paid as part of the settlement, you can select your preferred payment method on the official website. There, you can find information on speaking at the June 23 court hearing and on how to exclude yourself or write to the court to object by May 29.
As part of the settlement, Google will update its Google Play terms of service to clarify that certain data transfers do occur passively even when you’re not using your Android device, and that cellular data may be relied upon when not connected to Wi-Fi. This can’t always be disabled, but users will be asked to consent to it when setting up their device.
Google will also fully stop collecting data when its «allow background data usage» option is toggled off.
Who can be part of the settlement?
In order to join the Taylor v. Google LLC settlement, you must meet four qualifications:
- Be a living, individual human being in the US.
- Have used an Android mobile device with a cellular data plan.
- Have used the aforementioned device at any time from Nov. 12, 2017, to the date when the settlement receives final approval.
- You’re not a class member in the Csupo v. Google LLC lawsuit, which is similar but specifically for California residents.
The final approval hearing is on June 23, so you can add your payment method until then. The hearing’s date and time may change, and any updates will be posted on the settlement website.
If you choose to do nothing, you will still be issued a settlement payment, but you may not receive it if you don’t select a payment method.
How much will I get paid?
It’s not currently known exactly how much each settlement class member will receive, but the cap is $100. Payments will be distributed after final court approval and after any appeals are resolved.
After all administrative, tax and attorney costs are paid, the settlement administrator will attempt to pay each member an equal amount. If any funds remain after payments are sent, and it’s economically feasible, they will be redistributed to members who were previously and successfully paid. If it’s not economically feasible, the funds will go to an organization approved by the court.
Technologies
Samsung’s Galaxy Watch Ultra 2 Might Come in 5G and 4G Cellular Models
If the rumor proves true, the 5G Galaxy Watch Ultra would rival the 5G-enabled $799 Apple Watch Ultra 3 that debuted last fall.

Samsung’s next high-end Galaxy Watch could support faster 5G speeds, but if this leak is true, it will depend on where you live. The rumored Samsung Galaxy Watch Ultra 2 might come in 5G and 4G cellular models, with availability for each smartwatch depending on the country.
According to the Dutch website Galaxy Club (and spotted by SamMobile), Samsung’s servers may have revealed a series of model numbers that point to 5G, 4G and Wi-Fi-enabled editions of the next Galaxy Watch Ultra, which would succeed the original model that debuted in 2024.
A representative for Samsung did not immediately respond to a request for comment.
The Galaxy Club website speculates that the 5G edition would be sold in the US and Korean markets, while the 4G edition would sell in the rest of the world. In the US, a 5G version of the Galaxy Watch Ultra would rival the 5G-enabled $799 Apple Watch Ultra 3, which debuted last fall. The 4G edition would have broader compatibility worldwide, since the earlier network is far more established.
It will likely be a few months until we hear anything official about the Galaxy Watch Ultra 2. Samsung typically unveils its new watches in the summer alongside its Galaxy Z Fold and Z Flip foldable phones. Last year, Samsung unveiled the Galaxy Watch 8 and the Galaxy Watch 8 Classic, but otherwise left the prior 2024 Ultra in the lineup for those looking for a larger 47mm smartwatch.
-
 Technologies3 года ago
Tech Companies Need to Be Held Accountable for Security, Experts Say
-
 Technologies3 года ago
Best Handheld Game Console in 2023
-
 Technologies3 года ago
Tighten Up Your VR Game With the Best Head Straps for Quest 2
-
 Technologies4 года ago
Black Friday 2021: The best deals on TVs, headphones, kitchenware, and more
-
 Technologies5 лет ago
Google to require vaccinations as Silicon Valley rethinks return-to-office policies
-
 Technologies5 лет ago
Verum, Wickr and Threema: next generation secured messengers
-
 Technologies4 года ago
Olivia Harlan Dekker for Verum Messenger
-
 Technologies4 года ago
The number of Сrypto Bank customers increased by 10% in five days