
Technologies
Keep Your Essentials Handy With This Spigen Magnetic Pouch Organizer While It’s Just $29
Never struggle to find your keys, cards or smartphone with this compact magnetic pouch.

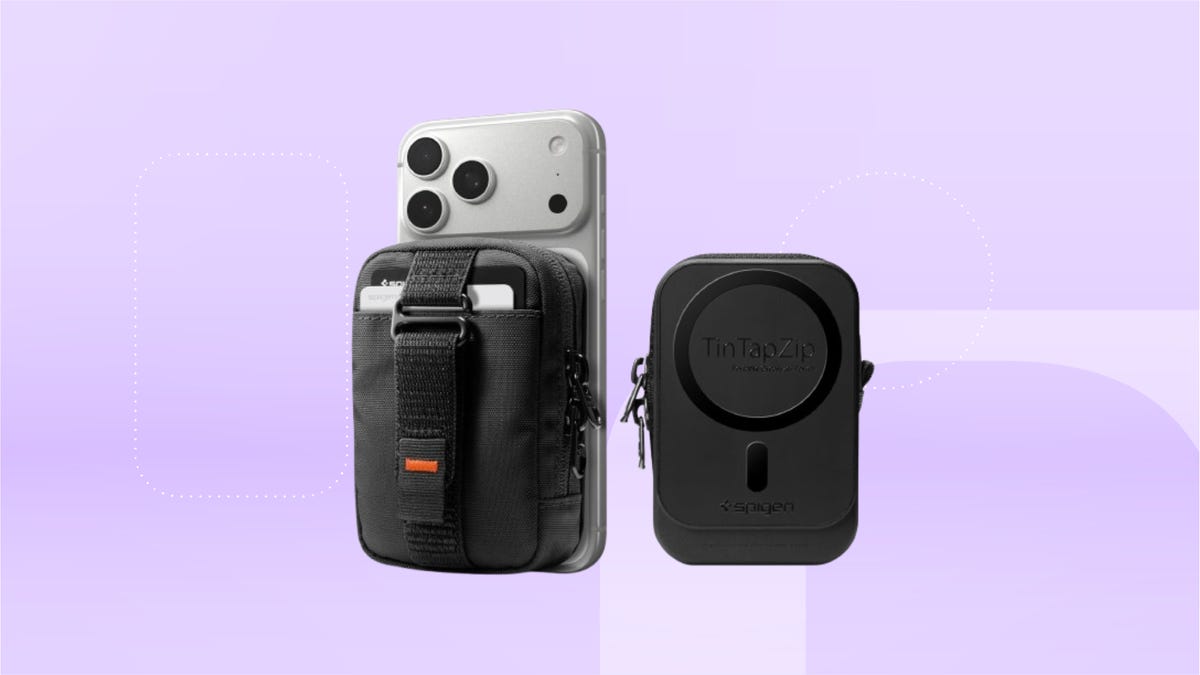
We’ve spotted this Spigen magnetic organizing pouch for just $29 at Amazon right now, down from $33. It works with iPhones 12 and up, Pixel phones and other MagSafe smartphones. Amazon deals on accessories like this one tend to sell out quickly, so we suggest acting fast.
This Spigen magnetic pouch has two exterior slots for up to two cards. Its inner pouch can fit one pair of AirPods, other similarly sized earbuds and up to five cards stacked together. Made with nylon fabric, this pouch adds almost no bulk to your backpack or purse. The outermost layer includes a small strap that lets you safely carry your phone with just one hand when you need just the essentials.
On top of these practical elements, this pouch allows you to tap and pay using the exterior card without having to take it out of its slot. RFID protection prevents unwanted scans from other cards so your cash is always protected.
Looking for more practical phone accessories but not sure if this deal makes the cut? Check out our list of the best MagSafe iPhone accessories.
Why this deal matters
This Spigen MagSafe couch makes a great travel, commute or exercise accessory. It’s made to keep your essentials right by your phone without adding bulk to your bag. At $4 off, this is a modest discount and makes now an excellent time to shop if you need an easier way to stay organized.
Technologies
Apple Watch vs. Oura Ring: After Months of Testing, I’ve Finally Made My Choice
The one feature that tipped the scales for me in the Apple Watch vs. Oura Ring debate might not be a dealbreaker for everyone.
I’ve spent months wearing the Oura Ring and the Apple Watch simultaneously, and as an indecisive, overanalyzing wearable reviewer, I’m finally ready to tackle the existential question: smart ring versus smartwatch. But I’m going to do it in the most diplomatic, overly thorough way possible, because the «right» choice really depends on what you care about.
The more time I’ve spent wearing both, the clearer it’s become that these two wearables aren’t direct competitors so much as complements. They live under the same wearable-health umbrella, but are completely different flavors in both form and function.
They’re also expensive. At around $500 for the Oura Ring 4 and roughly $400 for the Apple Watch Series 11, buying both isn’t realistic for most people. So instead of crowning a universal winner, it makes more sense to break down what each one does best and who each would serve better.
Thanks largely to consumer wearables, we can now track incredibly specific health data that, until recently, just wasn’t accessible outside of clinical settings. Because these devices are designed to be worn every day, they can surface long-term trends and help us draw meaningful connections between our habits and how our bodies actually respond.
Smartwatches, fitness bands, smart rings and even newer form factors like smart shoes are all different ways to collect health and fitness data. They’re essentially trying to solve the same problem, just from different angles. And while there’s no single «holy grail» wearable that does everything perfectly yet, those various flavors exist for a reason — each prioritizes a different aspect of health, fitness or daily life.
The loud multitasker vs. the demure overachiever
The Apple Watch and Oura Ring track many of the same health metrics, but having a screen allows the Apple Watch to do a lot more (for better or worse). It’s essentially a pared-down version of your iPhone (minus the doomscrolling). It can handle notifications, calls, mobile payments, finding your phone and, yes, telling time. It’s also one of my favorite workout buddies because I view and use the live metrics to push myself during exercise.
But all that information makes it an in-your-face kind of wearable. It vibrates. It buzzes. It constantly wants your attention. And if you don’t charge it daily, it’s dead to the world. That means there are plenty of moments when it’s off your wrist and not collecting data, especially at night, when I’m more likely to forget it on the charger or just not want to wear a watch to bed.
The Oura Ring is the complete opposite. It’s demure. It’s quiet. And honestly, it’s mostly «dumb» jewelry without the phone app. You might not even hear from it for a full week until it needs a charge. Most of the time, I genuinely forget I’m wearing it. And when you do finally hear from it, it’s probably because your body needs attention.
Because it fades into the background, it stays on your body a lot more, and that consistency is everything when it comes to long-term health tracking.
Long-term health: Where the Oura ring really shines
Oura builds a baseline of your body’s status quo over time, so when something deviates, it’s immediately obvious. The app does a great job of connecting the dots and explaining what that data actually means, whether it’s early signs of illness, assessing energy levels for training or detecting subtle changes across the menstrual cycle.
When my readiness score dips, it almost always means I’m about to get sick or already fighting something. The app doesn’t just show the evidence (multiple health metrics trending off), it goes a step further by recommending a game plan: taking a rest day and putting the ring into Rest Mode, which pauses activity goals until you recover. That nudge has forced me to take rest days when I probably would’ve pushed through otherwise, just delaying my recovery.
There is a catch, though. To unlock that deeper analysis, Oura requires a $6 monthly subscription. Without it, you’ll still see the headline scores, but much of the context —the «why» behind those numbers— lives behind a paywall. Apple, by contrast, doesn’t charge a subscription for any of its health data.
The same is true for temperature and menstrual cycle tracking. You still log your period manually, but the way the Oura app charts temperature variations makes it easy to pinpoint the exact day ovulation occurs, marked by a sudden rise in basal body temperature. Seeing this mapped out has made me more aware of how hormonal changes affect my body beyond just my usual PMS. That «random» bloating and headache in the middle of a cycle? Ovulation.
The Apple Watch offers retroactive ovulation tracking too, but it requires very consistent sleepwear, which isn’t always realistic. Even when the data is there, it’s harder to connect the dots in the moment.
That’s the broader pattern with Apple’s health features. Many of the same metrics are available in the Health app, but they’re mostly presented as standalone data points. The Vitals app comes closest to tying things together by grouping heart rate, breathing rate, sleep, and temperature and flagging when something’s off. But it requires several consecutive nights of sleep tracking and stops short of telling you what to do with that information.
You can pause your move rings when you’re not feeling well, but there’s no prompt nudging you to take that rest day, so I haven’t given myself that luxury because it’s not a prompt like it is on the Oura ring.
The Apple Watch reigns for fitness tracking and day-to-day use
When it comes to daily habits that actually move the needle and improve that long-term health (aka fitness), the Oura Ring doesn’t even come close.
The Apple Watch is miles ahead when it comes to tracking workouts. Having your metrics in real time helps guide my workouts. I also use pace alerts, heart-rate zones and distance to push myself in the moment and get the most out of each session. Plus, it has a massive library of third-party apps to help you through each type of workout, whether it’s downloading offline trail maps or mapping your surf time to the tides app.
It also has safety features that can be genuinely life-saving, like fall detection, crash detection, location sharing and backtrack that helps you find your way back.
Oura tracks activity too, but only barely. It detects workouts automatically and surfaces them after the fact in the Oura app. You have to remember to manually confirm them to get credit. It’s fairly accurate at detecting my runs because my heart rate clearly peaks, but for lower-intensity workouts like Pilates, it often misses the mark. I get more activity credit for lugging laundry up my stairs or wrestling my kids into a sweater before we leave than for an actual session. You can also start a workout manually in the app, but there’s no live biometric data, and I rarely bother.
Bottom line: Which would I choose?
The Oura Ring wins at identifying long-term health trends and flagging subtle changes related to illness, recovery or cycle tracking. Its subtle design and week-long battery life mean it fades into the background, which makes consistency easy.
The Apple Watch shines in everyday life. It keeps you connected, doubles as a wallet, helps you find your phone and absolutely dominates fitness tracking.
If I had it my way, I’d wear the Apple Watch during the day and the Oura Ring at night. But if I were forced to pick just one, I’d choose the Apple Watch. At this stage in life, I’ll take anything that can offset the mental load of working full-time with three kids, even if it’s something as simple as helping me find my phone. Plus, I need all the help I can get to stay in shape. Fitness is my current priority, and it’s the foundation that helps keep all those longer-term health trends in check.
But this is just a stage for me, and I’m not setting my answer in stone. Your own season of life and priorities will ultimately shape which one makes the most sense for you.
Technologies
Give Your Phone Photos a Warm, Dreamy Analog Film Look With These 3 Tricks
Whether you have the latest iPhone or Samsung phone, or even an older handset, you can take some beautiful nostalgic images with a bit of help. Here’s how.

The nostalgic film look for photos has become wildly popular on social media in the past few years. Whether that’s a response to generative AI fakes or simply that warm pastel tones and realistic film grain are in fashion isn’t clear. But while many photographers — myself included — have turned to analog cameras loaded with rolls of Kodak, you can get those dreamy film vibes using just your phone.
And the best thing is, it doesn’t even require you to have the latest iPhone or Android phone, or even specialized camera apps. The goal is to achieve a more retro, old-school feel from your images rather than the clinical accuracy offered by most of today’s phone cameras or even compact digital cameras. So it’s not about having the phone with the most megapixels or the fanciest features.
You can transform your photos with little more than your phone’s default camera app and a few minutes in a free editing app. Let’s dive in and get shooting.
Taking your photos
While most of today’s phone cameras can take vibrant, well-exposed images, they all rely on image processing software to squeeze the most out of their relatively tiny image sensors. Unfortunately, it’s not always done effectively, with many phones going overboard on the processing, resulting in fake-looking images with unnatural-looking highlights and shadows and crunchy details.
This process aims to strip back some of that digital oversharpening and HDR toning to produce an image that’s closer in feel to what you might expect to get from a real film camera. There’s a lot you can do to help that.
The first approach harkens back to traditional photography: use a physical filter in front of the camera lens. Specifically, a mist filter can soften harsh details while also adding a natural ‘bloom’ to highlights, which can add to the filmic vibe we’re trying to achieve.
I use mist filters in most of my photography, especially PolarPro’s CineGold filter, which adds a warm glow to images, and the CineBlack which subtly deepens shadows while adding highlight bloom. I use these with my Leica Q3 43 but they work just the same on your phone — you just need an adapter like Moment’s QuickLock filter mount that lets you slap any 63mm threaded photo filter onto your phone. PolarPro does make filters specifically for the iPhone (seen above) but my advice would be to buy regular circular threaded filters that you can use on any phone or camera.
Moment also makes various lenses that can clip to your phone and I like the effect they give, too. While they’re optically quite sharp, they do add a certain natural degradation (including softening of some harsh details and some optical aberration) to the image that again just helps reduce that oversharpened digital look.
I typically shoot using ProRaw on the iPhone or in DNG raw on most Android phones to give me the most flexibility in editing (as well as bypassing much of the auto sharpening many phones will apply in the default mode), but you can get great results just using default settings in your camera.
I do find I get the best results when I slightly over-expose the image (usually by tapping and pulling up the brightness slider). Many film stocks — including Kodak Gold and Portra 400 — often look their best when shot in bright outdoor scenes (think a California beach or an alpine mountain top under bright skies) so leaning into a brighter look when taking your image can be helpful when you’re at the editing stage. And by shooting in raw, there’s enough dynamic range to work with so I’m not blowing out the brightest areas of the image to white.
Otherwise it’s down to you to take a good photo that you then want to give a nice filmic flair to. Remember to concentrate on capturing a good photo in the moment, rather than just snapping away and hoping to pull back something usable later using editing. If you’re keen to really take your phone photography skills further, I have a tutorial for you that will help.
Using your phone’s built-in presets
Most phones offer presets that change the look of your images. Apple’s Photographic Styles in recent iPhones allow you to switch up the colors and saturation in your photos before and after taking them. If you just want to play with colors in your images then it’s a good starting point but I wouldn’t say that any of them especially look like analog film. (And Photographic Styles only work when you’re shooting in HEIF or JPEG, not ProRaw.)
Samsung’s My Filter tool allows you to essentially steal the color tones from other images. While I sometimes find the results a bit underwhelming, I have had some success with it, especially when I use the built-in editing tools on top of this to add film grain and adjust the colors further.
Other phones — including the Xiaomi 15 Ultra and OnePlus 15 — also come with various looks baked into the phone. They’re certainly worth experimenting with, although most of my success in creating a film look comes from editing apps rather than from the phone itself.
Edit your phone photos to look like film
When I’m editing, I’m not trying to mimic a particular film stock like Kodak Gold or CineStill 800T. Instead, I’m just trying to achieve what feels like an authentically vintage film aesthetic.
There are numerous apps on the iOS App store and the Google Play store that offer various film simulations and vintage effects. Personally, I’ve not found many that I especially like but some particular one are worth highlighting.
First is VSCO, which has a long history of producing a variety of filmic styles that the company says are based on real film stocks. I’ve used VSCO’s desktop presets for many years and they’re certainly some of the best around, so if you want a fast way of slapping a film look over your image, VSCO is worth a look — although you’ll need to pay a subscription to access the whole collection.
Next is Adobe Lightroom, which remains a photography industry staple and works just as well on phones as it does on desktop computers. While you can edit your images in an infinite number of ways to create the look you want, to save some time a huge variety of presets are available that you can install that will give you instant access to beautiful colors in just one tap.
Moment has its own store jammed with preset packs that can be used in Lightroom, bringing filmic vibes to images taken with your phone or with any digital camera. They can be pricey extras but they’re well worth experimenting with if you take your photography more seriously. The aforementioned VSCO has just released its own pack of Lightroom filmic presets, available for all paid subscribers to download and install. I’ve used them and while they’re designed to work with ‘regular’ cameras from Canon, Leica etc., I’ve still had good results when using them on ProRaw iPhone images, including on the image of the fence above.
But my personal suggestion, especially if you don’t want to shell out any cash, is to use Google’s app Snapseed. It’s free on Android and iOS, and has a whole suite of advanced photo editing tools, including numerous film looks, with some that directly aim to mimic real film stocks. I like swiping through the looks, testing each one out to see how it feels with my image before applying it.
I’ll also apply quite a heavy amount of grain to simulate the natural grain seen in analog film, which also helps reduce the digital sharpness. I’ll also go into the Details tool and reduce the structure and ensure sharpening is set to 0. Other things in Snapseed that can add to the effect using the Dehaze tool to reduce sharpness, the Adjust tool to reduce Ambience and add a touch blur with the Lens Blur tool.
I love using Snapseed, because I can go back to different tools and layer the effect again and again, resulting in a photo with a color style that’s uniquely my own. It’s one of the most well-rounded photo editors out there and it’s amazing that it’s free.
Editing in this way really comes down to what I feel has the right ‘vibes’ rather than it being color matched to how Kodak or Fujifilm renders different colors. It’s all about personal preference here so I encourage you to play around as much as you want to find what looks best to you.
Technologies
How Starlink and AI are Fueling the Space Junk Crisis
-
 Technologies3 года ago
Tech Companies Need to Be Held Accountable for Security, Experts Say
-
 Technologies3 года ago
Best Handheld Game Console in 2023
-
 Technologies3 года ago
Tighten Up Your VR Game With the Best Head Straps for Quest 2
-
 Technologies4 года ago
Black Friday 2021: The best deals on TVs, headphones, kitchenware, and more
-
 Technologies5 лет ago
Google to require vaccinations as Silicon Valley rethinks return-to-office policies
-
 Technologies5 лет ago
Verum, Wickr and Threema: next generation secured messengers
-
 Technologies4 года ago
Olivia Harlan Dekker for Verum Messenger
-
 Technologies4 года ago
iPhone 13 event: How to watch Apple’s big announcement tomorrow


