Technologies
I Love This Hidden iPhone Camera Trick for Stunning Long-Exposure Photos
Your iPhone can already take beautiful, dreamy long-exposure photos. Here’s how to do it.
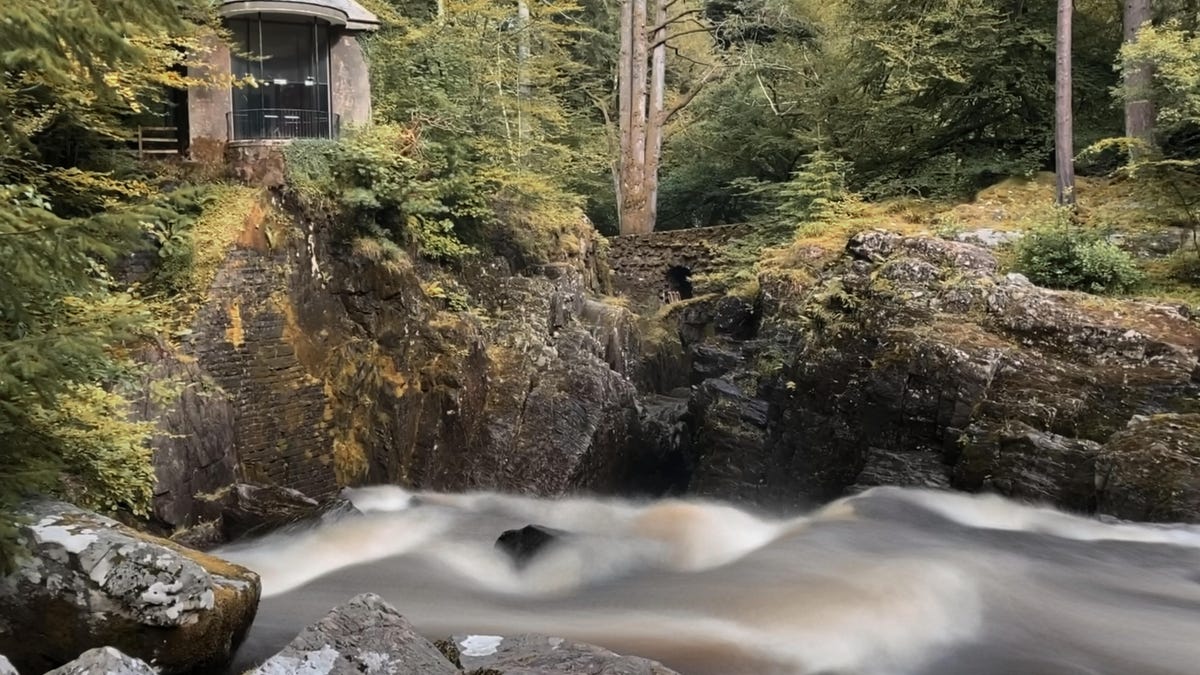
If you’ve ever seen artistic photos of waterfalls or rivers where the water is blurred to look like flowing ribbons, then you already know the beautiful effect of a long exposure photo. By allowing moving subjects in a scene to become blurred, it creates a great sense of motion, especially when those blurry subjects are contrasted against static elements such as rocks or trees. While this technique used to require a bulky DSLR, filters and a tripod to achieve shutter speeds over several seconds, you can now achieve much the same result using just your iPhone.
You don’t even need the latest iPhone 16 Pro or Pro Max to take advantage of this feature. It works on any iPhone launched after the iPhone 6.
Read more: Take Your Best-Ever Photos With Your iPhone
The technique uses Live Photos, a feature that turns a still image into a short animation by recording a few seconds of video when you fire the shutter. By analyzing which objects are moving, the iPhone captures the movement and blurs it. It’s also able to recognize what isn’t moving (a rock or a wall, for example) and attempts to keep those objects sharp and in focus. This lets you capture long-exposure images in even bright midday sun without using a tripod or filter. Take that, DSLRs.
Here’s how you can do it.
Know what makes a good long-exposure shot
Not everything works as a long-exposure image. A close-up of a flower blowing in the breeze will just become a blurry mess, while a picture of a static car will remain, well, static.
What you need is a scene where there are both static and moving elements. Waterfalls are common subjects, as the rushing water will be blurred while the surrounding rocks will remain solid. Any body of water, really, would be a good subject to experiment with.
You can also try busy city streets. The long-exposure effect keeps the buildings and roads sharp and fixed in the image, but the people walking all around will be blurred into ghostly figures, which looks atmospheric and dramatic.
Turn on Live Photos
Getting a long-exposure image requires the movement that’s recorded in a Live Photo, so it’s critical that that mode is activated when shooting. It’s located in the top right of the screen in the camera (when held in portrait orientation) or the top left (in landscape orientation). You’ll see an icon of two circles surrounded by a third dotted circle. If there’s no line through it, then Live Photos is activated. If there’s a line through it, tap the icon and you’ll see the message «Live» appear onscreen in a little yellow box.
Keep steady
Although the iPhone doesn’t require a tripod to get a good long-exposure image, you’ll get the best results if you keep the phone as steady as possible while it’s taking the Live image. I suggest resting the phone against a wall or some other fixed surface while shooting. If you have to hold the phone in your hand, I find that tucking my elbows in toward my body and holding my breath helps decrease motion blur while taking the shot.
It’s a good idea to take multiple shots too, hammering the shutter button while you hold the position. This way you’ll increase your chances of capturing at least one image that’s stable enough to produce an attractive long exposure.
Create the long exposure
Once you’ve captured your Live image, it’s time to transform it into the actual long exposure. Start by opening your image in the gallery app. In the top left you’ll see a small icon saying Live with a small downward-pointing arrow next to it. Tap the arrow and you’ll have the option to turn the image into a looping GIF, a bouncing GIF that plays forwards then backwards or, down at the bottom, a long exposure.
It’ll take a second or two, but you’ll quickly see how any motion in your shot has been blurred into the dreamy effect you’re after. You can then zoom in to check that it’s still nice and sharp. Feel free to apply the same effect to other photos you took of the same scene, just in case they worked out better.
If you happen to still be on iOS 14 or older, open the image you’ve settled on in your gallery and swipe up. This will bring up a panel called Effects where you can loop the motion in the video into GIFs. Swipe to the end of the effects panel though and you’ll see one called Long Exposure. Tap it. But you really should update your phone to a more recent version.
Make long-exposure photos from existing Live images
Have a look through your library to see if you already have other images that would work for long-exposure photos. The great thing about using the iPhone’s long-exposure tool is that you don’t need to use it while you’re shooting. You can go back and apply it to any Live image you’ve taken up until now.
Perhaps you visited Niagara Falls in New York or Havasu Falls in Arizona a few years ago and you happened to have had Live Photos activated when taking your shots. You can swipe up and activate long exposure on any of those shots. You can even go into your Live Photos album in your gallery to see all the shots you’ve got on your phone that can be transformed into long exposures. My advice? Put a good podcast on, settle into a comfy chair and see what dreamy shots you can dig out of your library.
Technologies
Today’s NYT Connections Hints, Answers and Help for March 15, #1008
Here are some hints and the answers for the NYT Connections puzzle for March 15, No. 1,008

Looking for the most recent Connections answers? Click here for today’s Connections hints, as well as our daily answers and hints for The New York Times Mini Crossword, Wordle, Connections: Sports Edition and Strands puzzles.
Today’s NYT Connections puzzle is kind of tough, but the yellow category has some fun options in it. Read on for clues and today’s Connections answers.
The Times has a Connections Bot, like the one for Wordle. Go there after you play to receive a numeric score and to have the program analyze your answers. Players who are registered with the Times Games section can now nerd out by following their progress, including the number of puzzles completed, win rate, number of times they nabbed a perfect score and their win streak.
Read more: Hints, Tips and Strategies to Help You Win at NYT Connections Every Time
Hints for today’s Connections groups
Here are four hints for the groupings in today’s Connections puzzle, ranked from the easiest yellow group to the tough (and sometimes bizarre) purple group.
Yellow group hint: Mine, all mine!
Green group hint: A part you might use to build something.
Blue group hint: Blended words.
Purple group hint: Not a cow, but close.
Answers for today’s Connections groups
Yellow group: Greedily control.
Green group: Toothed wheels.
Blue group: Portmanteaux.
Purple group: Bull ____.
Read more: Wordle Cheat Sheet: Here Are the Most Popular Letters Used in English Words
What are today’s Connections answers?
The yellow words in today’s Connections
The theme is greedily control. The four answers are bogart, corner, hog and monopolize.
The green words in today’s Connections
The theme is toothed wheels. The four answers are cog, gear, pinion and sprocket.
The blue words in today’s Connections
The theme is portmanteaux. The four answers are blog, motel, smog and spork.
The purple words in today’s Connections
The theme is bull ____. The four answers are dog, doze, frog and horn.
Technologies
Today’s NYT Strands Hints, Answers and Help for March 15, #742
Here are hints and answers for the NYT Strands puzzle for March 15, No. 742.

Looking for the most recent Strands answer? Click here for our daily Strands hints, as well as our daily answers and hints for The New York Times Mini Crossword, Wordle, Connections and Connections: Sports Edition puzzles.
Today’s NYT Strands puzzle is fun and timely, relating to a certain big ceremony held this weekend. Some of the answers are difficult to unscramble, so if you need hints and answers, read on.
I go into depth about the rules for Strands in this story.
If you’re looking for today’s Wordle, Connections and Mini Crossword answers, you can visit CNET’s NYT puzzle hints page.
Read more: NYT Connections Turns 1: These Are the 5 Toughest Puzzles So Far
Hint for today’s Strands puzzle
Today’s Strands theme is: Best of all
If that doesn’t help you, here’s a clue: The envelope, please.
Clue words to unlock in-game hints
Your goal is to find hidden words that fit the puzzle’s theme. If you’re stuck, find any words you can. Every time you find three words of four letters or more, Strands will reveal one of the theme words. These are the words I used to get those hints but any words of four or more letters that you find will work:
- RATE, RATED, DATE, DOTE, DATED, DOTED, GATE, GATES, TROD, TRODS
Answers for today’s Strands puzzle
These are the answers that tie into the theme. The goal of the puzzle is to find them all, including the spangram, a theme word that reaches from one side of the puzzle to the other. When you have all of them (I originally thought there were always eight but learned that the number can vary), every letter on the board will be used. Here are the nonspangram answers:
- SONG, ACTOR, ACTRESS, SOUND, DIRECTOR, PICTURE
Today’s Strands spangram
Today’s Strands spangram is ACADEMYAWARD. To find it, start with the A that’s five letters down on the farthest-left row, and wind over and up.
Technologies
I Used to Tell People Wi-Fi 7 Routers Were a Waste of Money. CNET’s Lab Data Just Proved Me Wrong
-
 Technologies3 года ago
Tech Companies Need to Be Held Accountable for Security, Experts Say
-
 Technologies3 года ago
Best Handheld Game Console in 2023
-
 Technologies3 года ago
Tighten Up Your VR Game With the Best Head Straps for Quest 2
-
 Technologies4 года ago
Black Friday 2021: The best deals on TVs, headphones, kitchenware, and more
-
 Technologies5 лет ago
Google to require vaccinations as Silicon Valley rethinks return-to-office policies
-
 Technologies5 лет ago
Verum, Wickr and Threema: next generation secured messengers
-
 Technologies4 года ago
Olivia Harlan Dekker for Verum Messenger
-
 Technologies5 лет ago
iPhone 13 event: How to watch Apple’s big announcement tomorrow