Technologies
Nintendo Switch 2 Hands-On: My Verdict After Playing All the Games
I got to spend a day playing all the new games for Nintendo’s upcoming $450 Switch 2 and came away with plenty of opinions.
It sounds like a dream to spend an entire day with the brand new Nintendo Switch 2 playing all the new games Nintendo threw at me during a special press preview. Believe me, it was an unforgettable experience, particularly now that because of tariffs, pre-orders in the US and Canada are on hold, while the initial batch in the UK sold out quickly. I just didn’t expect it to be a workout using the controllers in ways I’d never anticipated.
For example, pushing my hands around a fabric-covered table while holding two mouse controllers is surprisingly tiring. I was playing Drag x Drive, a new wheelchair sports game coming for the Nintendo Switch 2 that uses one of the console’s new features: Joy-Cons, which work like computer mice. I felt vibrations under my hands as though I was spinning my wheels. But I wondered: Who will play the Switch 2 while seated at a table? I realized later that you can also rub them on your pants legs to make them work. So I did that, too. It was a little less tiring.
This was just one weird part of a long day playing the Nintendo Switch 2, the $450 sequel to one of Nintendo’s most popular game consoles ever, arriving June 5, with preorders opening soon. I’ve loved playing games on the Switch, like many people. However, the Switch 2, while being a new console, feels a lot like an updated version of a system many people already own.
Much like the PlayStation 5 or the Xbox Series X, it’s betting that playing games that look a little better matters enough to upgrade. But Nintendo’s also laying down some side bets on new features that could make a difference: in-game voice chat with friends at the press of a button, a plug-in camera that can work with wacky party games and, yeah, new controllers that double as mice.
So here’s the question: Is this more fun than the existing Switch and its games? I’d say the Switch 2 is a better piece of hardware, no doubt, but the upgrade proposition feels pretty uncertain until Nintendo shows many more games that make it worth it.
That being said, the Switch 2, as a bigger, better version of the existing Switch, could make a lot of sense for those who can afford it, especially because there’s still nothing quite like it out there. At $450 (£395, AU$699), plus $70 or $80 for its two biggest launch-window games, Mario Kart World and Donkey Kong Bananza, this is an expensive proposition for any family right now. A CNET survey recently found that affordability is the top concern for US gamers considering the purchase. Then again, as a handheld game console with its own included dock that can also play games in 4K on a TV, it’s actually competitively priced versus the Steam Deck and Windows gaming handhelds.
I played Mario Kart World. I played Donkey Kong Bananza. I played remastered versions of Zelda: Breath of the Wild and Tears of the Kingdom, and Kirby and the Forgotten Land. I played Cyberpunk 2077 and Split Fiction. And I played Mario Party Jamboree with new mouse-Joy-Con and camera-optional modes that projected me onto the TV. It was all fun and the Switch 2 is the handheld I’d prefer to play my library of Switch games on. But I don’t think it’s a necessary upgrade for anyone right now. That said, your kids will probably ask for Mario Kart World and a Switch 2.
Hands-on with the handheld: Nice screen, larger feel, similar buttons
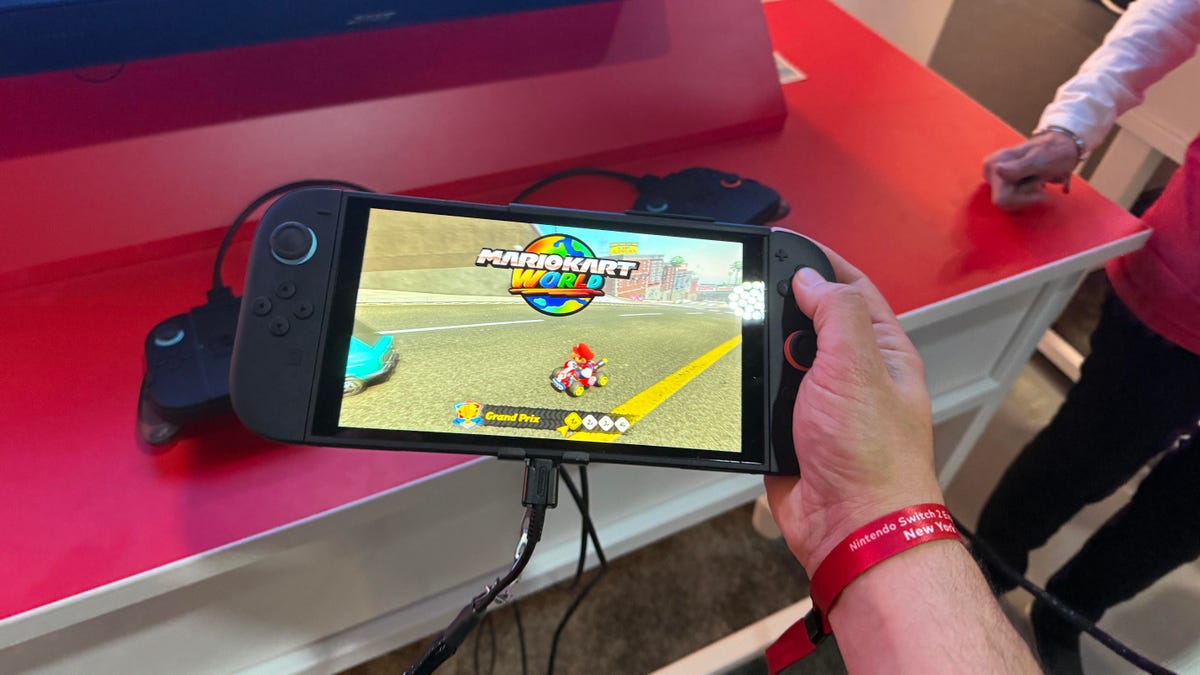
The Switch 2 is big and feels dense. It’s not that much bigger than the Switch OLED, to me, but that larger 7.9-inch screen feels welcome. I play on a large Steam Deck a lot lately and the Switch 2 feels sort of like that but actually thinner. It’s about the same thickness as the Switch in casual holding-and-looking comparisons.
The Switch 2 has an LCD, not OLED, like the last iteration of the Switch, which went on sale in 2021. But honestly, it looked great to me in the hours I tried it. The 1080p resolution, HDR capabilities and refresh rate that can go up to 120Hz, depending on the game, stood out while playing. I’d take this over the Switch OLED display right now.
The larger Joy-Cons now magnetically snap in and out but have little release buttons on the back. They snap in smoothly and then you eject them with the trigger release and remove them. It’s a smooth action and a lot easier than pressing that small button on the current Switch Joy-Cons. The controllers, although feeling sturdy, have a surprisingly similar feel. The analog sticks felt like existing Joy-Cons and the buttons clicked similarly. I’m bummed that there’s no analog rear trigger.
Instead, these triggers click just like the older Switch — something that the Switch 2’s producers and directors, in a roundtable chat during my New York demo day, said was decided upon because they offer a more immediate response in games. I think it’s a miss because every other console I’ve played has analog triggers and they work well. Putting analog triggers on a Switch 2 would have made previous Switch games feel different on the Switch 2, though, and maybe that’s where the challenge lay.
The C button on the right Joy-Con launches Game Chat, a new mode that allows four-player audio chats with trusted Switch friends (that can be parent-approved). These chats can also become grainy video chats with an optional plug-in camera that can be used with the Switch when docked. Nintendo sells its own stand-like camera for $50 but you could also use a third-party camera (mileage may vary, according to Nintendo).
I didn’t get to try Game Chat during the demo day but I’m curious about how good the audio quality and noise cancellation are. Nintendo says it’s good enough to filter around room noise while talking from across the room. The Switch 2 has a microphone but the Joy-Cons don’t. A new $80 Switch 2 Pro Controller, which feels similar to the previous Switch Pro Controller with two added rear paddle buttons, does have a headphone jack that can be used to connect a microphone-enabled headset.
The new Switch 2 dock has its own fan system and looks chunky. It’ll sit near a TV so you probably won’t mind but it’s a bigger unit than before and, like several accessories, won’t work with the first-gen Switch. It enables 4K gaming modes on TVs, though, so that’s the reason.
There’s a new Switch 2 kickstand, which tilts at a wider range of angles. But it’s made of plastic and feels a bit flimsier than I expected, although it holds its position well. And there are two USB-C ports now — one on top, one on bottom — but it turns out the top port won’t do video-out. Nintendo’s creative team told me at a developer roundtable that there are no plans to support plug-in display glasses such as the Xreal One, a trick the Steam Deck and Windows handhelds can pull off.
I like the way the Switch 2 feels, though. It seems like it’ll be easier to travel with than Windows handhelds and the Steam Deck, which have bulky side grips that add to the system’s case size needs. The Switch 2 rides somewhat flat, although it’s bigger and longer.
OK, at this point, you’re probably saying, «Scott, please, just talk about the games.» So, I played each game in roughly 20-minute sessions as we were shuttled around different stations in the New York exhibition space that will host the public Switch 2 Experience. It’ll work similarly at other Switch 2 Experience locations, too.
Mario Kart World: Open-world Mario Kart madness
I have no idea how big Mario Kart World is. I drove around freely for a few minutes before a race mode started and I madly rambled from a town to a farm to an arena to mountain roads, jumped on train tracks, hopped on a power line and rode it up in the air, knocked down a lot of fences and found some sinister Bowser-ish castle. The newest Mario Kart game, a Switch 2 exclusive and launch title, is clearly the «game to get.» What I love is the sense that this racing game could be as full of surprises as an open-world Mario game.
It’s Grand Theft Mario or Mario Horizon or whatever you want to call it. This open expanse game’s real estate makes it far vaster than existing Mario Karts. But I played two races, mostly. I don’t even remember exactly what the course looked like because I was so busy navigating against 23 other players. The 24-player gameplay is new and, combined with wider, more expansive-feeling tracks, it’s a lot to take in. There are a lot of new characters to choose from — I picked Luigi with a gondolier outfit and later a hamburger-hatted Toad and Donkey Kong with battle armor. There are bikes, cars and all sorts of other familiar vehicles.
A new knockout tournament mode has players racing across multiple tracks in a world-spanning rally to win. You’re eliminated if you’re in the bottom four. I thought I came in first and got way too excited but I was one lap short of the actual end. I came in 16th. Competitiveness in a field full of this many cars reaches total absurdity.
I want to play more. The game looks great and handles like classic Mario Kart but it’s the extras that make me curious.
Donkey Kong Bananza: Showcase for smashing stuff
Nintendo doesn’t have a new 3D Mario game for the Switch 2 yet but Donkey Kong Bananza looks like a solid replacement. It’s the first open-world (sensing a theme here?) Donkey Kong game in years. It’s also a Switch 2 exclusive, coming July 17. Nobody saw this game coming (well, almost nobody) and I liked what I tried.
The game’s biggest mechanic is digging and destroying nearly everything. Donkey Kong can burrow through walls or the ground and, depending on the level, you can burrow far. I started digging into a wall in my first cave-like level, got lost in my tunneling, then burst out again. Some areas have you digging all the way down to new depths, almost like Tears of the Kingdom (but not really). Where does the madness end?
Donkey Kong is full of goofy expressions and enemies look dynamic in a way that feels almost like Sony’s Ratchet and Clank games. It’s a loud and fun action adventure but I have no idea how long the game actually is. It did showcase a lot more particles of stuff flying around than the older Switch has pulled off and the graphics kept a crisp frame rate.
Metroid Prime 4 Beyond: A technical showcase for graphics (and the mouse mode)
My 20 minutes or so with Metroid Prime 4 made me realize how good Switch 2 games could look. Running at 1080p and 120Hz on a big TV, it moved extremely smoothly and was as impressive a shooter as I’ve ever seen on a Nintendo console. From landing on a barren planet to firing through waves of creatures, rolling around in ball mode and losing a tough battle against a big ugly boss, it won me over.
I played on TV mode only, using the Joy-Cons in standard controller mode and then a mouse-and-controller mode. You can put one Joy-Con down at any time and make it a mouse for controlling movement, just like on a PC. I loved the fast reaction feel of it and I also liked that I could just lift my hand up and go back to analog stick controls if I changed my mind midstream.
Switch 2 Welcome Tour: Why isn’t this free?
I was expecting a dose of the weird at Nintendo’s Switch 2 event but this wasn’t it. Still, the idea of a Welcome Tour isn’t bad. Much like Valve’s Aperture Desk Job and the PlayStation 5’s Astro’s Playroom (or several tutorial apps for the Meta Quest), this looks like a guided tour of the Switch 2’s features, complete with insights from Nintendo and mini-games. I played a few, some of which were more like glorified demos at best.
I dodged asteroids using a Joy-Con in mouse mode, played the first level of Super Mario Bros. in pixel-accurate mode on a 4K TV setting to show how much screen real estate is available and played a guessing game for what frame rate a bouncing ball was moving at. One «game» showed me HDR on and off while launching fireworks. The problem is, this is a paid digital game, instead of the freebie it clearly should have been. I can’t understand why this probably helpful system tutorial isn’t just included on the Switch 2 and I never will.
Drag x Drive: Nintendo’s wild-card game
Somewhere between Arms and Rocket League, Drag x Drive is a Switch 2 exclusive that uses the Joy-Cons in mouse mode to control wheelchair-using players in an intense hoop-shooting sports game. Moving each wheel requires pushing one Joy-Con forward and backward. It gets intense fast.
The feeling ends up being a bit like rowing and my arms tired out; you have to keep wheeling around and moving your arms rapidly, pretty much nonstop. One neat thing is you can feel rumbling haptic clicks beneath your controllers as you «wheel,» making it feel more convincing. Racing to the ball, hitting other players and shooting baskets felt as chaotic as a game of Rocket League. I’m not sure if I’ll ever find this game fun to play because of its seemingly high exertion requirements but I enjoyed trying it for a while.
Mario Party Jamboree flexes camera, mouse modes
The most wacky stuff I tried were probably the new mini-games for the Switch 2 update of Mario Party Jamboree, which add mini-games that work with the Joy-Cons’ new mouse features and a game mode that uses the optional plug-in camera.
Bridget Carey and I revved little wind-up cars by pulling back on the Joy-Con mouse and releasing it to launch forward, with vibrating haptics to add clicking feedback. We played air hockey by pushing our Mouse-Cons around the table to hit the Koopa shells flying back and forth. And then we screamed and danced and balanced shells on our heads in camera mini-games that made us look like we were transported into Mario Party, popping out of warp pipes.
The camera-based games were flashbacks to the days when the PlayStation had a TV camera and the Xbox had the Kinect, which both did similar things. It was definitely fun and it makes Mario Party Jamboree even better but I don’t know how much I’d feel compelled to play the new modes long-term.
Updated Switch games look better — for a price
I played a handful of games optimized for the Switch 2, which will be sold in Switch 2 Editions at a higher price or existing game owners can buy a digital upgrade. The upgrades can be free in some cases if you have the Nintendo Switch Online Plus membership, while others will cost you extra, regardless.
Zelda: Breath of the Wild and Tears of the Kingdom, the Switch’s two epic Zeldas, both have Switch 2 upgrades I briefly played. For sure, they look better, with better frame rates. I’d prefer to play them this way but the difference wasn’t massive. The Switch 2 versions also gain compatibility with a new phone app companion called Zelda Notes that we didn’t get to demo.
Kirby and the Forgotten Land has a new story mode and better-looking graphics on Switch 2. I had fun playing a bit of the new storyline, which involved a lot of freezing-up landscapes. Is it worth the upgrade price? Maybe, because it also has some DLC extras.
GameCube Mode … activated!
Nintendo is adding another bonus to the Switch 2 equation with a Nintendo GameCube virtual console library. It’s part of the Switch Online Plus Expansion Pack subscription but Switch owners cannot play those GameCube games.
There are only a few GameCube games expected at the Switch 2 launch but I gave a few a quick play to remind myself of when I played them back in my own GameCube days: Wind Waker and F-Zero GX. Wind Waker is a classic Zelda and I loved F-Zero GX, which was co-developed by Sega. It still feels ridiculously fast. Nintendo’s selling a GameCube wireless controller, which I also tried out. The buttons and sticks feel just like they used to.
Ports of new third-party games: Are they good enough?
Part of the Switch 2’s appeal to other non-Nintendo gamers is its ability to play games that PC, Xbox and PlayStation folks could play but Switch owners couldn’t. Elden Ring, Madden, Cyberpunk 2077 and Split Fiction are some of the biggest newcomers. The performance, from my quick early plays, was a mixed bag. Split Fiction is a hit co-op game that debuted this year and I love it on the Switch but the split-screen gameplay I tried had less than stellar frame rates and graphics quality. It was fun but didn’t look beautiful.
Cyberpunk 2077 shows off sprawling cityscapes but again, on a big TV, it was clearly not as good as what you could get from a PS5 or Xbox. Madden and Elden Ring weren’t there.
I know what playing games like these feels like on handhelds, though. The Steam Deck already has Elden Ring, Split Fiction and Cyberpunk 2077 support. The Switch 2 looks like a strong competitor to the Steam Deck and current Windows gaming handhelds for a wave of third-party games that’ll finally play decently. Still, I’m not sure how much it’ll convince Steam Deck owners or Windows handheld owners as the whole appeal of those systems is they’ll play PC games you already own.
It shows some promise for the Switch 2 being a step up for playing current-gen games but Nintendo didn’t share any details on how powerful the Nvidia processor onboard is. It’s capable of ray tracing and can upscale game graphics but what are the limits?
Verdict for now: The best Switch, but not yet a necessary one
I wanted more from the Switch 2. More surprises, more wow factor. That being said, it looks like easily the best Switch upgrade since 2017. And yet why do I feel like it’s not a must-buy yet? Because the games, as fun as they were, weren’t doing anything totally new. Because Nintendo raised prices for a lot of things, including more expensive games, Switch 2 Edition modes and even that tutorial game. And because, well, the world’s not in a great economic place right now.
I still want one and want to play Nintendo’s new games, though. Nintendo brings joy and unique experiences. In 2025, it’s the biggest thing gaming has. And the improved Steam Deck-ishness of this Switch 2 is slotting right into my recent handheld gaming habits. I can’t wait to try more when it arrives June 5.
Technologies
Today’s Wordle Hints, Answer and Help for April 12, #1758
Here are hints and the answer for today’s Wordle for April 12, No. 1,758.
Looking for the most recent Wordle answer? Click here for today’s Wordle hints, as well as our daily answers and hints for The New York Times Mini Crossword, Connections, Connections: Sports Edition and Strands puzzles.
Today’s Wordle puzzle is a tough one, with a double letter that could throw you off. If you need a new starter word, check out our list of which letters show up the most in English words. If you need hints and the answer, read on.
Read more: New Study Reveals Wordle’s Top 10 Toughest Words of 2025
Today’s Wordle hints
Before we show you today’s Wordle answer, we’ll give you some hints. If you don’t want a spoiler, look away now.
Wordle hint No. 1: Repeats
Today’s Wordle answer has one repeated letter.
Wordle hint No. 2: Vowels
Today’s Wordle answer has two vowels, plus one sometimes vowel.
Wordle hint No. 3: First letter
Today’s Wordle answer begins with A.
Wordle hint No. 4: Last letter
Today’s Wordle answer ends with Y.
Wordle hint No. 5: Meaning
Today’s Wordle answer can refer to a narrow passageway between or behind buildings.
TODAY’S WORDLE ANSWER
Today’s Wordle answer is ALLEY.
Yesterday’s Wordle answer
Yesterday’s Wordle answer, April 11, No. 1757, was PRUDE.
Recent Wordle answers
April 7, No. 1753: DENSE
April 8, No. 1754: INLET
April 9, No. 1755: LADEN
April 10, No. 1756: CAROM
Technologies
Today’s NYT Connections Hints, Answers and Help for April 12, #1036
Here are some hints and the answers for the NYT Connections puzzle for April 12, No. 1,036.

Looking for the most recent Connections answers? Click here for today’s Connections hints, as well as our daily answers and hints for The New York Times Mini Crossword, Wordle, Connections: Sports Edition and Strands puzzles.
Today’s NYT Connections puzzle features a fun mix of categories. The purple one isn’t too hard today, it’s actually a fun one! Read on for clues and today’s Connections answers.
The Times has a Connections Bot, like the one for Wordle. Go there after you play to receive a numeric score and to have the program analyze your answers. Players who are registered with the Times Games section can now nerd out by following their progress, including the number of puzzles completed, win rate, number of times they nabbed a perfect score and their win streak.
Read more: Hints, Tips and Strategies to Help You Win at NYT Connections Every Time
Hints for today’s Connections groups
Here are four hints for the groupings in today’s Connections puzzle, ranked from the easiest yellow group to the tough (and sometimes bizarre) purple group.
Yellow group hint: Clothing element.
Green group hint: Viewpoint or outlook.
Blue group hint: Send out from something.
Purple group hint: Barbie is one.
Answers for today’s Connections groups
Yellow group: Pants features.
Green group: Perspective.
Blue group: Emit.
Purple group: ____ doll.
Read more: Wordle Cheat Sheet: Here Are the Most Popular Letters Used in English Words
What are today’s Connections answers?
The yellow words in today’s Connections
The theme is pants features. The four answers are belt loop, cuff, fly and pocket.
The green words in today’s Connections
The theme is perspective. The four answers are angle, position, stance and take.
The blue words in today’s Connections
The theme is emit. The four answers are cast, project, radiate and shed.
The purple words in today’s Connections
The theme is ____ doll. The four answers are paper, rag, Russian and troll.
Technologies
Watch a Robot Stuff Cash Into a Wallet Just Like You Do
Generalist AI’s Gen-1 model is all about «teaching robots physical common sense.»
In 2026, we’re seeing robots progress by leaps and bounds with markedly improved dexterity, the kind of progress long needed in the quest for truly useful household helpers. Now a new AI model has arrived to power robots through activities, including folding laundry, constructing boxes, fixing other robots and even filling wallets with flimsy paper money.
Earlier this month, California-based company Generalist AI released Gen-1, a new physical AI model that makes robots capable of performing all of these tasks (and more) with success. It’s a big step forward in terms of robots designed for the real world based on intelligence born from the real world, Pete Florence, co-founder and CEO of Generalist AI told me.
In most of the example videos published by the company, Gen-1 is seen running on a pair of robotic arms, but that’s not all it’s built for. «Gen-1 is designed to be the brain of any robot, meaning the same model can run on a humanoid, an industrial arm or other robotic systems,» said Florence.
Already, this has proved to be a breakthrough year for general-purpose humanoid robots, with companies including Boston Dynamics and Honor unveiling cutting-edge bots capable of uncannily humanlike movements. The market for robots is expected to explode, with one estimate from Morgan Stanley predicting growth to a $5 trillion market by 2050. Predictions see robots coming for industry, retail, hospitality and care environments before eventually landing in our homes. To get us there, we need to see further advances in AI.
Training robots to live alongside humans
Over the past few years we’ve seen large language models, such as ChatGPT, Gemini and Claude, evolve at lightning speed. The same hasn’t been true of the physical AI models required to power robots, in large part because of a lack of data to train those models on. Robots — and especially humanoid robots — must learn to navigate a world built for humans just as a human would.
Often this data is collected from robots performing tasks while being teleoperated by humans, but not Gen-1. Instead, the dataset used to train Generalist AI’s models has been assembled by humans completing millions of different tasks using wearable technology.
«We built our own lightweight ‘data hands’ and distributed them globally to learn how people actually interact with objects, with all the subtle force feedback, tactile feel, slips, corrections and recoveries that define human dexterity in the real world,» said Florence. «That kind of data is critical for teaching robots physical common sense, the intuitive understanding and ability to adapt in real time rather than execute rigid instructions.»
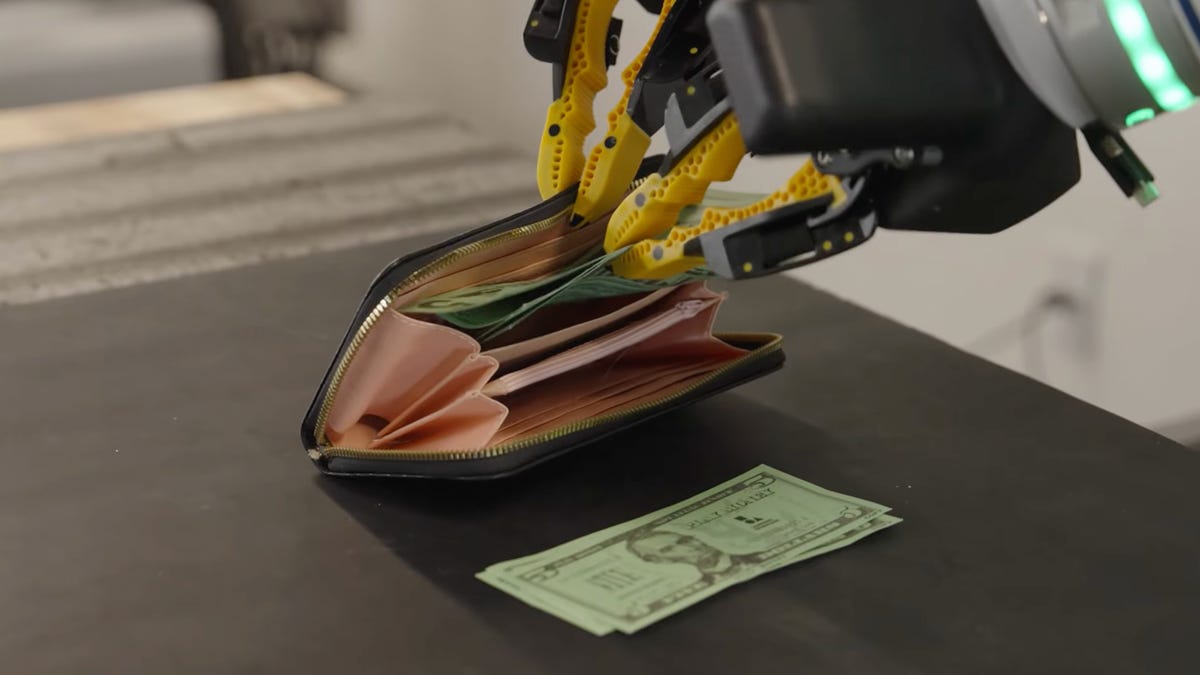
Generalist AI has released a series of videos showing the model running on robots repetitively performing a range of different tasks, with the most compelling, perhaps, being a robot drawing cash out of a wallet before reinserting it into the same pocket. This is a fiddly task that many humans fumble over. It’s clearly not easy for the robot, either, given the flimsiness of the paper money and the fabric of the wallet — and yet it completes the task.
Another video shows a robot sorting socks by color, folding them in neat piles and counting the number of pairs using a touchscreen. Other tricky tasks the model can complete include unzipping and filling a pencil case with pens, stacking oranges in a neat pyramid and plugging in an Ethernet cable.
These videos show the breadth of Gen-1’s capabilities, but more impressive is the success rate with which it can complete certain tasks. Generalist AI measured the model’s hit rate against the previous version and found Gen-1 could successfully service a robot vacuum cleaner in 99% of cases (up from 50% for Gen-0), fold boxes in 99% of cases (up from 81% for Gen-0) and package up phones in 99% of cases (up from 62% for Gen-0).
Robots do improv
Most robots are programmed to complete a task in a specific and orderly way. But what happens when a curve ball gets thrown? «The smallest changes in the environment can cause failures,» said Florence.
An important skill robots need, which humans innately possess, is the ability to think on their feet. This is why Gen-1 has been designed with improvisation in mind so it can come up with strategies to complete tasks. Florence gives me an example of a robot using two hands to reposition an awkwardly placed part for an automotive task, even though it has only been trained to use one.
«This kind of creativity has been largely absent from robotics until now,» he said.
Significant work still needs to be done when it comes to beefing up robots’ improv chops, but early progress show glimpses of a positive impact on both reliability and speed, says Florence. «We’re beginning to see real progress and are excited to push the boundaries of embodied intelligence.»
After all, there may come a day when you need a robot in your house that can fix all your other smaller robots.
-
 Technologies3 года ago
Tech Companies Need to Be Held Accountable for Security, Experts Say
-
 Technologies3 года ago
Best Handheld Game Console in 2023
-
 Technologies3 года ago
Tighten Up Your VR Game With the Best Head Straps for Quest 2
-
 Technologies4 года ago
Black Friday 2021: The best deals on TVs, headphones, kitchenware, and more
-
 Technologies5 лет ago
Google to require vaccinations as Silicon Valley rethinks return-to-office policies
-
 Technologies5 лет ago
Verum, Wickr and Threema: next generation secured messengers
-
 Technologies4 года ago
Olivia Harlan Dekker for Verum Messenger
-
 Technologies4 года ago
The number of Сrypto Bank customers increased by 10% in five days