Technologies
Google Pixel 8 Review: ‘Best Take’ Levels Up AI-Enhanced Photos
The AI integration and redefined design is the main attraction. However, keep in mind that not all functions work flawlessly despite the higher price.
The Google Pixel 8 is unlike any other phone you can buy today. After testing it for nearly a week, I realized that the Pixel 8 and its AI features offer an early glimpse at how photography, calling and even our phone’s wallpaper could evolve. I wouldn’t run out and buy a Pixel 8 today solely because of these features, but it certainly shows how AI will continue to be integrated into our daily lives.
For example, there’s a feature called Best Take (which I keep calling Face Swap) that works when taking a few consecutive photos of a person or group of people. After taking the photos, I can pull up a face and head editor (my term, not Google’s) in Google Photos and swap out a person’s head with a different version from another image from the series to get their best facial expression. The result is a photo where everyone’s eyes are open and smiling, if that’s what you want.
Philosophically, this photo doesn’t actually exist because the moment never happened. And yet, here it is.

At first, Best Take creeped me out. But after applying it to a variety of photos of friends and coworkers, I think it’s incredible and works remarkably well. I can’t see any lines where the heads were swapped. (Yep, I actually wrote that.) And I still can’t fully get my head around the possibilities that Best Take opens up. It’s the start of a path where our photography can be even more curated and polished, even if the photos we take don’t start out that way.
Will Best Take make us more vain by giving us another tool to present a seemingly ideal version of ourselves online? Or should I just enjoy that I can have a nice photo where my friends look their best at that possible moment? I’m still conflicted.

Starting at $699 (£699, AU$1,199) the Google Pixel 8 is an ideal phone for most people. And even if you aren’t interested in the AI features (and there are a lot of them), the Pixel 8’s updated design, display and cameras make it one of the best non-Pro Google phones. The higher price seems worth it and makes you realize just how incredibly affordable the Pixel 6 and 7 were.
The Pixel 8 is smaller, lighter and brighter
The Pixel 8 is like a svelte version of the Pixel 7. It’s shorter and less wide, although it’s actually 0.2 millimeters thicker. It weighs 10 grams less than the Pixel 7. Combine all that with the fact that nearly every edge is rounded over, and you’ll find, like me, that the Pixel 8 is incredibly comfortable to hold, with or without a case.
My review unit is the rose color, which in most lighting looks peach.
The screen is smaller, but so are the bezels around it. The 6.2-inch display now has a 60 to 120Hz variable refresh rate for smoother scrolling and a higher max brightness. It’s easy to see under bright sunlight, especially compared with the Pixel 7 and 7A, which look dim by comparison. Watching films, playing games or just admiring mundane Android 14 animations were all enjoyable on the Pixel 8’s screen.
The back is still defined by that wide camera bar, which I like. Overall, the Pixel 8 looks dapper and almost chic.
The Pixel 8 has a new main camera sensor
The Camera app has a slight redesign. There are two icons at the bottom: a photo camera and a video camera. When I tap on the photo camera, all the modes under the viewfinder change to photo-centric ones like portrait mode and long exposure mode. And when I tap on the video camera symbol, the modes become specific for video like slow motion. It took about a day to get used to this change, but I’m a fan of the new layout.
Also, the Pixel 8 has a new macro focus feature that kicks in when the phone’s main camera is within centimeters of a subject. I like this addition and found it useful for food and coffee snaps, where I want to get close enough for the cup or plate to fill the frame while remaining in focus.


The 12-megapixel ultrawide camera is the same as the one on previous Pixel models. The 50-megapixel main camera has a new sensor that Google claims can collect 21% more light. The front-facing camera is also new, but still only has fixed focus on the Pixel 8 – compared with the Pixel 8 Pro’s front-facing autofocus camera.
Take a look below at some of my favorite photos that I took with the Pixel 8.


Does the Pixel 8 take better photos than the Pixel 7? Yes. But they’re not dramatically different. Check out the photos below of the Manhattan Bridge. Both look great.
But if I punch in on where the main upright section intersects with the deck, you can see that the Pixel 8’s image below has more detail and sharpness. Notice the individual rivets on the metal uprights compared to the Pixel 7’s photo, where most of them don’t show up.
The Pixel 8 is defined by its camera AI tools
The Pixel 8’s AI features like Best Take steal the show when it comes to the camera. By the way, Best Take not only works on photos taken with the phone, but any photos in your Google Photos library on your Pixel 8. I used Best Take to swap out faces in photos I took on the iPhone 15 Pro and Pro Max as part of my review last month.
Best Take only works on a series of photos in a sequence. So you can’t take a photo of yourself at 40 and replace your head with one from a photo of when you were in your 20s. Also, the feature works only on people. But I can almost hear Google’s SVP for devices and services, Rich Osterloh, say at the Pixel 9 or Pixel 10 launch, «we heard you and we now offer Best Take for pets.» Applause and cheers!
Remember the Magic Eraser that debuted on the Pixel 6 that lets you remove a distraction from your photo like someone in the background? Now there’s Magic Editor on the Pixel 8 and 8 Pro, which lets you do even more. It can remove someone from the background or even move your photo’s subject and resize it. I replaced the sky, ground and even the entire background in some photos. Basically, if you see someone jumping abnormally high in a photo taken on a Pixel 8, beware: that person may have used the Magic Editor to exaggerate things.
For example, below is a photo I took of CNET’s Tara Brown and Theo Liggians jumping off a rock. I used the Magic Eraser, which has been around for a couple of years, to remove the rock. It’s obvious something was altered.

Below is the same photo after I used the new Magic Editor. It’s not perfect, but it’s an improvement over the Magic Eraser photo.

But why stop there? I tried the Magic Editor a second time and replaced the actual zigzag tiled ground and artificial turf with one entirely made of bricks. This obscured the shadow left from the rock and made everything look more uniform. I have no idea where the Pixel 8 came up with the replacement ground since there weren’t any bricks in the actual surface and that’s one of the downsides to using AI this way.

A majority of the time, Magic Editor generations took a matter of seconds. It didn’t feel like I waited long. But there were a couple of times where it took 10 seconds and another one time where I had to close the Google Photos app because it seemed stuck. Best Take feels like a more mature feature than Magic Editor which still has an experimental vibe to it.


The Magic Editor is a lot of fun, and I truly believe it adds another level of creativity to phone photography. But it does so while raising ethical questions around image manipulation. Fortunately, Magic Editor-generated photos have flaws, or at least the majority of the photos that I used it on did. I can usually spot the differences between photos I applied it on versus unedited images. The way the AI tries to fill in the background usually results in something looking off. But not everyone may be as photo-savvy as me, and I imagine that Google will keep refining the AI behind it to a point where it’s hard to tell the difference between an altered photo and an unedited one.


There’s one more AI-powered camera tool called Audio Magic Eraser, which can clean up audio in recorded videos for better clarity. It removes distracting background noise or music that might interfere with your video’s audio. Watch the review video that accompanies this article to see examples of it before and after, with and without the Audio Magic Eraser applied.
Using the tool was easy enough. However, the live preview didn’t reflect the changes to the audio that I made, which seems like a bug. I had to save a copy of the edited video to hear the difference Audio Magic Eraser made – which was impressive.
Taken in total, the Pixel 8 has an outstanding camera system with a lot of features you just don’t find on the more expensive iPhone 15 and Galaxy S23. It’s fascinating to see Google, who has an excellent reputation when it comes to getting the best images out of a phone camera, still be able to match the likes of Apple and Samsung all while leaning heavily into these hit-or-miss AI camera features.
My CNET colleague Andrew Lanxon, who is reviewing the Pixel 8 Pro, wasn’t as enamored with Best Take as I was.
Pixel 8 performance and battery
Google’s Tensor chip has never been about pure horsepower. Instead, it targets optimizing specific tasks and powering all those AI capabilities mentioned earlier. And that’s the case for the Pixel 8’s Tensor G3 chip. During my six days with the phone, I never ran into any performance issues. When I was downloading Genshin Impact and PUBG Mobile and setting them up, the Pixel 8 did get very warm. But that was the only time I noticed this happen.
The G3 chip along with Android 14 makes the Pixel 8 a delight to use. There’s Face Unlock, which is once again secure enough to use for contactless payments, even without the Pixel 4’s fancy radar sensor. There are strange non-camera AI features like AI Wallpaper that creates an original wallpaper for your home screen based on MadLibs-style prompts. You can’t enter your own words and are limited to a list of words for each entry. I can also use Google Assistant to read articles aloud, and there’s a summarize feature that I never got to work. Anytime I asked the Assistant to summarize a story I’m met with the message, «Sorry I can’t summarize on this device yet.»
Call Screen debuted on the 2018 Pixel 3 and lets the Google Assistant answer a call while you listen in. On the Pixel 8, the Call Screen’s voice sounds like an actual human. I can’t tell if it’s fake or a recording of an actual human voice, which shows you how far Google has pushed this technology over the past five years.
The Pixel 8 has a slightly bigger battery than last year’s Pixel 7. Over the six days, the Pixel 8 had no problem making it through a full day on a single charge. I’m still working on running CNET’s arsenal of battery life tests and performance benchmarks, so check back soon for the results.
Final word on the Pixel 8
The two biggest changes to the Pixel 8 don’t have anything to do with the physical phone. The first is the price. The Pixel 8 costs $699, which is $100 more than the Pixel 6 and 7’s launch prices. But the updates you get, like the refined design, new display and main camera improvements, are worth it. And the Pixel 8’s higher price is more reflective of just how ridiculously affordable Google priced the Pixel 6 and 7 compared with other major smartphone makers at the time. Outside the US, the Pixel 8’s price increase might be steeper.
The other big feature is software support. The Pixel 8 will receive seven years of OS support, which is longer than most Android phones. But the Fairphone 5 takes the crown with 8 years of support. Will the Pixel 8 survive until 2030? Maybe? I don’t know.
But in that spirit, I casually polled some of my CNET colleagues over Slack to ask them what was the longest amount of time they owned a phone. Most kept their phones for less than 5 years, but a few of my coworkers had nearly 6-year-old phones like the iPhone 8 and Galaxy Note 8. So perhaps there is an audience for this benefit.
I recommend the Pixel 8 to anyone coming from a Pixel 6A or older, or any phone that’s at least three years old. If you’re trying to decide between the Pixel 7A and Pixel 8, know that the Pixel 8 is better in nearly every way but does cost $200 more. And in terms of the Pixel 8 and 8 Pro, you get 85% of that Pixel 8 Pro experience on the regular Pixel 8. The Pixel 8 Pro has a nicer screen, a new higher resolution ultra wide camera, more RAM and a dedicated 5x telephoto camera, all of which the Pixel 8 lacks. The Pixel 8 Pro also has more camera tools, like video boost, compared to the Pixel 8.
With the Pixel 8’s launch, Google’s current lineup has a phone for every budget: $499 for the Pixel 7A, $699 for the Pixel 8, $999 for the Pixel 8 Pro and $1,799 for the Pixel Fold. The Pixel 8 isn’t Google’s most affordable device, but it’s a phone most people should consider. Its AI features, reasonable price and seven years of software support help it stand out among its Pixel siblings.
Google Pixel 8 specs vs. Pixel 8 Pro, Pixel 7A, Pixel 7
| Google Pixel 8 | Google Pixel 8 Pro | Google Pixel 7A | Google Pixel 7 | |
| Display size, tech, resolution, refresh rate, brightness | 6.2-inch OLED; 2,400×1,080 pixels; 60-120Hz adaptive refresh rate | 6.7-inch OLED; 3,120×1,440 pixels; 1-120Hz adaptive refresh rate | 6.1-inch OLED; 2,400×1,080 pixels; 60 or 90Hz variable refresh rate | 6.3-inch OLED display,FHD+ (1080 x 2400 pixels) , 90Hz |
| Pixel density | 428 ppi | 489 ppi | 361 ppi | 416 ppi |
| Dimensions (inches) | 5.9 x 2.8 x 0.4 in | 6.4 x 3.0 x 0.3 in | 6.00 x 2.87 x 0.35 in | 6.13 x 2.88 x 0.34 in |
| Dimensions (millimeters) | 150.5 x 70.8 x 8.9 mm | 162.6 x 76.5 x 8.8 mm | 152 x 73 x 9.0 mm | 155.6 x 73.2 x 8.7 mm |
| Weight (grams, ounces) | 187 g (6.6 oz) | 213 g (7.5 oz) | 193 g (6.81 oz) | 197 g (6.9 oz) |
| Mobile software | Android 14 | Android 14 | Android 13 | Android 13 |
| Camera | 50-megapixel (wide), 12-megapixel (ultrawide) | 50-megapixel (wide), 48-megapixel (ultrawide), 48-megapixel (telephoto) | 64-megapixel (main), 13-megapixel (ultrawide) | 50-megapixel (wide), 12-megapixel (ultrawide), |
| Front-facing camera | 10.5-megapixel | 10.5-megapixel | 13-megapixel | 10.8-megapixel |
| Video capture | 4K | 4K | 4K | 4K |
| Processor | Google Tensor G3 | Google Tensor G3 | Google Tensor G2 | Google Tensor G2 |
| Storage and RAM | 8GB + 128GB, 256GB | 12GB RAM + 128GB, 256GB, 512GB, 1TB | 8GB + 128GB | 8GB + 128GB, 256 GB, |
| Expandable storage | None | None | None | None |
| Battery | 4,575 mAh | 5,050 mAh | 4,385 mAh | 4,355 mAh |
| Fingerprint sensor | Under display | Under display | Side | Under display |
| Connector | USB-C | USB-C | USB-C | USB-C |
| Headphone jack | None | None | None | None |
| Special features | 5G (Sub 6, mmWave); VPN by Google One; 7 years of OS, security and Feature Drop updates; front-facing camera has autofocus; 13W Qi wireless charging; 30W wired charging; USB-3.2 speeds via USB-C; IP68 dust and water resistance; Gorilla Glass Victus 2 on front and back | 5G (Sub 6 and mmWave); VPN by Google One; 7 years of OS, security and Feature Drop updates; front-facing camera has autofocus; 13W Qi wireless charging; 30W wired charging; USB-3.2 speeds via USB-C; IP68 dust and water resistance; Gorilla Glass Victus 2 on front and back | 5G (Sub6, mmWave); IP67 rating; 18W fast charging; 7.5W wireless charging | 5G, Magic Eraser, Photo Unblur, Real Tone, Face Unblur, Long Exposure Mode, Action Pan; Hold For Me, Wait Times, Direct My Call Live Translate |
| US price off-contract | $699 (128GB) | $999 (128GB) | $499 (128GB) | $600 (128GB) |
| UK price | £699 (128GB) | £999 (128GB) | £449 (128GB) | £599 (128GB) |
| Australia price | AU$1,199 (128GB) | AU$1,699 (128GB) | AU$749 (128GB) | AU$999 (128GB) |
How we test phones
Every phone tested by CNET’s reviews team was actually used in the real world. We test a phone’s features, play games and take photos. We examine the display to see if it’s bright, sharp and vibrant. We analyze the design and build to see how it is to hold and whether it has an IP-rating for water-resistance. We push the processor’s performance to the extremes using both standardized benchmark tools like GeekBench and 3DMark, along with our own anecdotal observations navigating the interface, recording high-resolution videos and playing graphically intense games at high refresh rates.
All the cameras are tested in a variety of conditions from bright sunlight to dark indoor scenes. We try out special features like night mode and portrait mode and compare our findings against similarly priced competing phones. We also check out the battery life by using it daily as well as running a series of battery drain tests.
We take into account additional features like support for 5G, satellite connectivity, fingerprint and face sensors, stylus support, fast charging speeds, foldable displays among others that can be useful. And we of course balance all of this against the price to give you the verdict on whether that phone, whatever price it is, actually represents good value. While these tests may not always be reflected in CNET’s initial review, we conduct follow-up and long-term testing in most circumstances.
Technologies
Google Upgrades Maps Features With More Gemini and Faster Photo Uploads
Google Maps strengthens its crowdsourcing efforts for its 500 million contributors.
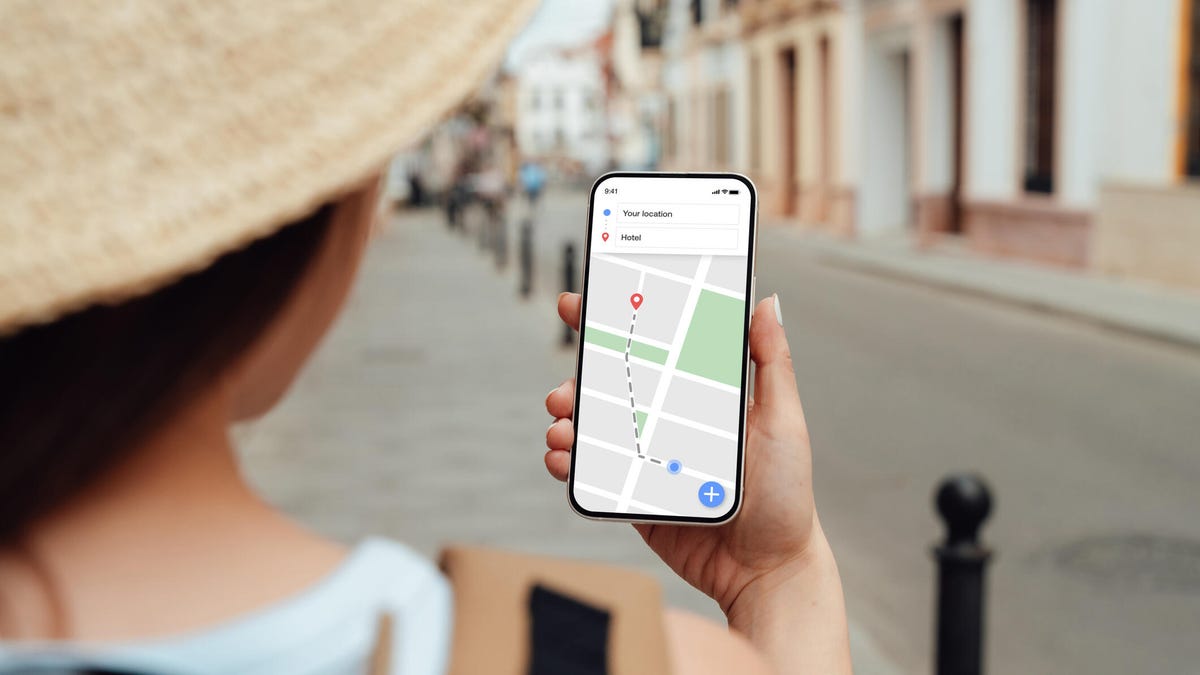
Google announced three new features for Maps on Tuesday that should streamline sharing your experiences. Despite being a strong maps application itself, Google relies on everyday users to contribute their reviews, photos and videos so others doing research can make more informed decisions about places they plan to visit. With the new updates to Google Maps, you can access your photos faster to contribute to information about places you’ve been. You can also choose to have Google’s AI model, Gemini, caption your photos and more quickly check the contributions you’ve made in the past.
New photo and video recommendations
It’s not hard to share photos or videos for a location on Google Maps, but the app will now offer photo and video suggestions from your saved images — if you give it permission to do so. The new feature will appear on the Contribute tab at the bottom of the maps app. When scrolling through the view, you’ll see photo and video recommendations or the option to upload other photos.
How the specific photo and video recommendations are determined isn’t clear, but the new feature will likely use a photo’s geolocation if that setting is enabled in your camera’s settings.
A Google representative didn’t immediately respond to a request for comment.
This feature is now available globally on Android and will expand to iOS in the coming months.
Gemini will auto-caption your photos
Google’s giving your photos some Gemini power by automatically analyzing and captioning them once you’ve selected them to share. This could be helpful in situations where you have selected several photos you don’t care to caption.
If you don’t like what Gemini comes up with, you can edit or remove the caption completely before publishing your photos to Maps.
Gemini captions are available in English on iOS and will expand to other languages globally and Android in the future.
New ways to view your contributions
You can now show off your prior contributions to Google’s Local Guide community program.
When you contribute, you gain points, and the more you contribute, the more you can level up as a Local Guide. All your points and badges are now prominently displayed on your profile. Google’s also adding gold profiles for high-level contributors, so you know you’re reading reviews from experienced users.
The new contributor updates are rolling out now on Android, iOS and desktop.
Technologies
This New Health-Tracking Pet Collar Is Like a Smartwatch for Dogs and Cats
Tractive announces two new smart collars armed with GPS tracking, AI-powered health monitoring and other tech tools.
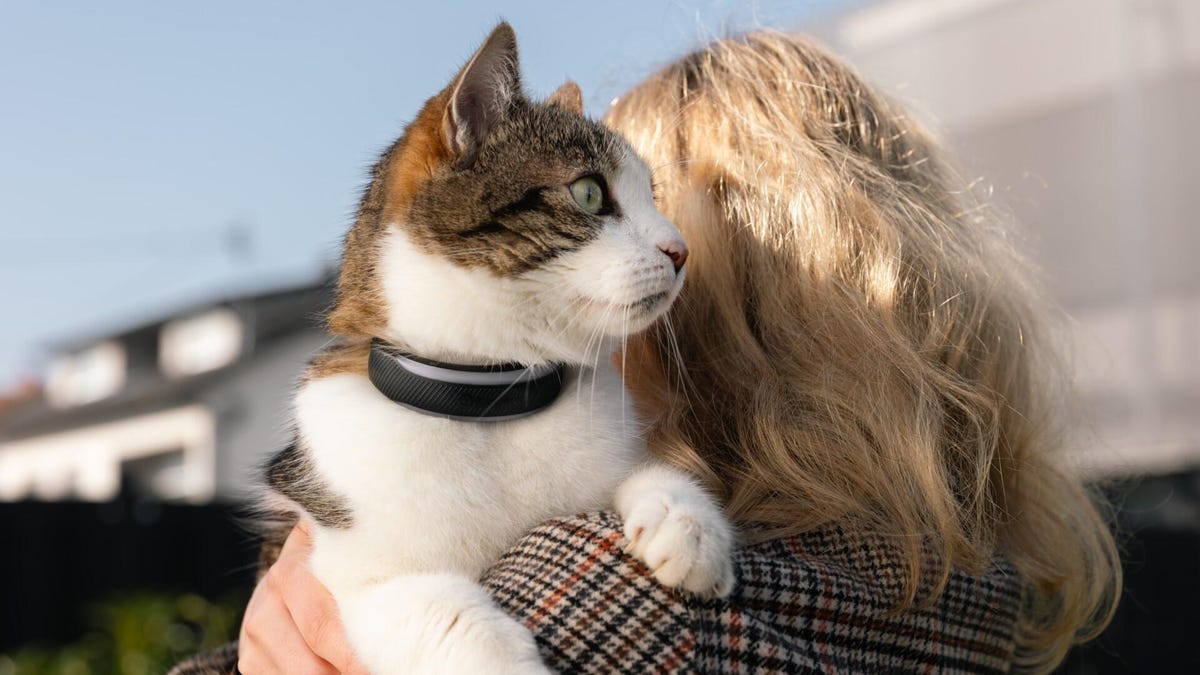
Our pets can’t speak up and tell us how they’re feeling, or why and where they are hiding. Tractive, an Austria- and Seattle-based tech company that creates GPS tracking devices for pets, announced on Wednesday two new smart collars that, according to the press release, «will redefine pet care for millions of families.»
Is your pet stressed, breathing unusually or scratching too much? Much like the basic health-tracking features you can find on a smartwatch, the collars — the Cat 6 Mini ($79) and Dog 6 XL ($89) — are designed to track this behavior and communicate the issues to help maintain your dog or cat’s quality of life.
«Pets can’t tell us when something is wrong, but their bodies can,» Michael Hurnaus, CEO and founder of Tractive, said in a statement. «With cutting-edge sensors on every tracker, learnings from millions of pets and AI-powered insights, we’re turning one of the world’s largest pet data platforms into clear, simple information so pet parents can act sooner and care even better.»
When it comes to tracking collars, dogs have usually been the target pet audience for such devices. Tractive’s new Cat 6 Mini collar aims to provide the same service for your feline friend. You can use it to monitor your cat’s respiratory rate and resting heart rate and identify any health concerns early. It’s expected to ship on May 31.
The Dog 6 XL collar, an upgrade from the company’s previous dog wearable, is designed for dogs weighing over 55 pounds. It’s more durable for outdoor use and offers up to four weeks of battery life between charges. It comes equipped with a scratch-monitoring system that flags unusual scratching behavior caused by allergies, skin irritants and other stressors.
You can also use the app to access your pet’s travels and mark safe zones regarding walks, entries and exits. An AI-powered health hub displays your pet’s overall health stats and also acts as a GPS tracker in case your dog or cat goes missing.
How would a veterinarian interact with the data collected on the device?
A Tractive representative told CNET, «In our experience, veterinarians are most interested in baseline resting heart and respiratory rate, so it’s less about monitoring these vitals in real time during recovery from anesthesia/acute care and more about understanding if the baseline is changing day to day to identify the onset of new conditions or manage existing ones.»
Even though the collars use a SIM card and require a strong cellular connection to work properly, they can capture activity, sleep and health data while offline. However, without connectivity, the devices «ultimately will not provide any utility,» the representative confirmed.
You’ll need to download the accompanying app and select a separate subscription plan at an added cost. The one-year plan costs $120, the two-year plan costs $168, and the five-year plan costs $300.
Technologies
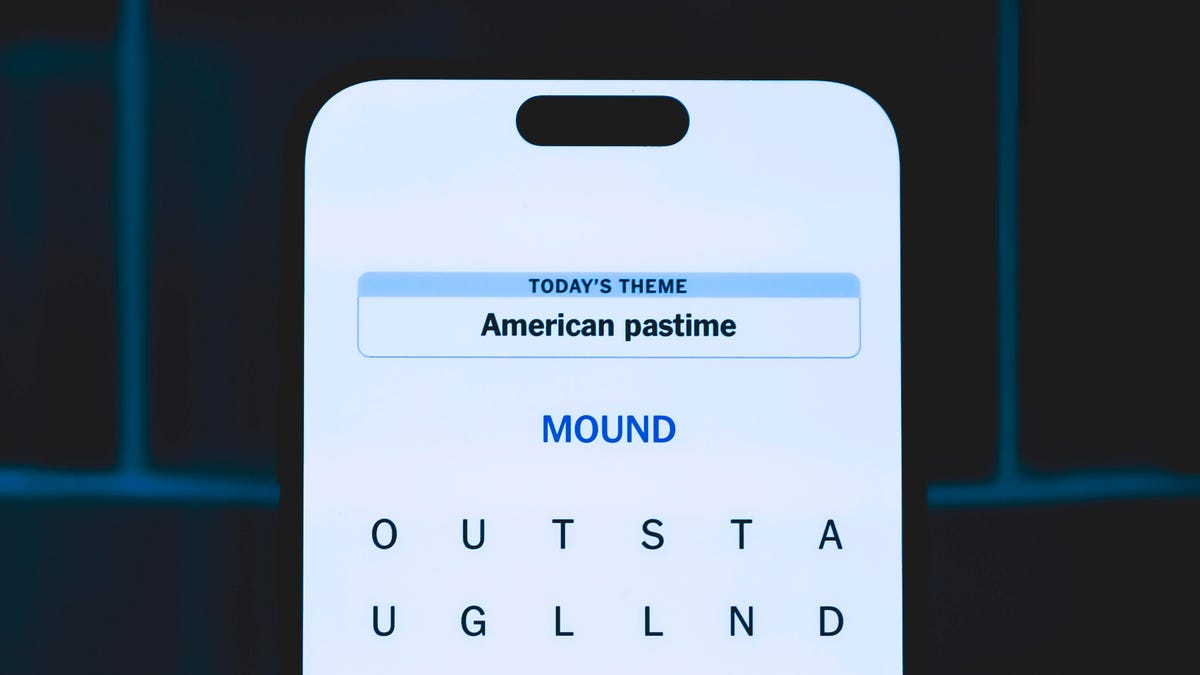
Today’s NYT Strands Hints, Answers and Help for April 9 #767
Here are hints and answers for the NYT Strands puzzle for April 9, No. 767.
Looking for the most recent Strands answer? Click here for our daily Strands hints, as well as our daily answers and hints for The New York Times Mini Crossword, Wordle, Connections and Connections: Sports Edition puzzles.
Today’s NYT Strands puzzle could be tough, unless you’re an artist. Even then, some of the answers are difficult to unscramble, so if you need hints and answers, read on.
I go into depth about the rules for Strands in this story.
If you’re looking for today’s Wordle, Connections and Mini Crossword answers, you can visit CNET’s NYT puzzle hints page.
Read more: NYT Connections Turns 1: These Are the 5 Toughest Puzzles So Far
Hint for today’s Strands puzzle
Today’s Strands theme is: In the paint.
If that doesn’t help you, here’s a clue: Hand me a brush.
Clue words to unlock in-game hints
Your goal is to find hidden words that fit the puzzle’s theme. If you’re stuck, find any words you can. Every time you find three words of four letters or more, Strands will reveal one of the theme words. These are the words I used to get those hints but any words of four or more letters that you find will work:
- COME, PATS, SPAT, SLOE, MEAN, LEAN, MANE, RATE, PEER, LATE, RATER
Answers for today’s Strands puzzle
These are the answers that tie into the theme. The goal of the puzzle is to find them all, including the spangram, a theme word that reaches from one side of the puzzle to the other. When you have all of them (I originally thought there were always eight but learned that the number can vary), every letter on the board will be used. Here are the nonspangram answers:
- FRESCO, PASTEL, ENAMEL, ACRYLIC, TEMPERA, WATERCOLOR
Today’s Strands spangram
Today’s Strands spangram is MEDIUM, the art term! To find it, start with the M that’s four letters down on the far-left vertical row, and travel straight across.
-
 Technologies3 года ago
Tech Companies Need to Be Held Accountable for Security, Experts Say
-
 Technologies3 года ago
Best Handheld Game Console in 2023
-
 Technologies3 года ago
Tighten Up Your VR Game With the Best Head Straps for Quest 2
-
 Technologies4 года ago
Black Friday 2021: The best deals on TVs, headphones, kitchenware, and more
-
 Technologies5 лет ago
Google to require vaccinations as Silicon Valley rethinks return-to-office policies
-
 Technologies5 лет ago
Verum, Wickr and Threema: next generation secured messengers
-
 Technologies4 года ago
Olivia Harlan Dekker for Verum Messenger
-
 Technologies4 года ago
The number of Сrypto Bank customers increased by 10% in five days