Technologies
10 Essential Mac Hacks
Make life easier with these Mac shortcuts and hidden features.

If you’re one of the millions of Mac users, you’ve probably come across a few Mac features that have surprised you. According to the digital inclusion consultancy Digital Unite, macOS is considered easier to use than other operating systems such as Windows and Linux. Despite macOS’s ease of use, there are plenty of hidden features in the operating system that Mac users might not know about, like taking a screen recording on your Mac without additional software.
Here are 10 Mac features, tips and tricks you don’t want to miss out on.
Use Split View
Split View lets you have two apps running side-by-side on one Mac screen without having to resize either window. This saves you from switching between apps and losing your place if you’re working in two different programs.
Here’s how to enable and turn off Split View.
1. Open two apps and place them on opposite sides of the screen.
2. In the top left corner of one app’s window, hover over, or click, the green bubble to open a dropdown menu.
3. Select either Tile Window to the Left of Screen or Tile Window to the Right of Screen. That app will fill that side of the screen.
4. Click the other app on the opposite side of the screen for the app to fill the remainder of the screen.
To exit Split View, click the green bubble again or press Esc on your keyboard. This only exits one app from Split View — the other app will now be in full screen mode on its own Desktop.
Force quit with Option
If an app on your Mac has frozen or isn’t working properly, you can use the Option key to quickly force quit the app. Press and hold Option, then in the dock across the bottom of your screen click with two fingers the app causing you issues. Then click Force Quit to shut down the malfunctioning app.
Use Spotlight for conversions and simple math

Spotlight can make conversions and solve simple math problems.
Screenshot by Zach McAuliffe/CNETYou can use your Mac’s built-in Spotlight feature to perform searches as well as conversions or do simple math. To open Spotlight, press Command + space bar or click the magnifying glass icon in the top right corner of your screen in the menu bar. Then, type in a math problem or what you want to convert — like gallons to liters — and Spotlight will do the rest. No Google needed.
Try different shortcuts to take a screenshot
Screenshots are an easy way to maintain receipts for digital purchases or have extra copies of tickets for flights or sports games. On a Mac, there are a few different shortcuts to take screenshots.
Pressing Command + Shift + 3 takes a screenshot of your entire screen. This is a useful way to screenshot a video quickly so you don’t miss a frame.
Press Command + Shift + 4 turns your mouse into a crosshair. This lets you click and drag the frame for your screenshot part of your screen or an app’s window.
If you press Command + Shift + 4 and then press your space bar, your mouse turns into a camera icon and it can take screenshots of the window, application or other element your mouse is over. When your mouse is over a specific element for a screenshot, that element will have a light-blue filter over it to show it’s being selected. Taking a screenshot this way also makes the screenshot look cleaner and gives it a nice shadow.
Taking a screenshot of a window makes the image appear cleaner.
Screenshot by Zach McAuliffe/CNETEasily take a screen recording
Sometimes people learn better by watching a video than reading instructions. In these instances, taking a screen recording is better than any detailed list you might write.
Press Command + Shift + 5, then in the toolbar that appears near the bottom of your screen, click either of the icons highlighted below. The icon with the dashed border on the right will allow you to set a border to what you’re recording, and the icon on the left will record your whole screen. When you’ve selected which you want to use, click Record. To stop recording, click the Stop icon in your Menu bar across the top of your screen, or you can press Command + Control + Esc.

These two icons enable screen recording on Macs.
Zach McAuliffe/CNETSave screenshots and recordings in a different location
Screenshots and recordings save to your desktop by default, and they can quickly clutter your workspace. But you can choose a new location to save these files so you can keep your desktop nice and tidy. Here’s how.
1. Press Command + Shift + 5.
2. Click Options.
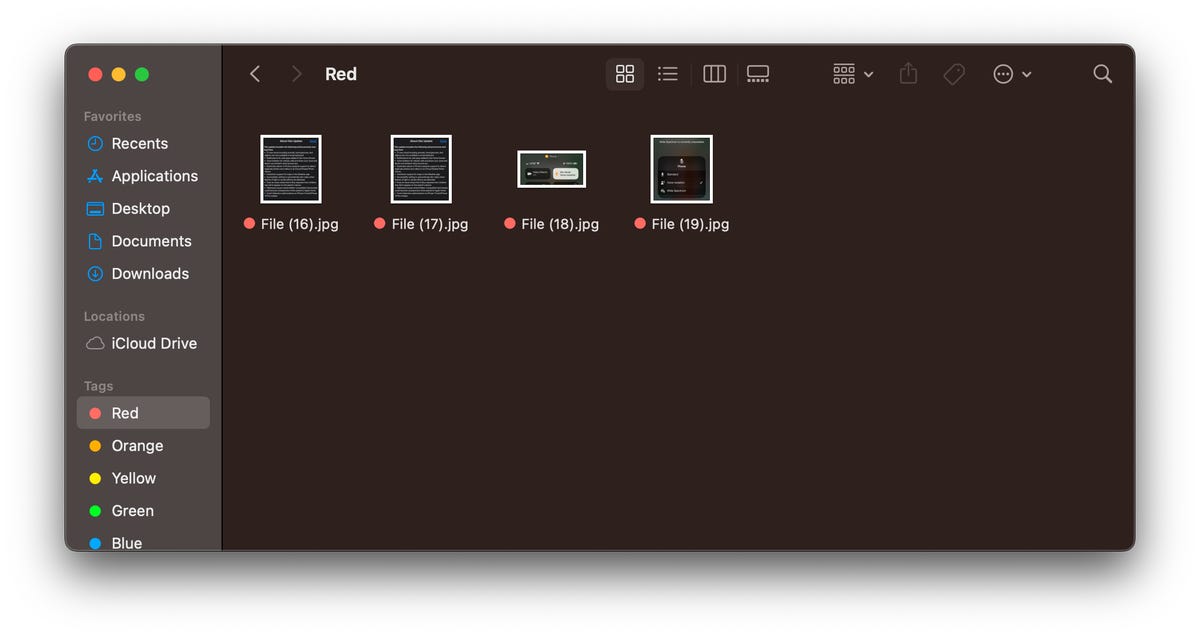
3. Under Save to, click one of the preselected destinations, like Documents or Messages, or Other Location to save your screenshot and recordings somewhere else, like a specific folder.
Easily preview files
If all your files in Finder or on your Desktop are named something similar or look the same, you can preview your content without opening them. Click a file once and then press your spacebar. Your file is now viewable without opening the Preview app. To close the file, press your spacebar again.
You can also quickly view and exit a file by selecting a file, holding the spacebar to preview it and then releasing the spacebar.
Copy text while previewing files
If you’ve got a document or screenshot full of text, you can copy the content from those files while previewing them. Preview the file by selecting it and hitting the spacebar, then move your mouse over what you want to copy and your pointer will transform into the cursor icon. You can now select and copy text like you normally would. This can be especially helpful if you’ve taken a text-heavy screenshot, like a recipe, and want to convert it into a document for better organization.
Write with emoji online and in apps

You can use the emoji keyboard in more places than just your iPhone.
Zach McAuliffe/CNETEmoji are a fun way to communicate with people in text, online chats and comments. Most people know how to access their emoji keyboard on their iPhone, and you can access the same keyboard on your Mac, too. You can use the emoji keyboard in certain apps, like Notes, social media chats online and search tools, like Google. However, this doesn’t seem to work on certain sites, like Google Docs.
To access the emoji keyboard in most places on your Mac, click into a text box or other location you’d type a message and press either Function — the Fn key — or Control + Command + spacebar. Both will pull up your emoji keyboard where you can search for the emoji you want, as you would on your phone.
Easily rename files
Renaming files can help keep your folders organized and easily searchable. To easily rename items, select a file and press Return. The file name will be highlighted and you can start typing your new file name.
For more Apple news, check out what’s new on your iPhone with iOS 16.4, the highs and lows of Apple’s Classical Music app and the rumors around Apple’s AR/VR headset.
Technologies
Can’t Wait for New Emoji? Here’s How to Create Your Own on iPhone
Apple Intelligence-enabled iPhones can create custom emoji in a few easy steps.
Apple brought new emoji to all iPhones when the company released iOS 26.4 on March 24. The new emoji include «» orca, «» distorted face and «» hairy creature — or as we might normally call it, Sasquatch. According to Emojipedia, there are 3,953 emoji with more on the way, including a pickle. But there’s no emoji for a dog wearing pajamas, a plate with burgers and fries and many other things. But if you have Genmoji on your iPhone you can create these emoji and many more.
Apple released iOS 18.2 in 2024 and the company introduced its own emoji generator, called Genmoji, to Apple Intelligence-capable iPhones at that time. The Unicode Standard, a universal character encoding standard, is responsible for creating new emoji, and approved emoji are added to all devices once a year. With Genmoji, you don’t have to wait for new emoji to appear on your iPhone each year. You can just create them as you need them.
Read on to learn how to use Genmoji on iPhone to create your own custom emoji. Just note that only iPhones with Apple Intelligence, like the iPhone 17 lineup, can use Genmoji at this time.
Note: The new emoji may not display correctly for Apple users whose devices aren’t on a 26.4 software version.
How to make custom emoji
1. Open Messages and go into a chat.
2. Tap the plus (+) button next to your text box.
3. Tap Genmoji.
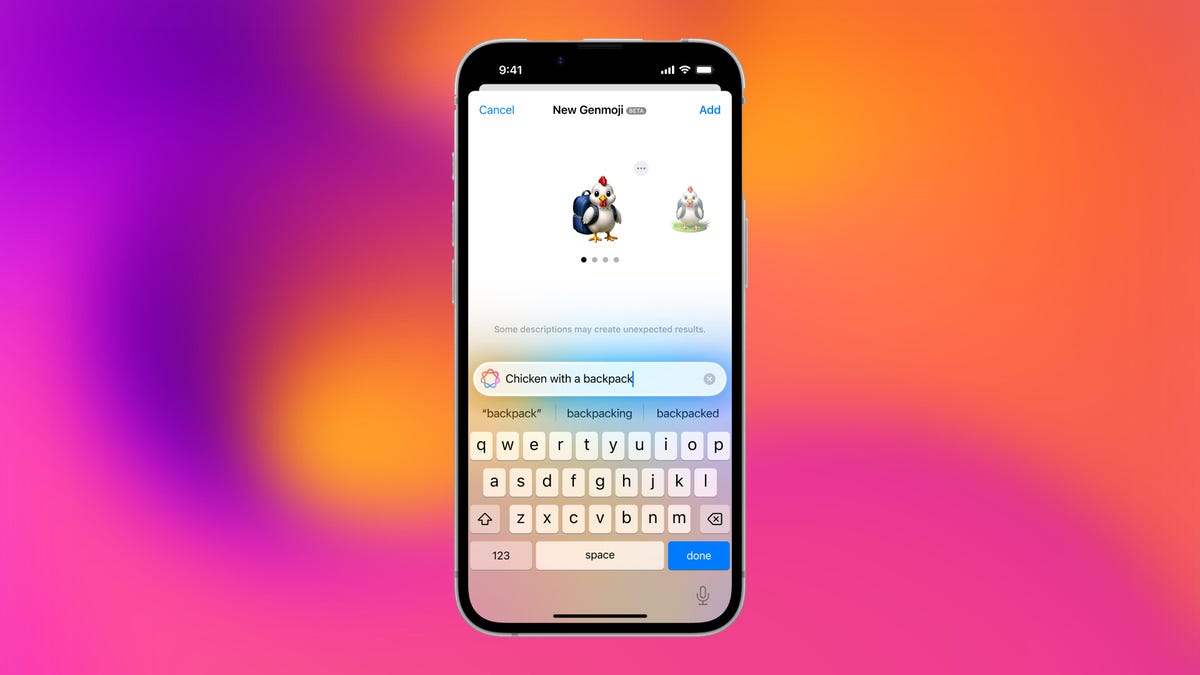
You can then type a description of an emoji into the text box near the bottom of your screen and tap the check mark on your keyboard to enter that description into Genmoji. You can also tap different suggestions and themes that are right above the text box. And with iOS 26 or later, you can also combine and use emoji to create others rather than describing a new emoji or using suggestions.
Your iPhone will generate a series of new emoji for you to pick from according to your description, and you can swipe through these new emoji. When you find the one you want, tap Add in the top right corner of your screen and the new emoji will be available to use as an emoji, tapback or a sticker. Now you don’t have to wait for the Unicode Standard to propose, create and bring new emoji to devices.
For more iOS news, here’s what to know about iOS 26.4 and iOS 26.3. You can also check out our iOS 26 cheat sheet for other tips and tricks.
Technologies
Save Over 20% on This Handy 10,000-mAh Anker Nano Power Bank
Keep your devices charged on the go with this Anker Nano power bank, now down to just $46.

We’ve just spotted the Anker Nano 45-watt portable power bank for just $46 at Amazon right now. This saves you $14 — a 23% discount on its list price. Though it’s $6 more than the lowest-ever price we saw during Black Friday, it’s still a solid discount when you take the rising cost of tech accessories into account. It also matches the lowest price we’ve seen in 2026. It comes in four colors: black, green, pink and white. They’re all on sale for the same price.
This Anker Nano portable charger weighs approximately 8.2 ounces and measures a compact 3.21×1.99×1.42 inches. Despite its small size, it has a retractable cable and supports fast charging in compatible Apple, Samsung, Google Pixel and other smartphones. It also has a large 10,000-mAh capacity and a smart display so you always know how much juice is left in your power bank.
The Nano can charge an iPhone 17 to up to 50% battery in an estimated 20 minutes, and is powerful enough to charge tablets and laptops. Need to charge your devices while charging your power bank? You can do so safely thanks to pass-through charging so you’ll never have to go without battery life.
We’ve also compiled a list of the best power banks for iPhones and for Android, in case this deal isn’t quite a fit for you.
Why this deal matters
If you travel, have a long commute time or are otherwise always on the go, a portable charger can help you keep your devices fully powered. This 45-watt Anker Nano power bank is compact, includes a loop that lets you keep track of it easily and has a built-in cable so you don’t have to keep up with extra cords. Amazon’s $14 discount makes this a solid deal for anyone looking for a compact power bank.
Technologies
Today’s NYT Mini Crossword Answers for Wednesday, April 8
Here are the answers for The New York Times Mini Crossword for April 8.
Looking for the most recent Mini Crossword answer? Click here for today’s Mini Crossword hints, as well as our daily answers and hints for The New York Times Wordle, Strands, Connections and Connections: Sports Edition puzzles.
Need some help with today’s Mini Crossword? Hint: It uses a lot of the letter Z for some reason. Read on for all the answers. And if you could use some hints and guidance for daily solving, check out our Mini Crossword tips.
If you’re looking for today’s Wordle, Connections, Connections: Sports Edition and Strands answers, you can visit CNET’s NYT puzzle hints page.
Read more: Tips and Tricks for Solving The New York Times Mini Crossword
Let’s get to those Mini Crossword clues and answers.
Mini across clues and answers
1A clue: ___-Carlton (hotel chain)
Answer: RITZ
5A clue: Span of the alphabet
Answer: ATOZ
6A clue: Cable channel with an out-of-this-world name
Answer: STARZ
7A clue: Takes care of, as a squeaky wheel
Answer: OILS
8A clue: Toy on a string
Answer: YOYO
Mini down clues and answers
1D clue: When a post receives far more negative comments than likes, in social media slang
Answer: RATIO
2D clue: World’s leading wine producer
Answer: ITALY
3D clue: Middle of the human body
Answer: TORSO
4D clue: Sleeping sound
Answer: ZZZ
6D clue: Tofu base
Answer: SOY
-
 Technologies3 года ago
Tech Companies Need to Be Held Accountable for Security, Experts Say
-
 Technologies3 года ago
Best Handheld Game Console in 2023
-
 Technologies3 года ago
Tighten Up Your VR Game With the Best Head Straps for Quest 2
-
 Technologies4 года ago
Black Friday 2021: The best deals on TVs, headphones, kitchenware, and more
-
 Technologies5 лет ago
Google to require vaccinations as Silicon Valley rethinks return-to-office policies
-
 Technologies5 лет ago
Verum, Wickr and Threema: next generation secured messengers
-
 Technologies4 года ago
Olivia Harlan Dekker for Verum Messenger
-
 Technologies4 года ago
The number of Сrypto Bank customers increased by 10% in five days