Technologies
Hands-On With Sony’s DualSense Edge Controller for PlayStation 5
The expensive and pro-style DualSense Edge game controller gives players more customization and performance options.

The DualSense Edge controller is the latest accessory for Sony’s PlayStation 5, and it offers a high degree of customization at an equally high price. The PS5’s default controller, the DualSense, got its name from its ultraspecific vibration functionality. The Edge is a pro-style controller that improves on that by allowing players more options to fine-tune their inputs and, as Sony explains, «craft [their] own unique gaming experience tailored to [their] playstyle.» However, this enhanced customization doesn’t come cheap.
While a typical PS5 controller will cost you around $70, the new DualSense Edge, which comes with some accessories, is $200. Alongside the controller itself, the box includes a carrying case with a pass-through window to allow for charging, a USB-C cable and a connector housing to secure it to the controller, plus two separate options for back paddles and two options for analog stick replacements.
The DualSense and DualSense Edge controller look very similar to one another at first glance. The controllers even weigh just about the same, with the DualSense coming in at around 281 grams while the Edge is slightly more at approximately 325 grams.
The Edge features a textured grip on the handles that helps the controller stay in your hands. It also has grooves on the trigger buttons, which is nice because you can more easily keep your fingers in the proper position. Textures and grooves aside, when the back buttons are removed, the controllers feel almost identical to use. The original DualSense has a notoriously short battery life, around 7 to 10 hours. From my brief testing, I’m disappointed to report that the Edge comes in at an even lower 5 to 7 hours. The included USB-C is pretty long so, fortunately, I could still play games while the controller charged.
More buttons, more options
Pro controllers give players more options for how the buttons and triggers register inputs. When connecting the controller to the PS5 for the first time, a welcome screen shows the different customization options from both a hardware and software perspective. On the hardware side, players can attach either half-dome (rounded and short) or lever (skinny and long) back paddles to the device. These paddles sit close to where the player’s middle or ring fingers rest and can be mapped to any other input on the DualSense Edge. First-person shooter fans often use these to keep their right thumb on the right analog stick so they can aim while still being able to jump or duck (an input often put on the X or O face buttons). While both paddles are comfortable to use, I prefer the half-dome option since it sits a bit further away and can’t be as easily pressed by mistake.
These back paddles are also a great accessibility feature. Players with low range of motion for any of the primary controller fingers (the thumbs or pointer fingers) can swap one of those inputs to the back of the controller where they might have an easier time pressing a button.
The next biggest hardware tweak is in the trigger buttons on top of the controller. Next to each trigger is a mechanical switch that adjusts how much the L2/R2 buttons can be pressed before registering a full push. Players can choose between three ranges of motion. Fans of twitch-based games often prefer shorter distances so they can press quicker and more often. For example, being able to shoot a gun more rapidly will give Call of Duty players an advantage. Microsoft’s Xbox Elite controller has similar options for its triggers and paddles.
Customizing the software
Customization options are set via the PS5 accessories settings screen, and the intensity and deadzone customization options are the most exciting. These menus can adjust how fast the input curves are for any of the controller’s analog inputs. For example, if you want to physically use the full range of the trigger buttons but want the controller to register that input more quickly, you can fine-tune that on a surprisingly granular level. This goes for the analog sticks’ movement, as well. In addition, you can adjust the deadzone (the center part of the stick where the controller registers no input) to be wider.
All of these software options can be saved into a user profile. The DualSense Edge features two Fn (function) buttons, located below the analog sticks. Holding either of them down and pressing any of the face buttons will let you toggle between four assigned profiles. It seems like a missed opportunity that both of these buttons do the same thing when held down and don’t have the ability to map different commands to each one. That said, being able to swap between profiles midgame was quite useful, especially when jumping between different games. For example, Fortnite and Overwatch have different crouch buttons, so using the same profile wouldn’t be helpful.
The DualSense Edge fills a hole that was missing from PlayStation’s portfolio. The controller feels good and offers new and more personal ways for any player to connect with a game, but its high price means it only makes sense for the truly dedicated.
This review is in progress, and we’ll update with additional impressions and a video later this week.
Technologies
This Duck-Billed Microphone Protects Against Eavesdroppers, But It Sure Is a Look
At CES 2026, this privacy accessory drastically quiets your conversations, though if you use it in public, you’ll surely raise questions.
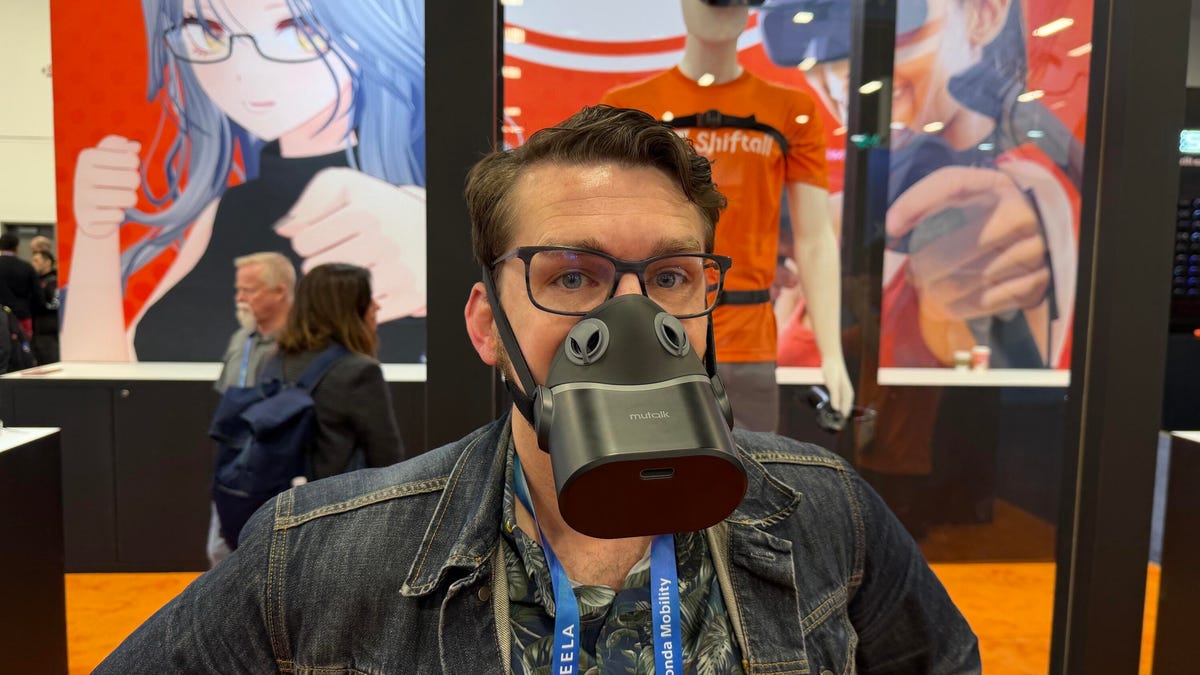
Ever wanted to have a phone conversation without others listening in? At CES 2026, I saw a solution to this privacy problem, the Mutalk 2, a wearable microphone that muted my voice from people around me. It also made me look like a cyberpunk platypus.
Coming from Japanese company Shiftall, the Mutalk 2 is a $200 accessory that you wear over your mouth and nose, sealed by a rubber gasket, with a plastic oval extending out for a few inches. It connects to phones or devices over Bluetooth or wired 3.5mm jack. In a demonstration, I wore the Mutalk and chatted over the phone with someone 10 feet away who could hear me clearly on the call, but could pick up only the barest mumbling otherwise.
There’s no getting around the Mutalk’s strangeness, and I would expect to raise eyebrows if I ever wore it in public, as strapping one on made me look like I was wearing a gas mask. To be fair to Shiftall, I don’t have the design chops to suggest a better look for a microphone that incorporates tech to muffle my voice. Granted, I could imagine plenty of reasons to use it in the comfort of one’s own home, like to chat with online friends while gaming late at night without worry of waking up roommates, partners or babies.
From my brief time with the Mutalk 2, it appears to work as intended, and $200 isn’t prohibitive compared to the prices of other microphones. While it undeniably looks odd, its design is more functional than exotic. After I adjusted its rubber straps that went around my head, the accessory sat comfortably enough on my face, and was light enough that it wouldn’t seem to drag down during a longer conversation. The rubber gasket that covers the mouth and nose is removable, making it easy to clean.
If you want private conversations while you’re out in public, there may be less obtrusive ways to go about it than the Mutalk 2, like a throat microphone. But Shiftall’s design has other benefits, such as blocking lip-reading. And it’s worth pointing out that some people out there would love to rock that cyberpunk platypus look. I mean, folks did line up to buy the Razer Zephyr RGB mask — some people embrace parts of the bleeding-edge technological future that’re different from anything else around.
Technologies
Cloudflare Says Winter Olympics Cybersecurity Is at Risk in Spat With Italian Regulators
But Cloudflare’s global head of policy tells CNET the company is open to an agreement with Italy.

The CEO of the networking company Cloudflare is lashing out at Italy in response to regulatory anti-piracy fines, threatening to withdraw from the country and potentially the 2026 Winter Olympics.
Don’t miss any of our unbiased tech content and lab-based reviews. Add CNET as a preferred Google source.
Italy announced on Jan. 8 that it had issued a fine of 14.2 million euros (approximately $16.5 million) against Cloudflare for failing to block access to pirated content. Soon after that, Cloudflare’s CEO Matthew Prince took to X to call out the fines, describing Cloudflare’s decision not to comply as a fight over censorship. Prince said that complying with Italy’s demands under its Piracy Shield policies would affect content globally.
Italy’s Piracy Shield is a program implemented by the country’s telecommunications regulator, AGCOM. In order to cut down on piracy in the country, such as hosting illegal streams of sporting events, the program allows IP holders to report content violations to a rapid-response automated system. However, some have complained that the 30-minute window given is not enough time for ISPs to properly vet complains, and is resulting in legitimate, non-pirated content being blocked as well.
«In other words, Italy insists a shadowy, European media cabal should be able to dictate what is and is not allowed online,» Prince said.
Yesterday a quasi-judicial body in Italy fined @Cloudflare $17 million for failing to go along with their scheme to censor the Internet. The scheme, which even the EU has called concerning, required us within a mere 30 minutes of notification to fully censor from the Internet any… pic.twitter.com/qZf9UKEAY5
— Matthew Prince 🌥 (@eastdakota) January 9, 2026
In his posts, Prince specifically mentioned the 30-minute timeframe that Italy requires for Cloudflare to disable access to suspected piracy traffic.
«We block pirate streams every time we find one,» he wrote. «We hate them.» But, he said, «we can’t put in place a system where a shadowy cabal can require us to remove GLOBALLY anything they don’t like on the internet within 30 minutes. That’s insane.»
Some of the proponents of Italy’s piracy rules are soccer teams that want to prevent the illegal streaming of their matches.
Prince went on to list steps his company might take, including pulling its cybersecurity service from the 2026 Milano Cortina Winter Olympics, removing Cloudflare servers from Italian cities and holding off on any plans to invest in the country. Prince also suggested he would get US government leaders involved, tagging Vice President JD Vance in his post. Prince also reposted a message addressed to the Italian prime minister, along with an article about Italy’s actions.
The Winter Olympics, scheduled to take place between Feb. 6 and Feb. 22 at sites across Lombardy and Northeast Italy, are a sensitive subject when it comes to cybersecurity, considering the potential that many may use VPN technology to view broadcasts of the event.
Door is open to an agreement, Cloudflare says
In an interview with CNET, a Cloudflare representative said that while the fine from Italy represents more than the company’s total revenue from the country, Cloudflare is still open to an agreement to avoid saying arrivederci to the country.
«We’re still evaluating, and we’re still open to working something out,» said Alyssa Starzak, Cloudflare’s deputy chief legal officer and global head of policy. «That would be a better solution. The hope is we can have some discussions for a more reasonable result.»
Starzak said the company has posted information and conducted outreach to Italian stakeholders about the ways Cloudflare is working to combat unauthorized streaming. But Italy’s law, she said, leaves no room for negotiation or nuance.
«It’s been very much a ‘You must do what we say’ » situation, she said.
Technologies
Transport Your Dungeons & Dragons Hero Off the Page With This Tabletop Gadget
At CES 2026, I found a couple ways that players and dungeon masters can use tech to upgrade their gameplaying experience.
As I walked around CES 2026, my eyes drifted over a poster awash with fantasy heroes, dastardly monsters and rolling dice — and I failed my saving throw to look away. If you’re a fellow tabletop gaming nerd, you might want to follow this pair of gadgets due out later this year.
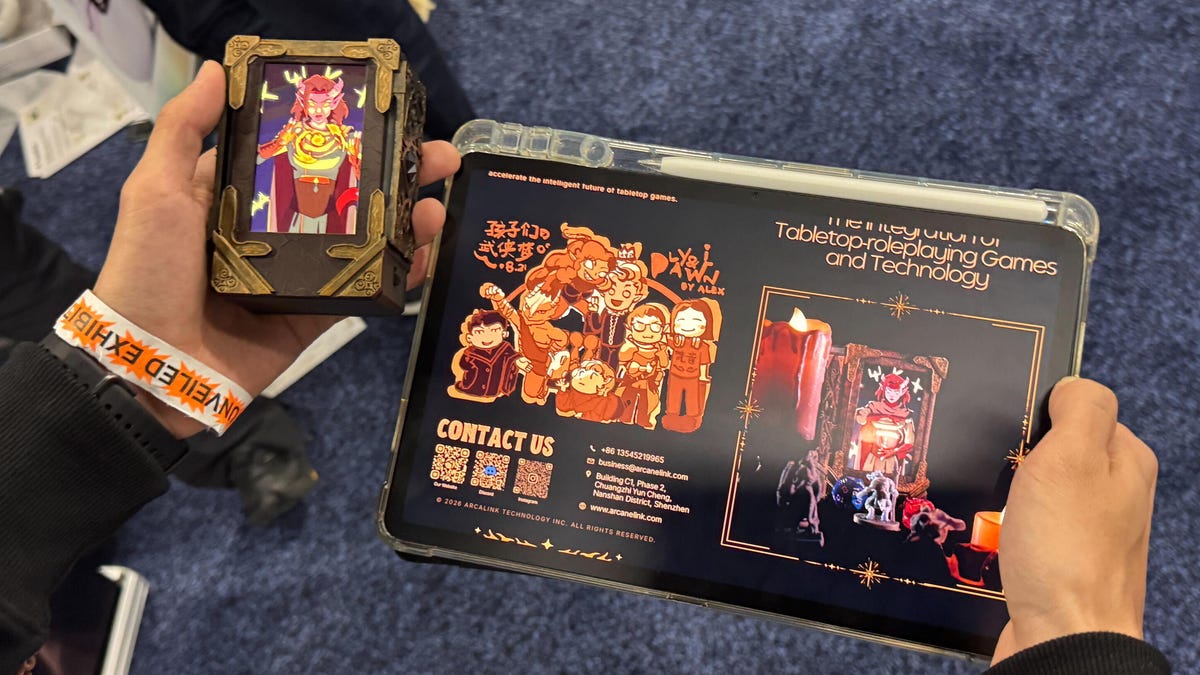
Tabletop gaming continues to appeal to players with its deliberately analog gameplay, using miniatures, maps, dice and other physical trinkets to keep the focus on real-world play. The niche has grown in popularity over the decades, and a supporting industry has risen around it, offering third-party materials and accessories to enhance the experience. Digital gadgets and software have been added to this mix in recent years, and a new company, Arcalink, has its own supporting products for the avid Dungeons & Dragons player.
The first of Arcalink’s upcoming tabletop augmentations is a gadget that’s small but mighty. About the size of a film canister, the Arcalink One is a rectangular display around 2 to 3 inches long that’s covered in fantasy decorations. These can be swapped out, with one looking like a doorway in stone ruins and another appearing like a blue wizard’s portal (a third, not present but described to me, would look like a Mimic, the classic D&D monster that appears as a treasure chest to trick adventurers).
The Arcalink One’s screen shows a player’s avatar, and since it was built with the fantasy roleplaying game D&D in mind, animations for popular spells that can be triggered by voice commands. Tabletop RPGs encourage the theater of the mind, with players envisioning their characters through vocal descriptions, but the Arcalink One seems like a neat way for them to accessorize with a digital version of their hero (uploaded in JPG or MP4 file formats) that’s neither essential to play nor large enough to be obtrusive — a totemic treat to take from one game to another, swapping out character portraits by using the paired app.
The basilisk in the room is the price tag: the Arcalink One is expected to cost between $100 and $150, Arcalink founder Lizheng Liu told me. While the company hasn’t hashed out the final numbers, that first number is the device itself, and the high end of the range will bundle more of those clip-on decorations along with it.
Over $100 for an optional device is prohibitive for most tabletop players, but I imagine this would appeal to adventurers with deeper pockets who want a neat little plug-and-play gadget to bring more flair to the game table. Also, let’s not pretend tabletop fans aren’t already spending a good amount of money on accessories, dice and miniatures (looking at you, wargamers).
The company plans to let a select group of supporters start backing the Arcalink One in March or April, with a full Kickstarter crowdfunding campaign launching around June.
The second product, Arca Studio, is entirely digital: AI-powered software to help dungeon masters, the thankless gameplay managers who tell the story and give voice to their world’s denizens for their characters to experience. No, it’s not using generative AI to spit out campaign ideas — this AI software records your game sessions and will make it easy to go back and search for characters and plot events while planning ahead of your next game day.
Yes, this is a sort of gaming version of the AI summaries that productivity apps offer when, say, you’ve finished a video chat, but there are a few unique features tailored to tabletop gaming. One makes a word cloud grouping together recurring names and concepts in your campaign recordings to visualize the themes and frequent elements — great for dungeon masters to see which plot lines and adventure types they might be overusing to switch them up.
Arca Studio will launch around May or June and will be a subscription service, though Arcalink hasn’t decided on an expected monthly cost yet. It’s worth pointing out that anything could change in pricing or product features before these two products reach the market — and just like a good tabletop campaign, there might be some last-minute twists that change everything.
-
 Technologies3 года ago
Tech Companies Need to Be Held Accountable for Security, Experts Say
-
 Technologies3 года ago
Best Handheld Game Console in 2023
-
 Technologies3 года ago
Tighten Up Your VR Game With the Best Head Straps for Quest 2
-
 Technologies4 года ago
Black Friday 2021: The best deals on TVs, headphones, kitchenware, and more
-
 Technologies4 года ago
Google to require vaccinations as Silicon Valley rethinks return-to-office policies
-
 Technologies4 года ago
Verum, Wickr and Threema: next generation secured messengers
-
 Technologies4 года ago
Olivia Harlan Dekker for Verum Messenger
-
 Technologies4 года ago
iPhone 13 event: How to watch Apple’s big announcement tomorrow