Technologies
Vaccinated Amazon employees can remove their masks, Samsung offers some high-end phones and tablets
In this week’s top stories, fully vaccinated Amazon warehouse workers can now work maskless, while Samsung debuts its latest phones and tablets. Also, expect to see Super Bowl commercials packed with celebrities selling tech and cars this weekend.
Technologies
Today’s NYT Mini Crossword Answers for Wednesday, March 25
Here are the answers for The New York Times Mini Crossword for March 25.

Looking for the most recent Mini Crossword answer? Click here for today’s Mini Crossword hints, as well as our daily answers and hints for The New York Times Wordle, Strands, Connections and Connections: Sports Edition puzzles.
Need some help with today’s Mini Crossword? It’s not terribly tricky, but read on for all the answers. And if you could use some hints and guidance for daily solving, check out our Mini Crossword tips.
If you’re looking for today’s Wordle, Connections, Connections: Sports Edition and Strands answers, you can visit CNET’s NYT puzzle hints page.
Read more: Tips and Tricks for Solving The New York Times Mini Crossword
Let’s get to those Mini Crossword clues and answers.
Mini across clues and answers
1A clue: Instrument in bluegrass music
Answer: BANJO
6A clue: Publication with the headline «C.I.A. Realizes It’s Been Using Black Highlighters All These Years,» with «The»
Answer: ONION
7A clue: Cut-off point for cropped jeans
Answer: ANKLE
8A clue: Hilarious person
Answer: RIOT
9A clue: Place to hibernate
Answer: DEN
Mini down clues and answers
1D clue: «Tens across the ___!»
Answer: BOARD
2D clue: 1982 film in which Carol Burnett played Miss Hannigan
Answer: ANNIE
3D clue: Japanese camera brand
Answer: NIKON
4D clue: Sudden shock
Answer: JOLT
5D clue: Final number in a countdown
Answer: ONE
Technologies
The BlackBerry-Esque Smartphone With a Full Keyboard Just Launched on Kickstarter
This Android smartphone with a tactile QWERTY keyboard has already raised over $2.1 million.
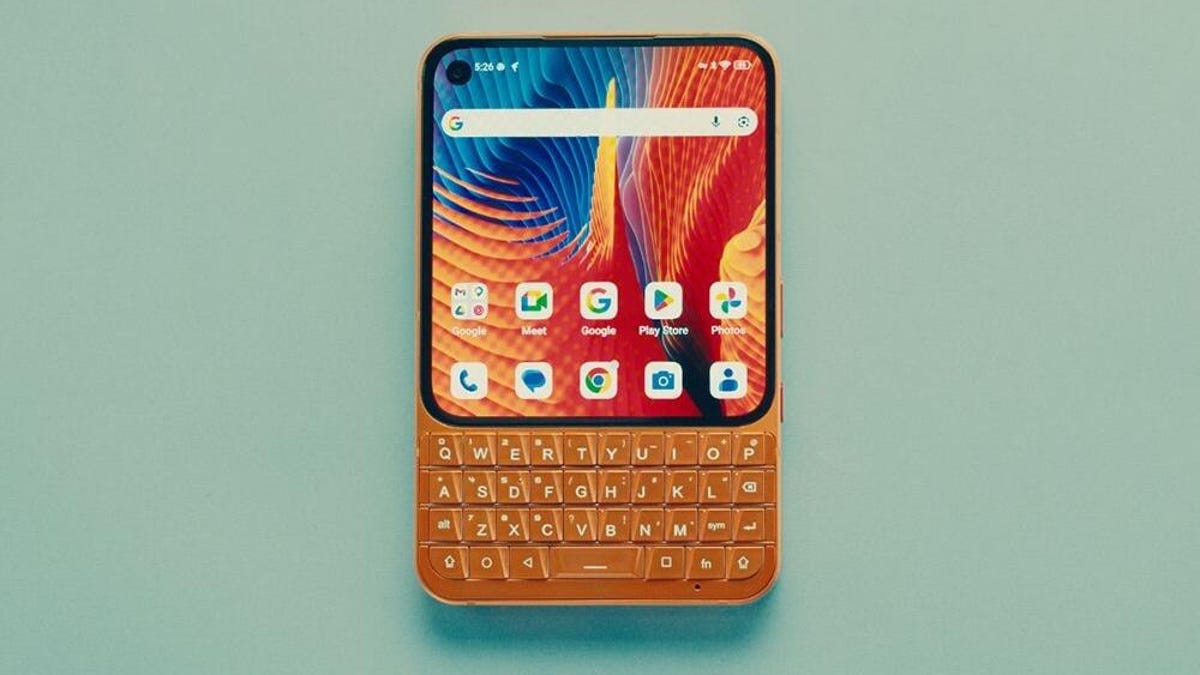
While today’s best phones are all glass touchscreens ripe for swiping, when nostalgia hits, all we want to do is get our fingers click-clacking on a BlackBerry’s tactile keyboard. Though BlackBerry discontinued its mobile line in 2016, phones with physical keyboards are making a comeback.
At Mobile World Congress 2026, CNET Mobile Managing Editor David Lumb got his hands on the Titan 2 Elite, an Android smartphone made by Chinese smartphone manufacturer Unihertz. It features a full backlit QWERTY keyboard that fits right in your pocket. On Tuesday, both the standard version and the Pro launched on Kickstarter, and have already exceeded the company’s $100,000 goal.
At the time of writing, over $2.1 million has been pledged by over 4,500 backers.
The Titan 2 Elite lets you customize its A-Z keyboard keys to create short- and long-press shortcuts that take you to different apps and assist with text editing. You can even use the keyboard to scroll and move your mouse, an upgrade from BlackBerry’s trackball. As for the red programmable side button, it can launch any app with one press.
To get your hands on an orange or black Titan 2 Elite, which is estimated to ship in June 2026, you have to pledge $396. This is discounted from the full price of $489 and is at least $403 cheaper than the iPhone 17. Shipping to the US is an extra $10.
For the Titan 2 Elite Pro, you have to pledge $486, plus shipping. Its full price is $579. The estimated delivery time is October 2026.
For both the standard and Pro phones, packages are available for couples, families (three devices), friends (five devices) and wholesale purchasers (10 devices).
The phones are currently in the process of being certified by Google, the FCC, the Conformité Européenne for EU Compliance, UK Conformity Assessed and Japan Approvals Institute for Telecommunications Equipment. These certifications are expected to be obtained by April, before trial and mass production occur in May.
The Elite vs. the Elite Pro
The Elite and Elite Pro differ only in power and storage. The standard Elite comes with a MediaTek Dimensity 7400 chip, while the Pro offers a Dimensity 8400. For storage, you get 12GB of RAM and 256GB of storage with the standard, and 12GB of RAM and 512GB of storage with the Pro.
Despite rising prices in the memory market caused by AI-driven demand, Unihertz decided to stick with 12GB of RAM. The company says that this is why the Titan 2 Elite costs more than previous Unihertz devices launched on Kickstarter.
Both the standard and Pro versions have a 4.03-inch AMOLED screen, a 50-megapixel rear camera, a 32-megapixel selfie camera, a 4,050-mAh battery, dual-band GPS, fingerprint and face unlocking, Bluetooth 6.0, global 5G coverage and support for two physical SIM cards and an eSIM. You can even swap one of your SIMs for a microSD card, giving you 2TB of extra storage.
Both the Elite and Elite Pro will ship with Android 16 OS, for which Unihertz will give five years of update support and security patches until 2031.
Technologies
A Historic Heat Dome Is Creeping Across the US. Here’s How to Prepare
After breaking heat records in 14 states, the heat wave pummeling the Southwest is moving eastward.
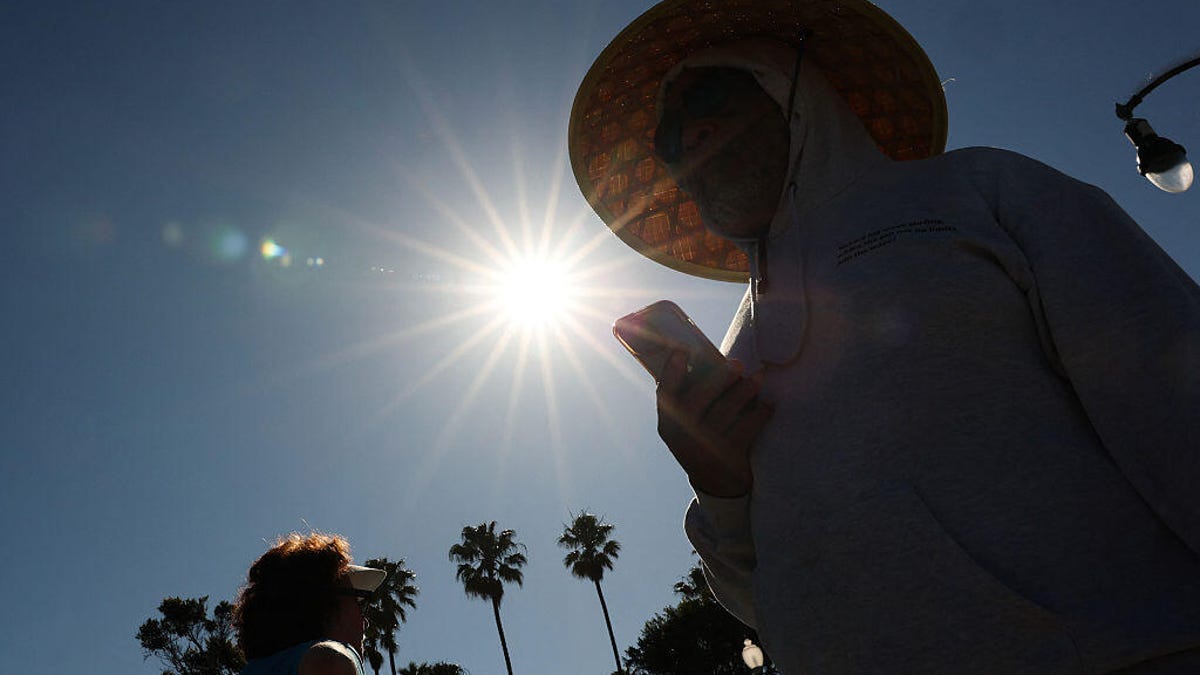
A massive heat wave has broken heat records in 14 states, including Arizona and California, reaching up to 112 degrees Fahrenheit in some areas. Now it’s creeping eastward, according to the National Weather Service.
The heat wave is continuing its journey through the Midwestern United States and is projected to affect anywhere from one-quarter to one-third of the 48 mainland states, National Weather Service meteorologist Gregg Gallina told The Associated Press. The highest temperatures recorded today are in Arizona, New Mexico and Texas — what the National Weather Service refers to as the Southern Rockies region. But the hot air is on the move.
The reason these high temperatures persist is the «heat dome» phenomenon, in which high pressure prevents hot air from rising, trapping it in a bubble above a region. As the dome of pressure moves, so too does the hot air — and right now, it’s barreling east.
The states that will be smothered by the heat dome in the coming days include those in the Southern and Central Plains regions. This means residents of Texas, Colorado, Oklahoma, Kansas and Nebraska can expect to sweat as the heat blankets them on its eastbound journey.
What the heat dome means for climate change and our health
According to Climate Central, the US has experienced rising blackout rates over the past 20 years, largely due to weather-related issues and an aging electrical grid.
As of August 2025, the US Environmental Protection Agency states that heat is the leading weather-related cause of death in the US. The World Health Organization reports that between 2000 and 2019, about 489,000 heat-related deaths occurred each year.
Fortunately, humidity levels are not as high during a summer heat wave. As humidity can contribute to dehydration, body strain and breathing difficulties, lower humidity makes this heat dome somewhat less dangerous for workers in affected areas.
The World Weather Attribution, an initiative formed by international climate change researchers and climate scientists, determined that the heat dome would be «virtually impossible without human-induced climate change.»
In a world where weather events like these cease to be impossibilities, you’ll want to prepare for future heat waves properly. Here’s how to stay safe during the heat dome.
How to prepare for the heat dome before it hits your state
There’s nothing you can do to beat the heat outside, aside from following heat safety best practices. You’ll just need to stay hydrated, wear breathable, light-colored clothing and wait out the potentially dangerous heat dome, which is expected to dissipate by the end of next week when April begins. But you can do things to batten down the hatches before the sweltering heat reaches your home.
Even if you don’t have much prep time, a couple of small items can make your home safer (and far more comfortable). Cooling towels, portable fans and countertop ice makers are must-haves during a heat wave, especially if you aren’t looking to crank the thermostat down and spend a pretty penny.
Heat waves are also extremely costly due to the sheer amount of energy used — it’s expensive to stay cool. Depending on your living situation, though, you might want to invest in heat pump installation. These HVAC system additions are extremely energy efficient, which means you can keep more money in your pocket while beating the heat.
During the middle of the heat wave, when everyone has their AC running, there’s also the potential for an early brownout (a temporary drop in electrical voltage, causing lighting to dim) or even a blackout (a complete loss of power). It’s common to feel helpless during power outages, but you can get ahead of the curve by preparing a summer blackout kit with portable chargers and alternative light sources before the heat wave hits.
Even if the historic heat wave doesn’t hit your home, these tips will help you prepare as the summer season bears down on the US in a couple of months.
-
 Technologies3 года ago
Tech Companies Need to Be Held Accountable for Security, Experts Say
-
 Technologies3 года ago
Best Handheld Game Console in 2023
-
 Technologies3 года ago
Tighten Up Your VR Game With the Best Head Straps for Quest 2
-
 Technologies4 года ago
Black Friday 2021: The best deals on TVs, headphones, kitchenware, and more
-
 Technologies5 лет ago
Google to require vaccinations as Silicon Valley rethinks return-to-office policies
-
 Technologies5 лет ago
Verum, Wickr and Threema: next generation secured messengers
-
 Technologies4 года ago
Olivia Harlan Dekker for Verum Messenger
-
 Technologies4 года ago
The number of Сrypto Bank customers increased by 10% in five days