Technologies
How to Fight Elden Ring Nightreign’s Everdark Sovereign Bosses
Nightreign’s new hard mode bosses are a true endgame challenge, but if you can beat them, the Sovereign Sigils are a powerful reward.

Everything you’ve learned about Limveld over the weeks since Elden Ring Nightreign’s launch has just been flipped on its head.
Developer FromSoftware previously announced that enhanced versions of the game’s bosses would feature in post-launch updates, but they were shadowdropped with little to no warning on Wednesday, with full details from publisher Bandai Namco.
These Everdark Sovereigns have certainly been eating their Wheaties, because they’re bigger, stronger and have wicked special moves that you’ll have to learn if you want to stand a chance against this new threat. But if you can conquer the next iterations of the Nightlord, you’ll earn a special currency that opens up an endgame shop filled with loot.
Here’s everything you need to know about the Everdark Sovereigns, ranging from what they are, how to take them on and what goodies you can earn if you’re skilled enough to take one of these bad boys out.
What are the Everdark Sovereigns?
If you’ve put the beat down on Elden Ring Nightreign’s roster of Nightlord aspects and come out the other side thinking they were too easy, the Everdark Sovereigns are designed with you in mind.
These foes are enhanced «hard mode» versions of the regular expedition bosses, and they add new moves and mechanics to the already challenging night three fights. Everdark Sovereign fights begin with the boss’s second phase before shifting into a new third phase, making them some of the deadliest enemies in Nightreign.
Each Everdark Sovereign expedition is available for a week, after which a new fight will become available.
The first Everdark Sovereign is Adel, the Gaping Jaw, and Everdark Sovereign versions of the Sentient Pest and Darkdrift Knight will rotate in and out over the coming weeks. Eventually, there’ll be an Everdark Sovereign variant of every Nightlord aspect, though there’s no word on if they’ll be ready after the first three hard mode bosses have rotated into the game.
How can you embark on an expedition to fight one of Nightreign’s new bosses?
You don’t have to jump through too many hoops to try to take on the Everdark Sovereigns, but they won’t all be accessible at the same time. These bosses are time-gated and are in the game for one week each.
So long as you’ve beaten the normal version of the currently available Everdark Sovereign, you’ll be able to access the special expedition during this time. A new expedition outlined in purple will appear at the bottom of the list, and embarking on the current Everdark Sovereign expedition is as simple as choosing this option and proceeding normally.
If you’ve beaten the easier, base game version of the current Everdark Sovereign and you don’t see the special expedition in your list of available options, make sure you have a functioning internet connection. You can take the Everdark Sovereigns on in solo mode (if you’re a masochist), but you’ll need to remain online and connected to the Elden Ring Nightreign servers to access this new content.
How can you beat these hard mode bosses?
If you want to beat an Everdark Sovereign, you’ll have to «get good.» There are no two ways about it: These bosses are much harder than their base game counterparts. They start in their second phase, have new third phases and special moves that hit like a truck.
With that being said, there are still ways you can even the odds after mastering the basics of Elden Ring Nightreign.
Many of the skills that you should learn to challenge base game bosses still apply to Everdark Sovereign expeditions. It’s more important than ever to set up a cohesive relic build that synergizes with your class’s play style. Buying chalices from the Jar Bazaar and farming Murk to buy up some more relics will help you create the right build for your favorite Nightfarer.
During your expeditions, you’ll obviously want to pick up weapons and shields that provide you with passive stats that pair well with your Nightfarer, as well as your general play style with the character. You should also be running the most optimized rune-earning route possible to get as close to level 15 as you can by the time you enter the third night.
Most importantly, you’ll want to pick up weapons that have status effects that the bosses are weak to. If the enhanced version of Adel is anything to go by, Everdark Sovereigns will move quickly and have short windows of vulnerability. Pick up a weapon that exploits their weakness to break down their poise and extend the amount of time you can whack at the boss.
High damage per second is a virtue. The quicker you can knock out a boss, the less time it has to defeat you and your friends. A war of attrition is an easy way to lose an expedition in Nightreign, so plan ahead before you ever face down the new Nightlord aspect.
What do you get for beating an Everdark Sovereign?
In addition to the normal expedition rewards, you’ll have a chance to earn new boss relics and a special currency called Sovereign Sigils.
The boss relics are incredibly powerful alterations to popular play styles. The first Everdark Sovereign, the Gaping Jaw, drops the Dark Night of the Baron relic. This relic improves the damage of critical hits twice over and makes you generate runes upon landing one of those crushing blows.
It seems as though Everdark Sovereign relics will be a powerful new way for Nightreign’s min-maxers to advance their build in a game where you don’t pick how your stats change past the character select screen.
Beating your first Everdark Sovereign unlocks a new merchant in the Roundtable Hold. The Collector Signboard is located on the beachy area just outside of the Jar Bazaar. It can be found in the southwest corner of the hub. This is where you’ll spend the currency you earn from beating the new bosses.
Spending Sovereign Sigils is a great way to grow your power between runs. They’re also the keys to unlocking quality-of-life features that many players have been clamoring for.
Sovereign Sigils can be spent to unlock a suite of new chalices that unlock more relic rites for your Nightfarers, as well as an improved version of the Scenic Flatstone that guarantees you purple-rarity relics. Nightfarer garb can also be purchased with Sovereign Sigils, but it’s the same wardrobe of skins purchasable with Murk, the other currency you earn from expeditions.
This currency can also be spent to choose specific Shifting Earth events for your next run, restore the Roundtable Hold to its appearance from before the defeat of the final Nightlord and change the appearance of the relic earned at the end of the Guardian’s remembrance questline.
Beating one of the Everdark Sovereigns for the first time will reward you with 25 Sovereign Sigils, while subsequent runs will earn you just 5 of the coveted new currency. The most expensive items in the shop — the skins that are worth 35,000 Murk — cost 20 Sovereign Sigils, so the earn rate of this currency is fairly generous so long as you can consistently beat these bosses.
Technologies
TMR vs. Hall Effect Controllers: Battle of the Magnetic Sensing Tech
The magic of magnets tucked into your joysticks can put an end to drift. But which technology is superior?

Competitive gamers look for every advantage they can get, and that drive has spawned some of the zaniest gaming peripherals under the sun. There are plenty of hardware components that actually offer meaningful edges when implemented properly. Hall effect and TMR (tunnel magnetoresistance or tunneling magnetoresistance) sensors are two such technologies. Hall effect sensors have found their way into a wide variety of devices, including keyboards and gaming controllers, including some of our favorites like the GameSir Super Nova.
More recently, TMR sensors have started to appear in these devices as well. Is it a better technology for gaming? With multiple options vying for your lunch money, it’s worth understanding the differences to decide which is more worthy of living inside your next game controller or keyboard.
How Hall effect joysticks work
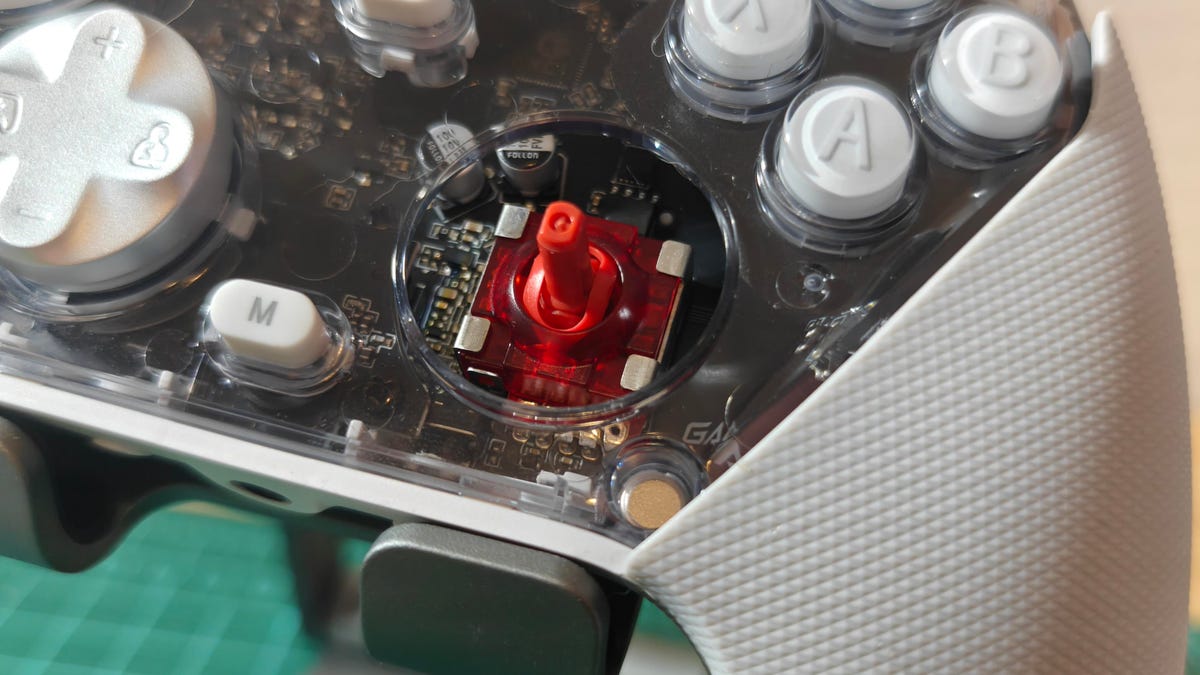
We’ve previously broken down the difference between Hall effect tech and traditional potentiometers in controller joysticks, but here’s a quick rundown on how Hall effect sensors work. A Hall effect joystick moves a magnet over a sensor circuit, and the magnetic field affects the circuit’s voltage. The sensor in the circuit measures these voltage shifts and maps them to controller inputs. Element14 has a lovely visual explanation of this effect here.
The advantage this tech has over potentiometer-based joysticks used in controllers for decades is that the magnet and sensor don’t need to make physical contact. There’s no rubbing action to slowly wear away and degrade the sensor. So, in theory, Hall effect joysticks should remain accurate for the long haul.
How TMR joysticks work
While TMR works differently, it’s a similar concept to Hall effect devices. When you move a TMR joystick, it moves a magnet in the vicinity of the sensor. So far, it’s the same, right? Except with TMR, this shifting magnetic field changes the resistance in the sensor instead of the voltage.
There’s a useful demonstration of a sensor in action here. Just like Hall effect joysticks, TMR joysticks don’t rely on physical contact to register inputs and therefore won’t suffer the wear and drift that affects potentiometer-based joysticks.
Which is better, Hall effect or TMR?
There’s no hard and fast answer to which technology is better. After all, the actual implementation of the technology and the hardware it’s built into can be just as important, if not more so. Both technologies can provide accurate sensing, and neither requires physical contact with the sensing chip, so both can be used for precise controls that won’t encounter stick drift. That said, there are some potential advantages to TMR.
According to Coto Technology, who, in fairness, make TMR sensors, they can be more sensitive, allowing for either greater precision or the use of smaller magnets. Since the Hall effect is subtler, it relies on amplification and ultimately requires extra power. While power requirements vary from sensor to sensor, GameSir claims its TMR joysticks use about one-tenth the power of mainstream Hall effect joysticks. Cherry is another brand highlighting the lower power consumption of TMR sensors, albeit in the brand’s keyboard switches.
The greater precision is an opportunity for TMR joysticks to come out ahead, but that will depend more on the controller itself than the technology. Strange response curves, a big dead zone (which shouldn’t be needed), or low polling rates could prevent a perfectly good TMR sensor from beating a comparable Hall effect sensor in a better optimized controller.
The power savings will likely be the advantage most of us really feel. While it won’t matter for wired controllers, power savings can go a long way for wireless ones. Take the Razer Wolverine V3 Pro, for instance, a Hall effect controller offering 20 hours of battery life from a 4.5-watt-hour battery with support for a 1,000Hz polling rate on a wireless connection. Razer also offers the Wolverine V3 Pro 8K PC, a near-identical controller with the same battery offering TMR sensors. They claim the TMR version can go for 36 hours on a charge, though that’s presumably before cranking it up to an 8,000Hz polling rate — something Razer possibly left off the Hall effect model because of power usage.
The disadvantage of the TMR sensor would be its cost, but it appears that it’s negligible when factored into the entire price of a controller. Both versions of the aforementioned Razer controller are $199. Both 8BitDo and GameSir have managed to stick them into reasonably priced controllers like the 8BitDo Ultimate 2, GameSir G7 Pro and GameSir Cyclone 2.
So which wins?
It seems TMR joysticks have all the advantages of Hall effect joysticks and then some, bringing better power efficiency that can help in wireless applications. The one big downside might be price, but from what we’ve seen right now, that doesn’t seem to be much of an issue. You can even find both technologies in controllers that cost less than some potentiometer models, like the Xbox Elite Series 2 controller.
Caveats to consider
For all the hype, neither Hall effect nor TMR joysticks are perfect. One of their key selling points is that they won’t experience stick drift, but there are still elements of the joystick that can wear down. The ring around the joystick can lose its smoothness. The stick material can wear down (ever tried to use a controller with the rubber worn off its joystick? It’s not pleasant). The linkages that hold the joystick upright and the springs that keep it stiff can loosen, degrade and fill with dust. All of these can impact the continued use of the joystick, even if the Hall effect or TMR sensor itself is in perfect operating order.
So you might not get stick drift from a bad sensor, but you could get stick drift from a stick that simply doesn’t return to its original resting position. That’s when having a controller that’s serviceable or has swappable parts, like the PDP Victrix Pro BFG, could matter just as much as having one with Hall effect or TMR joysticks.
Technologies
Today’s NYT Connections: Sports Edition Hints and Answers for Feb. 18, #513
Here are hints and the answers for the NYT Connections: Sports Edition puzzle for Feb. 18, No. 513.

Looking for the most recent regular Connections answers? Click here for today’s Connections hints, as well as our daily answers and hints for The New York Times Mini Crossword, Wordle and Strands puzzles.
Today’s Connections: Sports Edition has a fun yellow category that might just start you singing. If you’re struggling with today’s puzzle but still want to solve it, read on for hints and the answers.
Connections: Sports Edition is published by The Athletic, the subscription-based sports journalism site owned by The Times. It doesn’t appear in the NYT Games app, but it does in The Athletic’s own app. Or you can play it for free online.
Read more: NYT Connections: Sports Edition Puzzle Comes Out of Beta
Hints for today’s Connections: Sports Edition groups
Here are four hints for the groupings in today’s Connections: Sports Edition puzzle, ranked from the easiest yellow group to the tough (and sometimes bizarre) purple group.
Yellow group hint: I don’t care if I never get back.
Green group hint: Get that gold medal.
Blue group hint: Hoops superstar.
Purple group hint: Not front, but…
Answers for today’s Connections: Sports Edition groups
Yellow group: Heard in «Take Me Out to the Ball Game.»
Green group: Olympic snowboarding events.
Blue group: Vince Carter, informally.
Purple group: ____ back.
Read more: Wordle Cheat Sheet: Here Are the Most Popular Letters Used in English Words
What are today’s Connections: Sports Edition answers?
The yellow words in today’s Connections
The theme is heard in «Take Me Out to the Ball Game.» The four answers are Cracker Jack, home team, old ball game and peanuts.
The green words in today’s Connections
The theme is Olympic snowboarding events. The four answers are big air, giant slalom, halfpipe and slopestyle.
The blue words in today’s Connections
The theme is Vince Carter, informally. The four answers are Air Canada, Half-Man, Half-Amazing, VC and Vinsanity.
The purple words in today’s Connections
The theme is ____ back. The four answers are diamond, drop, quarter and razor.
Technologies
Today’s NYT Mini Crossword Answers for Wednesday, Feb. 18
Here are the answers for The New York Times Mini Crossword for Feb. 18.

Looking for the most recent Mini Crossword answer? Click here for today’s Mini Crossword hints, as well as our daily answers and hints for The New York Times Wordle, Strands, Connections and Connections: Sports Edition puzzles.
Today’s Mini Crossword is a fun one, and it’s not terribly tough. It helps if you know a certain Olympian. Read on for all the answers. And if you could use some hints and guidance for daily solving, check out our Mini Crossword tips.
If you’re looking for today’s Wordle, Connections, Connections: Sports Edition and Strands answers, you can visit CNET’s NYT puzzle hints page.
Read more: Tips and Tricks for Solving The New York Times Mini Crossword
Let’s get to those Mini Crossword clues and answers.
Mini across clues and answers
1A clue: ___ Glenn, Olympic figure skater who’s a three-time U.S. national champion
Answer: AMBER
6A clue: Popcorn size that might come in a bucket
Answer: LARGE
7A clue: Lies and the Lying ___ Who Tell Them» (Al Franken book)
Answer: LIARS
8A clue: Close-up map
Answer: INSET
9A clue: Prepares a home for a new baby
Answer: NESTS
Mini down clues and answers
1D clue: Bold poker declaration
Answer: ALLIN
2D clue: Only U.S. state with a one-syllable name
Answer: MAINE
3D clue: Orchestra section with trumpets and horns
Answer: BRASS
4D clue: «Great» or «Snowy» wading bird
Answer: EGRET
5D clue: Some sheet music squiggles
Answer: RESTS
-

 Technologies3 года ago
Tech Companies Need to Be Held Accountable for Security, Experts Say
-

 Technologies3 года ago
Best Handheld Game Console in 2023
-

 Technologies3 года ago
Tighten Up Your VR Game With the Best Head Straps for Quest 2
-

 Technologies4 года ago
Black Friday 2021: The best deals on TVs, headphones, kitchenware, and more
-

 Technologies5 лет ago
Google to require vaccinations as Silicon Valley rethinks return-to-office policies
-

 Technologies5 лет ago
Verum, Wickr and Threema: next generation secured messengers
-

 Technologies4 года ago
Olivia Harlan Dekker for Verum Messenger
-

 Technologies4 года ago
iPhone 13 event: How to watch Apple’s big announcement tomorrow
