Technologies
How to Clean Up Your Android Phone by Deleting Your Browser’s Cookies, Cache
Get rid of junk data that might be tracking your internet history with a few quick taps.
Your Android phone‘s web browser may be filled with tons of data from the websites you visit, including files you don’t need to keep. Much of that data — whether you’re using Google Chrome, Firefox or Samsung Internet — gets stored as part of the cookies and cache. This data can be helpful for websites you visit, letting them load faster with your accounts already logged in. That’s nice, but there’s plenty of information in the cookies and cache of your browser that isn’t necessary and could even be a privacy risk.
Why you should regularly clear out your cookies and cache
A lot of what ends up building up within your cookies and cache is just plain junk. Some of it could have arrived from websites you’ve visited just once. Others seem to be tracking your browsing history on an active basis, helping to serve up advertisements based on what you are buying or streaming on the internet. For instance, I’m constantly receiving advertisements for buying glasses online after browsing a few stores, or Amazon ads that just happen to show what was last in my shopping cart.
Because of this, it’s good to clear out your cache every so often. It allows you to remove data you don’t need on your phone, especially if an unknown data tracker is among your phone’s cookies. Clearing your cache is a minor inconvenience — you’ll have to log back into some of your favorite websites, but it’s a small price to pay to make sure your phone isn’t stocking up on extraneous data.
The steps differ slightly depending on the type of phone and web browser app you’re using. Below, we’ll go over how to clear this data for Google’s Chrome browser (often the default for many Android phones, like the Google Pixel line), Samsung’s internet browser (often the default on the Galaxy phone series) and Mozilla’s Firefox browser. You can also check out our separate guide on how to clear your cache on an iPhone web browser, in case you have a few Apple devices to tidy up, too.
Google Chrome
You can delete your cookies and cache from within the Android version of Google Chrome by first tapping the More button in the top right corner of the browser, indicated by a column of three dots, then tapping History, then Clear browsing data. You can also access this from the Chrome Settings menu, tapping Privacy and Security and then Clear browsing data.
Chrome also offers Basic and Advanced settings for clearing your Browsing history, Cookies and site data and Cached images and files. You can use the Time range drop-down to select whether you want to delete the entire history or a selection of anywhere from the past 24 hours up to the last four weeks. Tapping Advanced will also give you access to deleting Saved passwords, Autofill form data and Site settings. After selecting what you want to delete, tap the blue Clear data button. You might receive an additional prompt in the event Chrome deems certain websites as being «important» to you, and if so you’ll get the chance to confirm before clearing. Otherwise if you do not receive that prompt, Chrome will immediately proceed to clear as you instructed.
Read more: Ditch Google Chrome and Use This Privacy-Focused Browser Instead
Samsung Internet
There are two different ways you can clear your Samsung Internet browser’s cache and cookie data. You can clear from within the browser itself, or you can go through your phone’s Settings app.
To clear while in the Samsung Internet browser app, first tap the Options button in the bottom right corner represented by three horizontal lines, then Settings; scroll down to and tap Personal Data, then tap Delete browsing data to get a menu of options to delete. You can clear your Browsing history, Cookies and site data, Cached images and files, Passwords and Autofill forms in any combination. After tapping Delete data, you’ll then receive a prompt asking for you to confirm your choices before deleting.
Going through the browser app itself provides the most customization of what you want to delete. However, if you want to access similar options from your phone’s settings menu, open the Settings app and tap on Apps, then scroll down to and tap Samsung Internet and then Storage.
At the bottom of Storage, you get separate options to Clear cache and Clear data. Tapping Clear cache will immediately delete the cache, but Clear data brings up a prompt that warns you that all of the application’s data will be deleted permanently, including files, settings, accounts and databases. While it doesn’t specify cookies, this «going nuclear» approach should zap all remaining data, letting you restart the Samsung Internet browser as if it were brand-new.
Read more: Change These Android Settings to Get the Most Out of Your Phone
Mozilla Firefox
Much as with Google Chrome, you can clear the cache from within the Mozilla Firefox Android app. To access this function, tap the More button on the right of the address bar, again symbolized by three vertically aligned dots. Then tap Settings and scroll down to Delete browsing data.
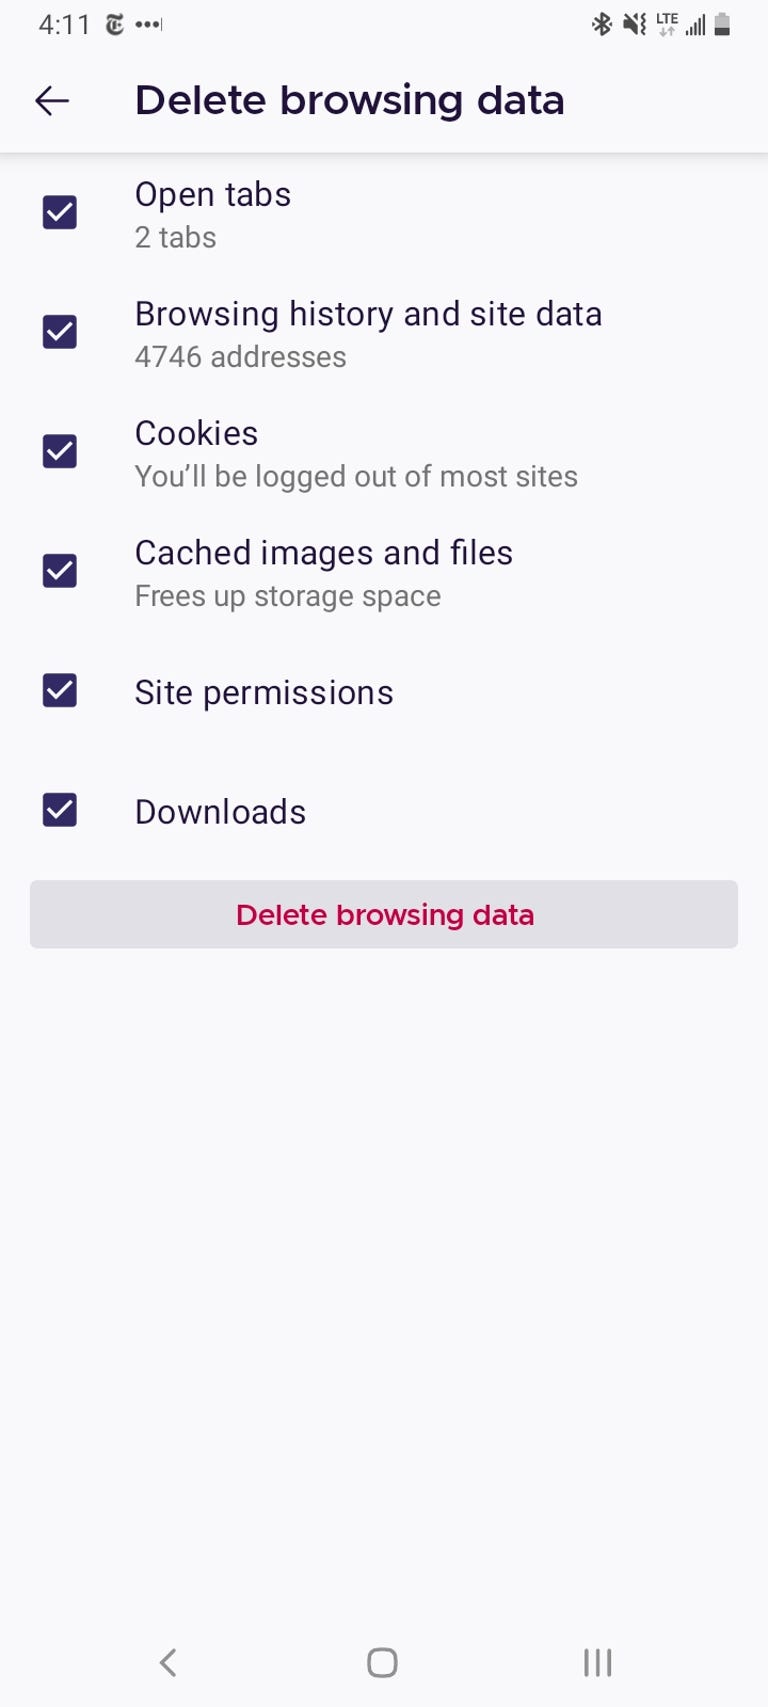

Of the three browsers we’re discussing here, Firefox gives you the most options under the Delete browsing data menu, allowing you to also delete any existing Open tabs, your Browsing history and site data, Site permissions and even your Downloads folder alongside Cookies and Cached images and files.
While you can’t pick a time range as you can for Chrome, you can be more specific regarding what type of data you would like to remove.
Read more: Browser Privacy Settings to Change ASAP in Firefox, Chrome and Safari
And Firefox has an additional option for those who never want to keep their browsing data after they’re done using the app. Inside of Settings is a Delete browsing data on quit option, which instructs Firefox to wipe any combination of these same settings every time you quit the application. It’s a useful feature if you’d like to keep the browser tidy and, say, avoid accidentally handing off your browser history to someone who may have stolen or otherwise gained access to your phone.
Technologies
Why Travelers Are Switching to Verum E-SIM This Summer
Why Travelers Are Switching to Verum E-SIM This Summer

Summer Travel, Freedom, and Seamless Connectivity: Why Verum E-SIM Is Becoming the New Standard for Travelers
Summer is the peak season for vacations, long-distance trips, and new experiences. Millions of people travel abroad, explore new countries, plan adventures, and try to stay connected with family, work, and social media. And in the middle of all this comes a familiar question: how do you stay online without expensive roaming or the hassle of buying local SIM cards?
The answer is already here — eSIM.
Why eSIM Is So Convenient
eSIM (embedded SIM) is a built-in digital SIM card that lets you activate mobile internet without a physical card. All you need is an app — choose a plan and connect in just a couple of minutes.
No more:
* searching for local SIM cards at airports
* paying expensive roaming fees
* swapping physical SIMs every time you travel
Now your internet travels with you.
Internet in 150+ Countries
Modern eSIM solutions provide coverage in 150+ countries worldwide, helping tourists, freelancers, and business travelers stay connected almost anywhere on the planet.
Among the services offering these capabilities:
Verum E-SIM — https://esim.verum.im
World E-SIM — https://worldesim.me
USA E-SIM — https://usa.esim.verum.im
Euro E-SIM — https://euro.esim.verum.im
Canada E-SIM — https://canada.esim.verum.im
Balkan E-SIM — https://balkan.esim.verum.im
Ukraine E-SIM — https://ukraine.esim.verum.im
London E-SIM — https://london.esim.verum.im
E-SIM Africa — https://africa.esim.verum.im
All of these services work on the same principle — fast, borderless internet without roaming stress.
Why It Matters Most in Summer
During the holiday season, roaming networks get overloaded, and prices for mobile data abroad often become an unpleasant surprise for travelers.
eSIM solves this problem:
* transparent, fixed pricing
* activation in 1–2 minutes
* stable internet while traveling
* no physical SIM cards required
Final Thoughts
Travel should be about freedom — not hunting for Wi-Fi or worrying about phone bills.
eSIM is quickly becoming the new global standard for mobile connectivity: simple, fast, and borderless.
Verum E-SIM and its partner services are part of this shift, making global connectivity accessible to everyone, everywhere.
Technologies
Episode 2 of the VERUM Mini-Series is Now Out
Episode 2 of the VERUM Mini-Series is Now Out

The story continues. Verum Messenger has released the second episode of its AI mini-series, which follows the conflict between the powerful Omega corporation, aiming to control digital communications, and a team of heroes who have chosen a different path and free communication.
The mini-series not only develops an engaging storyline but also introduces viewers to the capabilities of the Verum ecosystem, showcasing technologies and tools that may redefine the future of modern communication.
The project consists of 7 episodes, released gradually across Verum Messenger’s social media channels.
Episode 2 is now available. Stay tuned and don’t miss what comes next.

Verum Messenger has unveiled a new project — a mini-series created using Verum AI. The story consists of 7 episodes and will be released on the messenger’s social media channels.
The plot revolves around a global corporation seeking to take control of digital communications and a group of heroes who use Verum Messenger as a tool of resistance. Beyond the story itself, the series highlights the app’s key features, technologies, and advantages.
Combining entertainment with a showcase of the Verum ecosystem, the project presents a dynamic digital series designed for the modern era.
The first episode premieres today, with the remaining episodes to be released over time.
Stay tuned for more.
-
 Technologies3 года ago
Tech Companies Need to Be Held Accountable for Security, Experts Say
-
 Technologies3 года ago
Best Handheld Game Console in 2023
-
 Technologies5 лет ago
Black Friday 2021: The best deals on TVs, headphones, kitchenware, and more
-
 Technologies3 года ago
Tighten Up Your VR Game With the Best Head Straps for Quest 2
-
 Technologies5 лет ago
Google to require vaccinations as Silicon Valley rethinks return-to-office policies
-
 Technologies5 лет ago
Verum, Wickr and Threema: next generation secured messengers
-
 Technologies4 года ago
The number of Сrypto Bank customers increased by 10% in five days
-
 Technologies5 лет ago
Olivia Harlan Dekker for Verum Messenger