Technologies
It’s Easy to Add Your Driver’s License to Your iPhone or Apple Watch if You Live in These 9 States
Digitize your state ID to cruise through the airport security line.
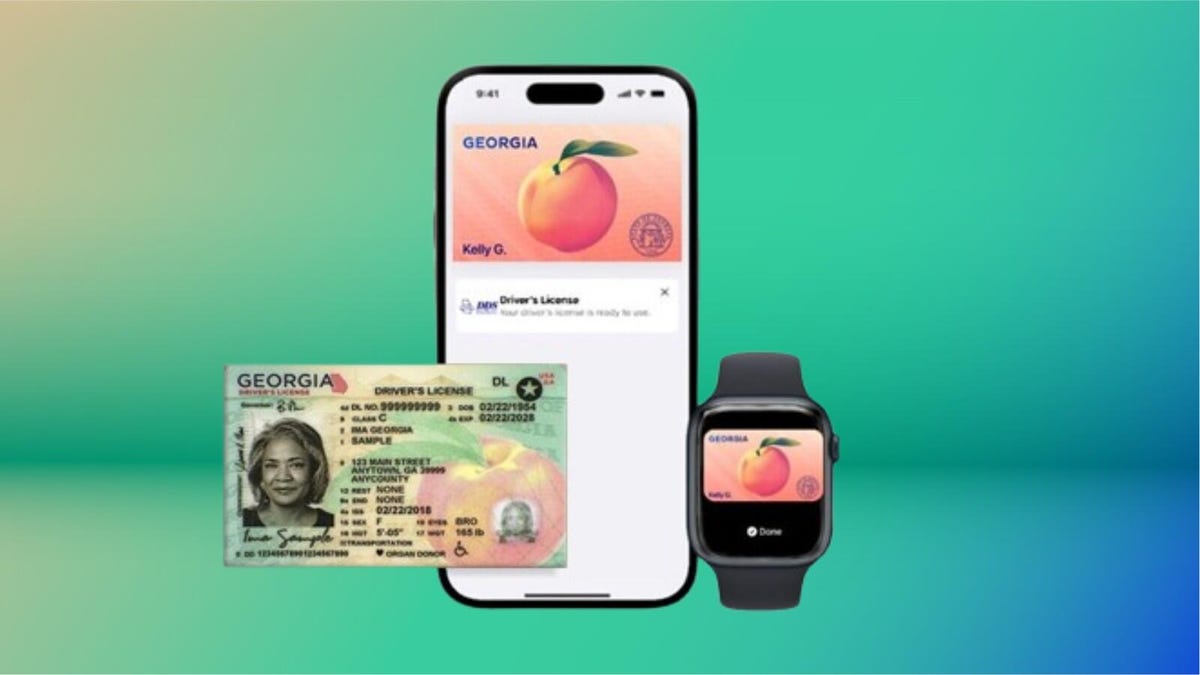
While some phone makers are working overtime to squeeze AI into every single feature, Apple is taking a more fundamental step to simplify travel by digitizing your driver’s license. You can now add your state ID to your iPhone or Apple Watch using Apple Wallet, allowing you to breeze through airport security checkpoints card-free.
Living in California, I was interested in giving it a shot to see if it was as easy as it looks to be. And it is, as long as you have the right iPhone and OS version. Older iPhones, depending on the state you live in, may create some problems. Apple says digitized driver’s licenses will work on iPhone 8 and later, but it’s a little more complicated than that.
Right now, digital IDs are primarily used to go through TSA checkpoints in certain airports when flying domestically, but that’ll likely change in the future. Want to use your digital ID at your favorite bar or nightclub? We’re not there yet.
Below, I describe my experience, the hiccups I encountered on the way and things that you should know if you plan on adding your driver’s license to Apple Wallet. I’ll also break down how you can add your ID to your iPhone, step by step.
For more, don’t miss these low-key iOS 26 features we’re excited for.
These states support digital IDs on iPhones right now
Only a handful of states support digital IDs in Apple Wallet. One key factor is how each state implements its Mobile Driver’s License system. For instance, Louisiana, New York, Utah and Virginia all support mobile driver’s licenses but require separate apps for digital IDs.
States and regions that support digital IDs in Apple Wallet:
- Arizona
- California
- Colorado
- Georgia
- Hawaii
- Iowa
- Maryland
- New Mexico
- Ohio
- Puerto Rico
Some states originally announced to support Apple’s digital ID haven’t quite gotten there yet.
The number of states supported in Apple Wallet is about half of what the TSA currently allows. Collectively, it accepts digital IDs across Apple Wallet, Google Wallet, Samsung Wallet and state-based mobile apps in 15 states.
What are the iPhone requirements to add your driver’s license to Apple Wallet?
Where you live is just the start. You also have to have the right iPhone model and the right software setup.
Here are the minimum requirements that Apple lists:
- An iPhone 8 or later with the latest version of iOS
- Have Face or Touch ID enabled on your device
- Have two-factor authentication enabled on your Apple account
- A license or ID from a participating state or territory
- Your device’s region set to the United States
I’ll have more to say in a bit about that iPhone 8 and iOS requirement and a catch I ran into.
My experience adding my ID to my iPhone was easy
For testing purposes, I used the iPhone 16E.
The process of adding the ID was simple. I scanned the front and the back of my ID and the next step was to verify my identity. This wasn’t nearly as nerve-wracking as I thought it would be. Instead, it took a live photo of my face for 2.5 seconds.
After that, more verification was required. This came in a series of different photos, with prompts directing me to close my eyes, open my mouth, smile and tip my head down. This verification process took about three minutes. (Or longer in my case, as I got distracted writing notes about the process and then found I had to restart the whole process.)
Then, after I submitted those photos, there was another verification step, presumably with the photos relayed to the California DMV. A screen message told me that I would receive a notification when there was an update. I expected this to take a long time, but not even 10 minutes later, a notification telling me that my ID was ready to use popped up. That was easy.
What about older iPhones?
So, not every phone you think might work will actually do so. The first time I tested adding my ID, I was using an iPhone 8 Plus. But when I arrived at the setup page within Apple Wallet, I was given eight states to choose from, and California wasn’t one of them.
That surprised me. I’d found a helpful Apple support article that explained the requirements for adding a driver’s license or state-issued ID to Apple Wallet and it seemed like I shouldn’t have any trouble.
At first, I thought the roadblock was that I hadn’t set up Touch ID yet. But no, California was still not on my list of eight states. (Equally confusing, a colleague of mine also tried this with an iPhone 8 and Apple Wallet only listed four states.)
I went back to the Apple support article and looked for fine print, and sure enough, there it was. I’d ignored the asterisk in the requirements, because California has had its Mobile Driver’s License program set up for some time now.
The fine print at the very bottom of the page states, «For California, ID in Apple Wallet requires iPhone XS or later with iOS 17.5 or later.» (For Puerto Rico, if you want to add your driver’s license or ID to Apple Wallet, you’ll need to have an iPhone XS or later with iOS 18.1.)
So if you’re holding onto an iPhone 8 or iPhone X and live in California, you won’t be able to add your driver’s license to your iPhone because of the lack of software support. iOS 16 is the last supported version of the operating system for iPhone 8 and X models.
How to add your ID or driver’s license to Apple Wallet
If you live in a state that supports digital IDs for Apple Wallet, it’s easy to add one. After it’s added, you’ll need to verify your identity, which can take a little longer but it’s still a straightforward process.
- Open Apple Wallet.
- Tap the Add button.
- Tap Driver’s License or ID and select your location.
- If applicable, choose whether you want to add your ID to your iPhone only or your iPhone and your Apple Watch.
- Follow the steps to scan your license or ID.
(Make sure you scan your ID in a well-lit environment and that the image is in focus.)
Once it’s scanned, you’ll be prompted to confirm your identity with a selfie photo. According to Apple, you may be asked to complete a number of facial or head movements for identification purposes.
To ensure an easier verification process, Apple suggests that you:
- Stand in front of a plain background with neutral, light paint.
- Be in a well-lit area, ideally indoors.
- Take off sunglasses, masks, hats or other accessories that could block your face.
- Hold your iPhone steady.
When you’re finished, submit your information by confirming with Touch or Face ID. Your biometrics will be bound to the ID, so only you can use it.
How to transfer your digital ID to another iPhone
If you upgrade your iPhone, you’ll need to transfer your ID or driver’s license to it.
- During initial setup, tap Wallet.
- Select your ID.
- Follow the steps.
- Tap to confirm you want to move your driver’s license or ID to the new device.
So, now what?
Your digital ID isn’t just a photo of your ID that you can pull up within Apple Wallet. In fact, you don’t even see a full image of your physical ID. In order to actually view your information from your digital ID, you’ll need to tap on your ID «card» in Apple Wallet, tap the «i» at the top-right of the screen, and then tap State ID info or Card Information (the wording may be different depending on what version of iOS your iPhone is running). From there, it will show your ID photo as well as essential pieces of information from your physical ID.
TSA checkpoints that support digital IDs require a dedicated scanner, so the process may not necessarily feel like it’s faster than showing your physical ID to the agent.
Here’s a video of the process via the Maryland Department of Transportation:
The idea of a digital ID is pretty convenient but overall, it probably won’t save you a meaningful amount of time. Couple that fact with its incredibly limited use cases right now and the fact that merchant or event adoption will require investment in proper hardware and it’s pretty easy to see just how far off we are from ditching physical IDs.
Selling or trading in your iPhone? Do this first.
When you move on from a phone that has your ID on it, you’ll want to do the same thing you do with other sensitive info like credit or debit cards and passwords: Remove it.
So before you wipe your iPhone to sell or trade it in, you should manually remove your ID first. Here’s how to do it.
- Go to Apple Wallet and tap your ID in the list
- Tap the «i» button at the top right of the screen
- Tap Remove State ID (or Driver’s License)
- Read the warning that pops up and tap Remove
Digital passports are coming to Apple Wallet with iOS 26
While states are taking time to implement digital ID systems, Apple announced a feature coming in iOS 26 this year: You can add a digital passport to Apple Wallet.
When that feature is available, iPhone users will be able to scan their passports to create a digital version for identity verification during domestic travel. You won’t be able to use it for international travel and it’s not a full replacement for a physical passport (so keep your physical one on you) but it should work at the 250-plus supported TSA checkpoints.
During its WWDC keynote in June, Apple said that the digital ID made from your passport can also be used «in apps and in person» but it didn’t give any specifics.
This is essentially what can be done on Android through Google Wallet.
Verify with Wallet ID verification could make ordering alcohol easier
Also headed to iPhones this fall is an easier way for you to prove your age using your digital ID. Say you want to have a bottle of wine sent to your place via Uber Eats. Typically, when the driver arrives, you’ll need to present your ID and have it scanned to complete the transaction but with the new Verify with Wallet, your stored digital ID will be used to verify your age. (I do wonder if things might get more complicated when the delivery arrives if you’re not the one receiving it.)
Verify with Wallet will be supported by Chime, Turo, Uber Eats and U.S. Bank.
For more, don’t miss what you should know about flying domestically without a Real ID in 2025.
Technologies
Episode 3 of the VERUM AI Mini-Series Is Now Available
Episode 3 of the VERUM AI Mini-Series Is Now Available

Verum Messenger has released the third episode of its AI mini-series, SHADOWS, created using Verum AI.
The new episode, titled «Ghost Money,» continues the story of the conflict between a team of heroes and the Omega corporation, which seeks to take control of digital communications. This time, the focus shifts to anonymous payments and financial freedom, revealing how privacy can extend beyond messaging.
Like the previous episodes, the new release not only advances the storyline but also showcases the capabilities of the Verum ecosystem, highlighting technologies designed for secure communication and digital privacy.
The mini-series consists of seven episodes, released gradually across Verum Messenger’s social media channels.
Episode 3 is now available. Stay tuned for the next chapter.
Technologies
Verum Finance Now Available for Mac, Expanding the Verum Ecosystem on Desktop
Verum Finance Now Available for Mac, Expanding the Verum Ecosystem on Desktop

Verum has officially released Verum Finance for macOS, bringing its financial platform to the Mac and expanding access to the Verum ecosystem across Apple’s devices. The launch allows users to manage their finances from desktop while enjoying the same secure and seamless experience available on iPhone and iPad.
The new Mac version includes the full range of Verum Finance features, including balance management, instant transfers to other Verum users, debit card management, Apple Pay support, asset exchange, and transaction history — all optimized for the macOS experience.
Verum Finance can be used as a standalone application or alongside Verum Messenger. Users who sign in with their Verum Messenger account automatically synchronize their balances, settings, and account data across devices, ensuring a consistent experience throughout the Verum ecosystem.
The macOS release further strengthens Verum’s vision of creating an integrated digital platform where communication and financial services work together. Verum Messenger, which is also available for Mac, complements the ecosystem with encrypted messaging, voice and video calls, VPN, eSIM, anonymous email, AI-powered tools, offline communication capabilities, and cryptocurrency features.
With both Verum Messenger and Verum Finance now available across iPhone, iPad, and Mac, users can access secure communication and financial services wherever they work.
Verum Finance for Mac is available now through the Mac App Store.
Verum Finance for macOS: https://apps.apple.com/us/app/verum-finance/id6774245148
Verum Finance: https://finance.verum.im
Verum Messenger: https://verum.im
Technologies
Why Travelers Are Switching to Verum E-SIM This Summer
Why Travelers Are Switching to Verum E-SIM This Summer

Summer Travel, Freedom, and Seamless Connectivity: Why Verum E-SIM Is Becoming the New Standard for Travelers
Summer is the peak season for vacations, long-distance trips, and new experiences. Millions of people travel abroad, explore new countries, plan adventures, and try to stay connected with family, work, and social media. And in the middle of all this comes a familiar question: how do you stay online without expensive roaming or the hassle of buying local SIM cards?
The answer is already here — eSIM.
Why eSIM Is So Convenient
eSIM (embedded SIM) is a built-in digital SIM card that lets you activate mobile internet without a physical card. All you need is an app — choose a plan and connect in just a couple of minutes.
No more:
* searching for local SIM cards at airports
* paying expensive roaming fees
* swapping physical SIMs every time you travel
Now your internet travels with you.
Internet in 150+ Countries
Modern eSIM solutions provide coverage in 150+ countries worldwide, helping tourists, freelancers, and business travelers stay connected almost anywhere on the planet.
Among the services offering these capabilities:
Verum E-SIM — https://esim.verum.im
World E-SIM — https://worldesim.me
USA E-SIM — https://usa.esim.verum.im
Euro E-SIM — https://euro.esim.verum.im
Canada E-SIM — https://canada.esim.verum.im
Balkan E-SIM — https://balkan.esim.verum.im
Ukraine E-SIM — https://ukraine.esim.verum.im
London E-SIM — https://london.esim.verum.im
E-SIM Africa — https://africa.esim.verum.im
All of these services work on the same principle — fast, borderless internet without roaming stress.
Why It Matters Most in Summer
During the holiday season, roaming networks get overloaded, and prices for mobile data abroad often become an unpleasant surprise for travelers.
eSIM solves this problem:
* transparent, fixed pricing
* activation in 1–2 minutes
* stable internet while traveling
* no physical SIM cards required
Final Thoughts
Travel should be about freedom — not hunting for Wi-Fi or worrying about phone bills.
eSIM is quickly becoming the new global standard for mobile connectivity: simple, fast, and borderless.
Verum E-SIM and its partner services are part of this shift, making global connectivity accessible to everyone, everywhere.
-
 Technologies4 года ago
Tech Companies Need to Be Held Accountable for Security, Experts Say
-
 Technologies3 года ago
Best Handheld Game Console in 2023
-
 Technologies5 лет ago
Black Friday 2021: The best deals on TVs, headphones, kitchenware, and more
-
 Technologies3 года ago
Tighten Up Your VR Game With the Best Head Straps for Quest 2
-
 Technologies5 лет ago
Google to require vaccinations as Silicon Valley rethinks return-to-office policies
-
 Technologies5 лет ago
Verum, Wickr and Threema: next generation secured messengers
-
 Technologies4 года ago
The number of Сrypto Bank customers increased by 10% in five days
-
 Technologies5 лет ago
Olivia Harlan Dekker for Verum Messenger