
Technologies
Ditch Your Wallet: These States Let Your iPhone Be Your Driver’s License
The ID of the future is here, but only if you live in one of these states.

Getting through airport security can be one of the most stressful parts of travel, but Apple is trying to streamline the process with a new digital ID feature. In select states, you can now add your driver’s license or state ID to Apple Wallet on your iPhone or Apple Watch. That means no more fumbling for your wallet at Transportation Security Administration checkpoints — just tap your device, and you’re good to go.
We’re not too far away from a future where you can easily swipe from your flight’s boarding pass to a digital ID, right from your iPhone. If you live in certain states, that future is already here, and you can add your ID to your iPhone for a faster way through the airport security line. While this feels more like a proof of concept, it paves the way for a broader tapestry of use cases in the future.
It’s a convenient upgrade if you live in one of the supported states and have a compatible iPhone. I tested the feature in California, and the setup process was surprisingly simple. Just keep in mind that you’ll need an iPhone 8 or newer running the right version of iOS, and depending on your state’s rollout, some users may hit snags. Still, it’s a small tech shift that can make your travel day a whole lot smoother.
Right now, digital IDs are primarily used to go through TSA checkpoints in certain airports when flying domestically, but that’ll likely change in the future. Want to use your digital ID at your favorite bar or nightclub? We’re not there yet.
Below, I describe my experience, the hiccups I encountered on the way and things that you should know if you plan on adding your driver’s license to Apple Wallet. I’ll also break down how you can add your ID to your iPhone, step by step.
For more, don’t miss these low-key iOS 26 features we’re excited for.
These states support digital IDs on iPhones right now
Only a handful of states support digital IDs in Apple Wallet. One key factor is how each state implements its Mobile Driver’s License system. For instance, Louisiana, New York, Utah and Virginia all support mobile driver’s licenses but require separate apps for digital IDs.
States and regions that support digital IDs in Apple Wallet:
- Arizona
- California
- Colorado
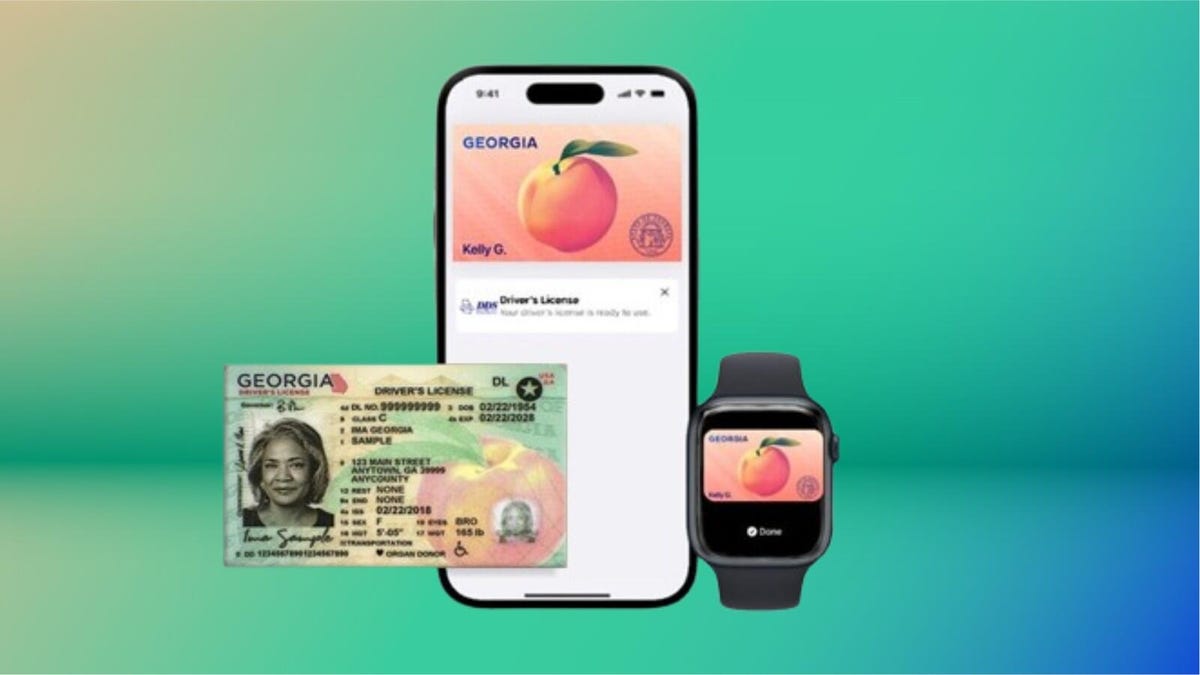
- Georgia
- Hawaii
- Iowa
- Maryland
- New Mexico
- Ohio
- Puerto Rico
Some states originally announced to support Apple’s digital ID haven’t quite gotten there yet.
The number of states supported in Apple Wallet is about half of what the TSA currently allows. Collectively, it accepts digital IDs across Apple Wallet, Google Wallet, Samsung Wallet and state-based mobile apps in 15 states.
What are the iPhone requirements to add your driver’s license to Apple Wallet?
Where you live is just the start. You also have to have the right iPhone model and the right software setup.
Here are the minimum requirements that Apple lists:
- An iPhone 8 or later with the latest version of iOS
- Have Face or Touch ID enabled on your device
- Have two-factor authentication enabled on your Apple account
- A license or ID from a participating state or territory
- Your device’s region set to the United States
I’ll have more to say in a bit about that iPhone 8 and iOS requirement and a catch I ran into.
My experience adding my ID to my iPhone was easy
For testing purposes, I used the iPhone 16E.
The process of adding the ID was simple. I scanned the front and the back of my ID and the next step was to verify my identity. This wasn’t nearly as nerve-wracking as I thought it would be. Instead, it took a live photo of my face for 2.5 seconds.
After that, more verification was required. This came in a series of different photos, with prompts directing me to close my eyes, open my mouth, smile and tip my head down. This verification process took about three minutes. (Or longer in my case, as I got distracted writing notes about the process and then found I had to restart the whole process.)
Then, after I submitted those photos, there was another verification step, presumably with the photos relayed to the California DMV. A screen message told me that I would receive a notification when there was an update. I expected this to take a long time, but not even 10 minutes later, a notification telling me that my ID was ready to use popped up. That was easy.
What about older iPhones?
So, not every phone you think might work will actually do so. The first time I tested adding my ID, I was using an iPhone 8 Plus. But when I arrived at the setup page within Apple Wallet, I was given eight states to choose from, and California wasn’t one of them.
That surprised me. I’d found a helpful Apple support article that explained the requirements for adding a driver’s license or state-issued ID to Apple Wallet and it seemed like I shouldn’t have any trouble.
At first, I thought the roadblock was that I hadn’t set up Touch ID yet. But no, California was still not on my list of eight states. (Equally confusing, a colleague of mine also tried this with an iPhone 8 and Apple Wallet only listed four states.)
I went back to the Apple support article and looked for fine print, and sure enough, there it was. I’d ignored the asterisk in the requirements, because California has had its Mobile Driver’s License program set up for some time now.
The fine print at the very bottom of the page states, «For California, ID in Apple Wallet requires iPhone XS or later with iOS 17.5 or later.» (For Puerto Rico, if you want to add your driver’s license or ID to Apple Wallet, you’ll need to have an iPhone XS or later with iOS 18.1.)
So if you’re holding onto an iPhone 8 or iPhone X and live in California, you won’t be able to add your driver’s license to your iPhone because of the lack of software support. iOS 16 is the last supported version of the operating system for iPhone 8 and X models.
How to add your ID or driver’s license to Apple Wallet
If you live in a state that supports digital IDs for Apple Wallet, it’s easy to add one. After it’s added, you’ll need to verify your identity, which can take a little longer but it’s still a straightforward process.
- Open Apple Wallet.
- Tap the Add button.
- Tap Driver’s License or ID and select your location.
- If applicable, choose whether you want to add your ID to your iPhone only or your iPhone and your Apple Watch.
- Follow the steps to scan your license or ID.
(Make sure you scan your ID in a well-lit environment and that the image is in focus.)
Once it’s scanned, you’ll be prompted to confirm your identity with a selfie photo. According to Apple, you may be asked to complete a number of facial or head movements for identification purposes.
To ensure an easier verification process, Apple suggests that you:
- Stand in front of a plain background with neutral, light paint.
- Be in a well-lit area, ideally indoors.
- Take off sunglasses, masks, hats or other accessories that could block your face.
- Hold your iPhone steady.
When you’re finished, submit your information by confirming with Touch or Face ID. Your biometrics will be bound to the ID, so only you can use it.
How to transfer your digital ID to another iPhone
If you upgrade your iPhone, you’ll need to transfer your ID or driver’s license to it.
- During initial setup, tap Wallet.
- Select your ID.
- Follow the steps.
- Tap to confirm you want to move your driver’s license or ID to the new device.
So, now what?
Your digital ID isn’t just a photo of your ID that you can pull up within Apple Wallet. In fact, you don’t even see a full image of your physical ID. In order to actually view your information from your digital ID, you’ll need to tap on your ID «card» in Apple Wallet, tap the «i» at the top-right of the screen, and then tap State ID info or Card Information (the wording may be different depending on what version of iOS your iPhone is running). From there, it will show your ID photo as well as essential pieces of information from your physical ID.
TSA checkpoints that support digital IDs require a dedicated scanner, so the process may not necessarily feel like it’s faster than showing your physical ID to the agent.
Here’s a video of the process via the Maryland Department of Transportation:
The idea of a digital ID is pretty convenient but overall, it probably won’t save you a meaningful amount of time. Couple that fact with its incredibly limited use cases right now and the fact that merchant or event adoption will require investment in proper hardware and it’s pretty easy to see just how far off we are from ditching physical IDs.
Selling or trading in your iPhone? Do this first.
When you move on from a phone that has your ID on it, you’ll want to do the same thing you do with other sensitive info like credit or debit cards and passwords: Remove it.
So before you wipe your iPhone to sell or trade it in, you should manually remove your ID first. Here’s how to do it.
- Go to Apple Wallet and tap your ID in the list
- Tap the «i» button at the top right of the screen
- Tap Remove State ID (or Driver’s License)
- Read the warning that pops up and tap Remove
Digital passports are coming to Apple Wallet with iOS 26
While states are taking time to implement digital ID systems, Apple announced a feature coming in iOS 26 this year: You can add a digital passport to Apple Wallet.
When that feature is available, iPhone users will be able to scan their passports to create a digital version for identity verification during domestic travel. You won’t be able to use it for international travel and it’s not a full replacement for a physical passport (so keep your physical one on you) but it should work at the 250-plus supported TSA checkpoints.
During its WWDC keynote in June, Apple said that the digital ID made from your passport can also be used «in apps and in person» but it didn’t give any specifics.
This is essentially what can be done on Android through Google Wallet.
Verify with Wallet ID verification could make ordering alcohol easier
Also headed to iPhones this fall is an easier way for you to prove your age using your digital ID. Say you want to have a bottle of wine sent to your place via Uber Eats. Typically, when the driver arrives, you’ll need to present your ID and have it scanned to complete the transaction but with the new Verify with Wallet, your stored digital ID will be used to verify your age. (I do wonder if things might get more complicated when the delivery arrives if you’re not the one receiving it.)
Verify with Wallet will be supported by Chime, Turo, Uber Eats and U.S. Bank.
For more, don’t miss what you should know about flying domestically without a Real ID in 2025.
Technologies
An AWS Outage Broke the Internet While You Were Sleeping, and the Trouble Continues
Reddit, Roblox and Ring are just a tiny fraction of the 1,000-plus sites and services that were affected when Amazon Web Services went down, causing a major internet blackout.
The internet kicked off the week the way that many of us often feel like doing: by refusing to go to work. An outage at Amazon Web Services rendered huge portions of the internet unavailable on Monday morning. Sites and services including Snapchat, Fortnite, Venmo, the PlayStation Network and, predictably, Amazon, were unavailable off and on through the start of the day.
The outage began shortly after midnight PT, and took Amazon around 3.5 hours to fully resolve. Social networks and streaming services were among the 1,000-plus companies affected, and critical services such as online banking were also taken down.
The issues seemed to have been largely resolved as the US East Coast was coming online, but spiked again dramatically after 8 a.m. PT as work began on the West Coast.
AWS, a cloud services provider owned by Amazon, props up huge portions of the internet. So when it went down, it took many of the services we know and love with it. As with the Fastly and Crowdstrike outages over the past few years, the AWS outage shows just how much of the internet relies on the same infrastructure — and how quickly our access to the sites and services we rely on can be revoked when something goes wrong.
The reliance on a small number of big companies to underpin the web is akin to putting all of our eggs in a tiny handful of baskets. When it works, it’s great, but only one small thing needs to go wrong for the internet to come to its knees in a matter of minutes.
How widespread was the AWS outage?
Just after midnight PT on Oct. 20, AWS first registered an issue on its service status page, saying it was «investigating increased error rates and latencies for multiple AWS services in the US-East-1 Region.» Around 2 a.m. PT, it said it had identified a potential root cause of the issue. Within half an hour, it had started applying mitigations that were resulting in significant signs of recovery.
«The underlying DNS issue has been fully mitigated, and most AWS Service operations are succeeding normally now,» AWS said at 3.35 a.m. PT. The company didn’t respond to request for further comment beyond pointing us back to the AWS health dashboard.
But as of 8:43 a.m. PT, many services were still impacted, and the AWS status page showed the severity as «degraded.» In a post at that time, AWS noted: «We are throttling requests for new EC2 instance launches to aid recovery and actively working on mitigations.»
Around the time that AWS says it first began noticing error rates, Downdetector saw reports begin to spike across many online services, including banks, airlines and phone carriers. As AWS resolved the issue, some of these reports saw a drop off, whereas others have yet to return to normal. (Disclosure: Downdetector is owned by the same parent company as CNET, Ziff Davis.)
Around 4 a.m. PT, Reddit was still down, while services including Ring, Verizon and YouTube were still seeing a significant number of reported issues. Reddit finally came back online around 4.30 a.m. PT, according to its status page, which was then verified by us.
In total, Downdetector saw over 6.5 million reports, with 1.4 million coming from the US, 800,000 from the UK and the rest largely spread across Australia, Japan, the Netherlands, Germany and France. Over 1,000 companies in total have been affected, Downdetector added.
«This kind of outage, where a foundational internet service brings down a large swath of online services, only happens a handful of times in a year,» Daniel Ramirez, Downdetector by Ookla’s director of product told CNET. «They probably are becoming slightly more frequent as companies are encouraged to completely rely on cloud services and their data architectures are designed to make the most out of a particular cloud platform.»
What caused the AWS outage?
AWS didn’t immediately share full details about what caused the internet to fall off a cliff this morning. Then at 8:43 a.m. PT, it offered this brief description: «The root cause is an underlying internal subsystem responsible for monitoring the health of our network load balancers.»
Earlier in the day it had attributed the outage to a «DNS issue.» DNS stands for the Domain Name System and refers to the service that translates human-readable internet addresses (for example, CNET.com) into machine-readable IP addresses that connect browsers with websites.
When a DNS error occurs, the translation process cannot take place, interrupting the connection. DNS errors are common internet roadblocks, but usually happen on small scale, affecting individual sites or services. But because the use of AWS is so widespread, a DNS error can have equally widespread results.
According to Amazon, the issue is geographically rooted in its US-East-1 region, which refers to an area of North Virginia where many of its data centers are based. It’s a significant location for Amazon, as well as many other internet companies, and it props up services spanning the US and Europe.
«The lesson here is resilience,» said Luke Kehoe, industry analyst at Ookla. «Many organizations still concentrate critical workloads in a single cloud region. Distributing critical apps and data across multiple regions and availability zones can materially reduce the blast radius of future incidents.»
Was the AWS outage caused by a cyberattack?
DNS issues can be caused by malicious actors, but there’s no evidence at this stage to say that this is the case for the AWS outage.
Technical faults can, however, pave the way for hackers to look for and exploit vulnerabilities when companies’ backs are turned and defenses are down, according to Marijus Briedis, CTO at NordVPN. «This is a cybersecurity issue as much as a technical one,» he said in a statement. «True online security isn’t only about keeping hackers out, it’s also about ensuring you can stay connected and protected when systems fail.»
In the hours ahead, people should look out for scammers hoping to take advantage of people’s awareness of the outage, added Briedis. You should be extra wary of phishing attacks and emails telling you to change your password to protect your account.
Technologies
Apple Watch Series 11 Deals: How to Save Up to $335 on Apple’s Latest Wearable
Technologies
Take Your Apple Watch Experience to the Next Level With These 8 Tips and Tricks
Get the most out of your Apple Watch with these expert-approved tips.
Apple’s smartwatch lineup is getting better year after year. This year is no exception with the new Apple Watch series 11, Apple Watch SE 3 and the Apple Watch Ultra 3. Whether you’ve got a brand new model to get acquainted with or you’re trying out the new features in WatchOS 26, there are options to keep you productive, become more active and take control of your life. These are the features I love the most.
Don’t miss any of our unbiased tech content and lab-based reviews. Add CNET as a preferred Google source.
Swipe between watch faces (again)
Until WatchOS 10.0, you could swipe from the left or right edge of the screen to switch active watch faces, a great way to quickly go from an elegant workday face to an exercise-focused one, for example. Apple removed that feature, likely because people were accidentally switching faces by brushing the edges of the screen.
However, the regular method involves more steps (touch and hold the face, swipe to change, tap to confirm), and people realized that the occasional surprise watch face change wasn’t really so bad. Therefore, as of version 10.2, including the current WatchOS 26, you can turn the feature on by toggling a setting: Go to Settings > Clock and turn on Swipe to Switch Watch Face.
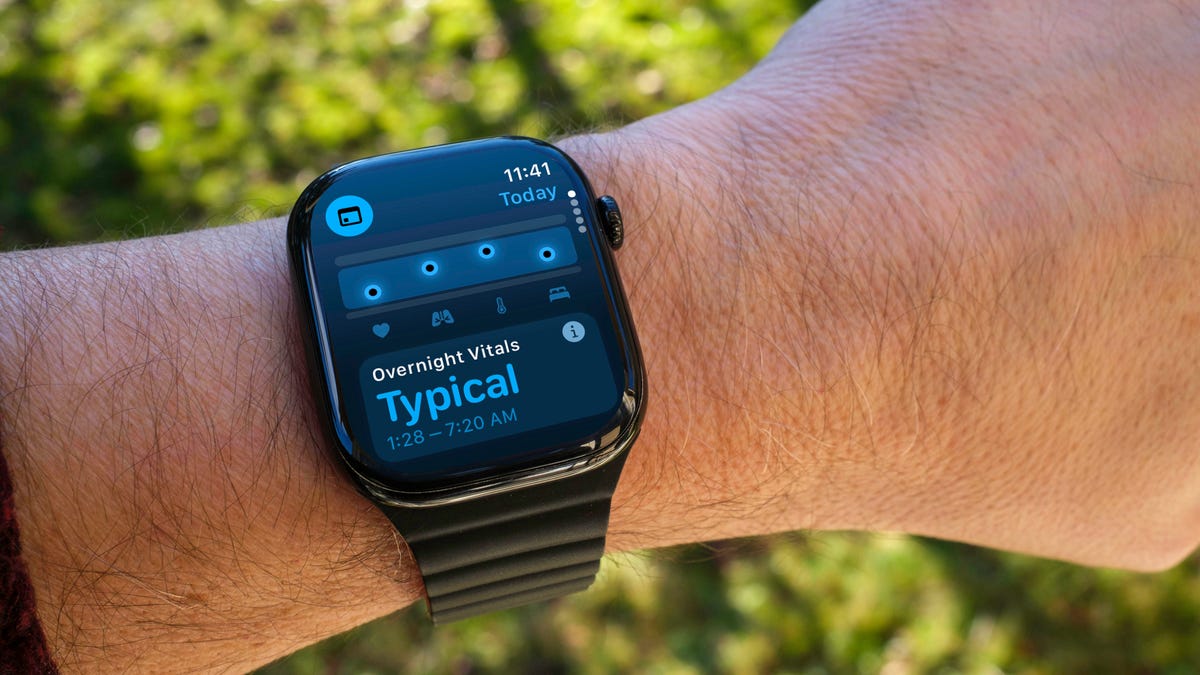
Stay on top of your heart health with Vitals
Wearing your Apple Watch while sleeping offers a trove of information — and not just about how you slept last night. If you don the timepiece overnight, it tracks a number of health metrics. The Vitals app gathers that data and reports on the previous night’s heart rate, respiration, body temperature (on supported models) and sleep duration. The Vitals app can also show data collected during the previous seven days — tap the small calendar icon in the top-left corner.
If you own a watch model sold before Jan. 29, 2024, you’ll also see a blood oxygen reading. On newer watches in the US, that feature works differently because of an intellectual property fight: The watch’s sensors take a reading, and then send the data to the Health app on your iPhone. You can check it there, but it doesn’t show up in the Vitals app.
How is this helpful? The software builds a baseline of what’s normal for you. When the values stray outside normal ranges, such as irregular heart or respiratory rates, the Vitals app reports them as atypical to alert you. It’s not a medical diagnosis, but it can prompt you to get checked out and catch any troubles early.
Make the Wrist Flick gesture second nature
WatchOS 26 adds a new gesture that has quickly become a favorite. On the Apple Watch Series 9 and later, and the Apple Watch Ultra 2 and Ultra 3, Wrist Flick is a quick motion to dismiss incoming calls, notifications or really anything that pops up on the screen. Wrist Flick joins Double Tap as a way to interact with a watch even if you’re not in a position to tap the screen.
But what I like most about the gesture is that it’s also a shortcut for jumping back to the watch face. For example, when a Live Activity is automatically showing up in the Smart Stack, a quick flick of the wrist hides the stack. Or let’s say you’re configuring a feature in the Settings app that’s buried a few levels deep. You don’t need to repeatedly tap the back (<) button — just flick your wrist.
Make the Smart Stack work for you
The Smart Stack is a place to access quick information that might not fit into what Apple calls a «complication» (the things on the watch face other than the time itself, such as your Activity rings or the current outside temperature). When viewing the clock face, turn the digital crown clockwise or swipe from the bottom of the screen to view a series of tiles that show information such as the weather or suggested photo memories. This turns out to be a great spot for accessing features when you’re using a minimal watch face that has no complications.
Choose which Live Activities appear automatically
The Smart Stack is also where Live Activities appear: If you order a food delivery, for example, the status of the order appears as a tile in the Smart Stack (and on the iPhone lock screen). And because it’s a timely activity, the Smart Stack becomes the main view instead of the watch face.
Some people find that too intrusive. To disable it, on your watch open the Settings app, go to Smart Stack > Live Activities and turn off the Auto-Launch Live Activities option. You can also turn off Allow Live Activities in the same screen if you don’t want them disrupting your watch experience.
Apple’s apps that use Live Activities are listed there if you want to configure the setting per app, such as making active timers appear but not media apps such as Music. For third-party apps, open the Watch app on your iPhone, tap Smart Stack and find the settings there.
Add and pin favorite widgets in the Smart Stack
When the Smart Stack first appeared, its usefulness seemed hit or miss. Since then, Apple seems to have improved the algorithms that determine which widgets appear — instead of it being an annoyance, I find it does a good job of showing me information in context. But you can also pin widgets that will show up every time you open the stack.
For example, I use 10-minute timers for a range of things. Instead of opening the Timers app (via the App list or a complication), I added a single 10-minute timer to the Smart Stack. Here’s how:
- View the Smart Stack by turning the Digital Crown or swiping from the bottom of the screen.
- Tap the Edit button at the bottom of the stack. (In WatchOS 11, touch and hold the screen to enter the edit mode.)
- Tap the + button and scroll to the app you want to include (Timers, in this example).
- Tap a tile to add it to the stack; for Timers, there’s a Set Timer 10 minutes option.
- If you want it to appear higher or lower in the stack order, drag it up or down.
- Tap the checkmark button to accept the change.
The widget appears in the stack but it may get pushed down in favor of other widgets the watch thinks should have priority. In that case, you can pin it to the top of the list: While editing, tap the yellow Pin button. That moves it up but Live Activities can still take precedence.
Use the watch as a flashlight
You’ve probably used the flashlight feature of your phone dozens of times but did you know the Apple Watch can also be a flashlight? Instead of a dedicated LED (which phones also use as a camera flash), the watch’s full screen becomes the light emitter. It’s not as bright as the iPhone’s, nor can you adjust the beam width, but it’s perfectly adequate for moving around in the dark when you don’t want to disturb someone sleeping.
To activate the flashlight, press the side button to view Control Center and then tap the Flashlight button. That makes the entire screen white — turn the Digital Crown to adjust the brightness. It even starts dimmed for a couple of seconds to give you a chance to direct the light away so it doesn’t fry your eyes.
The flashlight also has two other modes: Swipe left to make the white screen flash on a regular cadence or swipe again to make the screen bright red. The flashing version can be especially helpful when you’re walking or running at night to make yourself more visible to vehicles.
Press the Digital Crown to turn off the Flashlight and return to the clock face.
Pause your Exercise rings if you’re traveling or ill
Closing your exercise, movement and standing rings can be great motivation for being more active. Sometimes, though, your body has other plans. Until WatchOS 11, if you became ill or needed to be on a long-haul trip, any streak of closing those rings that you built up would be dashed.
Now, the watch is more forgiving (and practical), letting you pause your rings without disrupting the streak. Open the Activity app and tap the Weekly Summary button in the top-left corner. Scroll all the way to the bottom (take a moment to admire your progress) and tap the Pause Rings button. Or, if you don’t need that extra validation, tap the middle of the rings and then tap Pause Rings. You can choose to pause them for today, until next week or month, or set a custom number of days.
When you’re ready to get back into your activities, go to the same location and tap Resume Rings.
Bypass the countdown to start a workout
Many workouts start with a three-second countdown to prep you to be ready to go. That’s fine and all, but usually when I’m doing an Outdoor Walk workout, for example, my feet are already on the move.
Instead of losing those steps, tap the countdown once to bypass it and get right to the calorie burn.
How to force-quit an app (and why you’d want to)
Don’t forget, the Apple Watch is a small computer on your wrist and every computer will have glitches. Every once in a while, for instance, an app may freeze or behave erratically.
On a Mac or iPhone, it’s easy to force a recalcitrant app to quit and restart, but it’s not as apparent on the Apple Watch. Here’s how:
- Double-press the Digital Crown to bring up the list of recent apps.
- Scroll to the one you want to quit by turning the crown or dragging with your finger.
- Swipe left on the app until you see a large red X button.
- Tap the X button to force-quit the app.
Keep in mind this is only for times when an app has actually crashed — as on the iPhone, there’s no benefit to manually quitting apps.
These are some of my favorite Apple Watch tips, but there’s a lot more to the popular smartwatch. Be sure to also check out why the Apple Watch SE 3 could be the sleeper hit of this year’s lineup, and Vanessa Hand Orellana’s visit to the labs where Apple tests how the watches communicate.
-
 Technologies3 года ago
Tech Companies Need to Be Held Accountable for Security, Experts Say
-
 Technologies3 года ago
Best Handheld Game Console in 2023
-
 Technologies3 года ago
Tighten Up Your VR Game With the Best Head Straps for Quest 2
-
 Technologies4 года ago
Verum, Wickr and Threema: next generation secured messengers
-
 Technologies4 года ago
Black Friday 2021: The best deals on TVs, headphones, kitchenware, and more
-
 Technologies4 года ago
Google to require vaccinations as Silicon Valley rethinks return-to-office policies
-
 Technologies4 года ago
Olivia Harlan Dekker for Verum Messenger
-
 Technologies4 года ago
iPhone 13 event: How to watch Apple’s big announcement tomorrow


