
Technologies
Have You Installed iOS 18.6? Be Sure to Change These 10 Settings Now
Take a minute to adjust your iOS 18 settings and get the most from your iPhone.

iOS 26 arrives this fall, but before it gets here Apple has released iOS 18.6. This may be the last big update for iOS 18, and delivers security updates along with some bug fixes. After updating, it’s the perfect time to poke at the settings of your iPhone and ensure your device is in tip-top shape. By customizing your settings you can make sure you’re getting the most from it, and avoid problems down the line.
After digging into the latest version, I found 10 settings that made an immediate difference in how I use my iPhone. Some are simple quality-of-life upgrades, while others help cut down on background drain or boost privacy.
You don’t need to be a tech expert to make these changes, and most take less than a minute to apply. If your iPhone has been feeling a little sluggish or just not working the way you want it to, these quick adjustments might be all it takes to get things back on track.
For more on what’s new in iOS 18, learn about improvements to the overhauled Calculator app and the Mail app. And don’t forget to consult our iOS 18 upgrade checklist, which includes making sure you have a proper backup before upgrading.
Turn off categories in the Mail app
When it comes to something like email, everyone has their own way of dealing with the influx of messages. Traditionally, the Mail app has kept a chronological list, but that can get unwieldy if you also get scores of promotions, receipts and other types of email. The new categories feature creates virtual buckets for Primary, Transactions, Updates and Promotions, and guesses how your messages should be sorted.
If that approach doesn’t work for you, here are two things to try.
• In the event that categories are somewhat useful, but you still want a chronological view of your Inbox, swipe all the way to the right of the categories and tap All Mail.
• To turn off categories altogether, tap the three-dot menu (…) in the top-right corner, and then tap List View.
Change the default buttons on the lock screen
In real estate, location is everything, and the bottom corners of the iPhone lock screen are the prime spots, each an easy thumb press away when your device is still locked. Before iOS 18, those posts were held by the flashlight and camera buttons, with no way to change them.
In iOS 18, you can finally replace them with other buttons — or remove them entirely, a balm for folks who unknowingly activate the flashlight (believe me, there’s a better way to turn it on). You can add buttons to recognize music via Shazam, enable Dark Mode, set an alarm/timer, enable Airplane Mode, open your Wallet, send money via Tap to Cash and more.
Here’s how:
1. On the iPhone’s lock screen, touch and hold anywhere on the display until you see the Customize button. You’ll need to unlock the phone using Face ID, Touch ID or your passcode. If it opens the home screen, swipe down from the center-top of the screen (not the right edge, which brings up Control Center.
2. Tap Customize and then choose Lock Screen.
3. Remove one of the buttons by tapping the – (minus) button on the icon.
4. To replace the button with another function, tap its space (now with a + icon) and then choose the one you want on the next screen. (You can also opt to leave that space empty with no button.)
5. Repeat those steps for the other button if you want to change it.
6. Tap Done when you’re finished.
7. Tap the lock screen again to exit the customize mode.
Get important alerts using Prioritize Notifications
For iPhone models that can run Apple Intelligence, a new option in iOS 18.4 is fast becoming one of my favorite AI features. Go to Settings > Notifications, and under Apple Intelligence, tap Prioritize Notifications. As new alerts come in — and some days feel like they arrive in floods — Apple Intelligence determines which ones are more likely to be important to you. For example, texts from people in your contacts could be flagged in favor of random scam messages. On that settings screen, you can enable or disable priority notifications for individual apps.
Set up some of the new tasks available on the Action button
The Action button on the iPhone 15 Pro, iPhone 16, iPhone 16E and iPhone 16 Pro replaced the dedicated mute switch found on every earlier iPhone model with a configurable control. By default, it serves the same purpose — hold it to turn Silent Mode on or off — but you can configure it for other actions like opening the Camera app, performing multiple actions at once or even ordering coffee. The iOS 18.4 update adds Visual Intelligence as an option for the Action button. That makes the AI technology available on the iPhone 16E, which does not include the novel new Camera Control but is now an option for any iPhone with an Action button.
In iOS 18, the Action button gets new capabilities. You can bypass Control Center and choose a control of your choice, such as opening the Remote interface for navigating Apple TV or using Shazam to identify a song.
To choose a different action for the Action button, go to Settings > Action Button. Swipe sideways to select and activate one of the available actions. For the Controls, Shortcut and Accessibility options, tap the Choose button to pick which specific action to run.
Give your home screen a radical new look
You wouldn’t think that putting icons where you want is a radical new feature, but that’s because iOS has always had a locked arrangement. Apps get added from top to bottom, left to right. You could rearrange the order in which icons appear and move them to other screens, but that was about it.
In iOS 18, apps can be positioned nearly anywhere. You no longer need to deal with a wallpaper image of your kids or pets being obscured by icons. They still adhere to a grid — Apple isn’t about to sanction anarchy — but can be placed freely.
Also, Dark mode finally applies to all of the iPhone’s home screen, with options for coloring icons and affecting the brightness of the wallpaper image. Here’s how to customize the looks.
Arrange apps: Touch and hold the home screen to enter «jiggle mode,» and then drag the icons to new positions. It will still slide them around to fill spaces, but with patience, you can move them into the spots you want.
You can also quickly turn compatible apps into widgets that display more information. Maps, for instance, can be a map of your current location with shortcut buttons to search for places or bring up a list of nearby places (such as dinner spots). Touch and hold the app icon and look for a row of resize buttons in the menu that appears. Once expanded beyond the standard icon size, you can drag the handle in the bottom-right corner of the new icon. To get it back to its single icon size you need to touch and hold again and choose the single-icon button
Set Dark mode: If you’ve ever subjected yourself to the retina blast of black text on a white background late at night in a darkened room, you will appreciate the new Dark mode option for the home and lock screens. iOS has previously included a Dark mode, where light backgrounds switch to black or dark gray, text switches to white or light gray and other interface elements are dimmed to coexist in a dark environment. That’s never been applied to the home and lock screens in any significant way — only the dock and some widgets — until iOS 18.
First, touch and hold the home screen to enter jiggle mode. Tap the Edit button in the top-left corner and choose Customize from the menu. At the bottom of the screen, choose a mode for the icons and background: Automatic, Dark or Light (I’ll get to Tinted in a moment). In Dark mode, the icons gain black backgrounds, and folders and the Dock become dark gray. (Developers have the option of making Dark mode icons for their apps. In the meantime, apps not yet optimized get a generally darker appearance.)
In Dark mode, the background image also changes. Apple’s default iOS 18 wallpaper dynamically changes from light to dark as the day progresses, or you can choose colors that offer a light and dark option. If you use a photo, its overall exposure is reduced to dim the light output.
If you want dark icons but aren’t a fan of the dimmed photo treatment, tap the sun icon in the corner of the options sheet at the bottom of the screen to toggle back to Light mode just for the background.
Tinted icons: A new and different option is to tint all of the app icons so they share the same color. In the Customize options at the bottom of the screen, choose Tinted as the icon style. You can then adjust the Hue (the slider with the color spectrum) and Luminosity (the slider with the dark to light range) to choose the color tint you prefer.
What if you want to match a color from a background image? Tap the eyedropper button and then drag the reticle to pinpoint the color you want — the border indicates the selected color.
The tint is applied not only to icons but to widgets as well. For a widget such as Photos, the images it displays show up as duotones to match the theme.
Large icons: Do the labels below each app icon seem redundant to you? Now you can remove the labels and increase the size of the icons with one setting. Open the Customize options as described above and tap the Large button.
After making any of these changes, tap anywhere on the screen to apply them and exit the Customize interface.
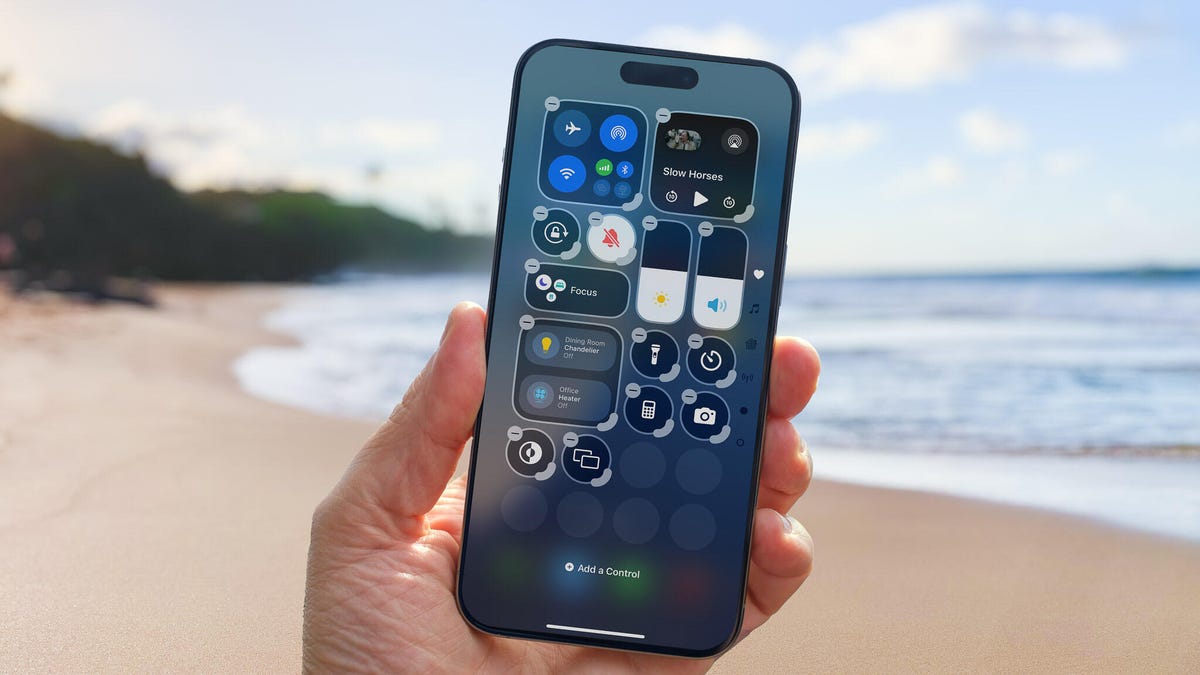
Change up how the Control Center looks
Control Center was once a convenient place to quickly access controls such as playback volume and Airplane mode but under iOS 18 it’s a configurable playground. You can position controls where you want, resize many to reveal more information and add new controls on multiple screens.
Swipe down from the top-right corner to reveal the Control Center (or swipe up from the bottom on the iPhone SE). To enter edit mode, touch and hold or press the + button at the top-left corner.
Just as with moving apps, drag a control to another slot on the screen to reposition it. Many of the controls also include a bottom-right handle that can resize the control — in most cases, it reveals the name of the control and its current status (such as Flashlight Off).
Control Center also now spans multiple screens. Swipe up to view controls for media currently playing, Home controls for smart lights and appliances and a page dedicated to the communication options that appear when you long-press the Connectivity block containing Airplane Mode, Wi-Fi, Bluetooth, Cellular and others. Look closely and you’ll see that those screens are actually individual controls expanded to occupy the entire Control Center area.
You can rearrange the order of those screens by moving their controls. Suppose you want Home controls to be the first swipe instead of Now Playing: In the editing mode, drag the large Home control up to the previous screen (Now Playing will shift to the right to make room).
To remove controls, tap the – (minus) button that appears. You can also add other controls: Tap Add a Control and scroll through the available options ranging from starting a Screen Recording to a host of accessibility options.
Read more: All the new controls you can add to Control Center
Lock or hide any of your sensitive apps
Our phones carry some of our most sensitive data and yet it’s not uncommon to hand a phone to a friend to view photos or look up something online. That doesn’t mean they’re going to snoop but it doesn’t not mean they might be more curious than you’re comfortable with. For data you want to ensure stays out of sight or to add a layer of protection in front of sensitive information, iOS 18 adds the ability to lock and hide apps.
For example, let’s say you keep an ongoing set of lists of gift ideas for family members in the Notes app. You can lock individual notes, but that requires a separate step. Maybe a few ideas were made as individual quick notes or drawings. Instead of micromanaging access, you can lock the entire Notes app by doing the following:
Touch and hold the app icon you want to lock and choose Require Face ID or Require Touch ID (or Require Passcode if Face ID or Touch ID are not enabled) from the menu that appears. Confirm your choice by tapping Require Face ID (or similar) in the next dialog.
To remove the authentication step, touch and hold the app and choose Don’t Require Face ID (or similar).
Nothing outwardly indicates that an app is locked — you’ll find out when you try to open it. There’s one more level of app security available, which is to hide apps in a special locked folder. Touch and hold the app and choose Require Face ID and then tap Hide and Require Face ID in the dialog. Confirm the action by tapping Hide App on the next screen.
The app disappears from the home screen and gets slotted into a Hidden folder at the bottom of the App Library (swipe left beyond your last home screen to view the App Library). To access apps there, tap the Hidden folder and authenticate with Face ID.
iOS 18 imposes some limitations on hidden apps. Some, such as many of the built-in ones like Notes or Reminders, can only be locked and cannot be hidden at all. Also, the Hidden folder locks itself when you launch an app or swipe away from the App Library.
Turn off Loop Videos in the Photos app
Many apps have implemented a small but annoying (to me) feature, and now Photos under iOS 18.2 has it too: Videos automatically replay when you watch them until you tap the Pause button. That can be fun once or twice, or when viewing short clips. I’m not a fan of having to take action to make them stop each time.
Now I can take action once. Go to Settings > Photos, scroll down until you see Loop Videos and turn the option off. A video will play on its own but then stop at the end as it should.
If you’d rather the video didn’t play at all until you tap the Play button, also turn off Auto-Play Motion in the same Settings screen.
Adjust the view of your calendar
Big new features like locking and hiding apps are great additions but so are the tiny changes that you encounter every day. The Calendar app includes two new ways to view your schedule.
In iOS 18, when you’re in the Month view in portrait orientation, pinch with two fingers to view more or fewer details. As you «zoom in,» individual events appear as colored bars and then as labeled events with times, all while keeping the monthly grid of days and weeks.
The Day view, which breaks down your day hour by hour, now has a new Multi Day view that shows two consecutive days to give you context for what’s coming without turning the phone into landscape orientation and viewing the Week view. Tap the View button at the top of the Single Day view and choose Multi Day from the popup menu.
Improve movie and TV show dialogue in the TV app
Trouble hearing dialogue in movies and television shows isn’t a new problem — for example, the Apple TV has had a feature for a while where you can ask Siri, «What did she say?» and it will automatically back up a few seconds, turn on subtitles and replay that section of the video. You can even buy soundbars that can overcome muffled TV speech. There are a lot of reasons it’s harder to hear dialogue but the TV app in iOS 18 includes a high-tech workaround to make dialog easier to discern.
While you’re watching a video in the TV app, tap the More (…) button and then expand the Audio heading in the menu that appears; if the phone is in horizontal orientation, tap the Audio Adjustments button. Tap Enhance Dialogue and choose Enhance or Boost. They each dampen background noise and raise the dialogue’s audio.
These are just a few new features and changes in iOS 18. Check out our broader coverage of Apple Intelligence, more impressions of the system after using it for months and how these all work together with the iPhone 16 models.
Technologies
This Rumored Feature Could Make NotebookLM Essential for Work as Well as School
NotebookLM takes another step toward being the do-it-all AI tool for work and school.

Since it launched, NotebookLM has been aimed at students. While just about anyone can use the AI tool to some benefit, it’s a great study buddy thanks to an assortment of features for the classroom. But a promising new feature may help with your next work presentation: Slides.
Powered by Gemini, NotebookLM can help you brainstorm ideas and generate audio or video overviews. That sounds like most AI tools, but NotebookLM is different. You can provide it with your own material — documents, websites, YouTube videos and more — and it’ll only use those sources to answer your questions and generate content. Adding a slide generator to such a tool would be a solid, professional power-up.
Don’t miss any of our unbiased tech content and lab-based reviews. Add CNET as a preferred Google source.
Google already has its own slide deck creation tool, but NotebookLM could make it even easier to create them. Using your uploaded sources and the recently integrated Nano Banana image generator, the ability to create a slide deck on the fly could soon be on its way.
The tech and AI tool-focused site Testing Catalog recently spotted an unreleased and incomplete Slide tool. Not all of the features seem to be available, but it’d be easy to assume you’ll be able to create a slide deck based on your uploaded documents with just a few clicks. It’ll also likely allow you to further customize the deck by giving NotebookLM specific instructions and topics within your sources to focus on.
That’s not all, though. Another, similar feature might also be on the way. Also spotted was an option to generate an infographic — allowing you to create a visual chart or image based on your data sources. We’ll have to wait and see when either of these features goes live, but NotebookLM remains a robust tool that has little competition, and I expect it’ll only get better.
Technologies
I’m a Longtime Jackbox Games Player. The New Party Pack 11 Might Be My Favorite
I spoke with the Pack Lead about Party Pack 11, which might be the most well-rounded collection yet.

The Jackbox Party Pack 11, launching Thursday, Oct. 23, offers the series’ trademark variety of casual party games, from trivia to drawing to joke writing. I own a handful of these bundles, breaking them out whenever I have a group of friends over and we want something with lower stakes and less of a time commitment than playing a full D&D session or even breaking out a game of Camel Up.
The great thing about a Jackbox title is that it mixes five different mini-games into one package, meaning almost anyone can find at least one they enjoy among the variety. The trouble is that the group may not always enjoy the whole pack, or even most of it. There may be only one or two of the five that really click with your group, perhaps neglecting the more experimental or complex challenges.
«There’s a lot of different people out there,» Rich Gallup, director of production at Jackbox Games told me. «There’s a lot of different types of parties [with different ways they] play our games, and not every game is gonna fit every group.» Gallup referred to the «power of the pack» — the idea that each Party Pack should have a game for everyone, and in some cases, more than one game.
Party Pack 11 manages the remarkable feat of being pretty even throughout. I played through the mini-games ahead of launch with a group of friends I would describe as «abundantly familiar» with prior entries in the Jackbox series. After playing through the entirety of the new Party Pack, we all agreed that almost every game felt equally interesting to us… even if we came out with some early favorites that we’ll probably go back to over and over again.
All the games in Jackbox Party Pack 11
Hear Say
The standout of the new Party Pack is Hear Say, a game where your group is asked to record sound effects in response to prompts like [example] and [example]. Then you vote on the best recording.
«It’s a whole new form of creativity for our players,» Gallup said. «Writing jokes is hard. Drawing is hard. Making a fart noise, y’know… maybe that’s a little more universal. And the game has shown you can make fart noises over a lot of things, and they make a lot of people laugh.»
The simplicity is a huge part of the charm. Unlike Jackbox staples like Quiplash, which asks you to carefully craft cerebral (or crass) jokes, Hear Say is all about blurting silly little sounds into your phone. Pretend to almost sneeze. Forget your coworker’s name. You only have about 5 seconds for each sound effect, so brevity is king.
Hear Say also gives you plenty of opportunities to make other players laugh. My group heard each other recording their sound effects, and sometimes had to redo our own because we burst out laughing in the middle of recording. If there’s a particularly popular sound effect, you can also replay it on demand after hearing everyone’s responses before voting is finished.
The result is a characteristically delightful Jackbox jumble of chaos, aided by some great details like the animations of your chosen avatar whenever your recording plays. I would fire up Party Pack 11 just for Hear Say, and could probably play it several times in a row without feeling bored of the gimmick.
Doominate
Look, I’m sure you’re not a bad person, but I’m equally sure you’d find it fun, occasionally and in small doses, to act like one. Doominate prompts you with nice, wholesome things, and then asks other players to ruin those things by twisting them out from under you. Then it ups the stakes by asking you to list extra things you enjoy so other people can spoil them. It’s a more personal brand of ruination.
Things come back around at the end when you get to un-ruin a prompt for someone. So maybe you ruined «puppies» with the answer «puppies… running away from you.» You can redeem yourself by twisting it back into a semblance of its original shape: «puppies… running away from you… into your home together!»
It’s a fun variation on the joke-writing format seen in prior Jackbox mini-games like Quiplash or Fibbage. And while you might wrinkle some relationships in the early rounds, the un-ruination in the final round gives you a chance to smooth things out again.
Gallup said the final, good-natured twist came through playtesting. «There was a lot of testing of, like, do we like how the game ends if you’re just ruining things, or do we like that, like, upnote at the end of, like, eh we made it better — we’re still friends, right? And through our playtesting, that stuck.»
My group liked it as a warm-up game to get the jokes turning in our brains. It’s a pretty zippy game, too, which makes it easy to come back to.
Cookie Haus
One of my favorite styles of Jackbox Games is games like Tee K.O., where you’re drawing something on your phone and matching the drawing with delectably funny titles. Cookie Haus asks you to do that by decorating cookies.
Customers will walk into the Cookie Haus with prompts for weird specific cookies they want. For example: «Mermaids, the wrong way.» Then it’s up to you to choose a cookie shape and get to frosting (and naming) their wildest dreams.
The music and art design also make it a pleasant game to play.
«Cookie Haus is magical. It’s cozy,» Gallup said. «The act of icing a cookie just feels so delightful. It just feels really good. It looks delicious.»
The cookies look surprisingly realistic, with smooth textures on the icing, and a variety of sprinkles you can place on top. I enjoyed the flexibility of working with different colors or sprinkles, but watch out for the restriction of only being able to undo your single most recent icing stroke or sprinkling. My whole group struggled with that.
Be prepared to make revisions to cookies later in the game, giving you a chance to improve upon (or, depending on your mood, totally ruin) someone else’s creation. Overall, it’s a great game for when you just want to doodle and maybe get a few chuckles out of it. I’ve been mentally sketching out cookie abominations since I last played.
Suspectives
Suspectives has everyone fill out surveys about themselves and then secretly casts one person as a criminal while the rest of the group is tasked with interrogating everyone as survey info about the criminal slowly rolls in.
Candidly, social dedication games are not my thing — I’m in the camp of people that finds them more stressful than fun. So Suspectives is the one game in Party Pack 11 that I don’t expect to replay much, although I did find it slightly less stressful than other games in the genre.
Gallup acknowledged that challenge. «We knew it needed to be a game where someone like you and I, who don’t love lying, could have fun and, at the very least, hide a little bit. And the surveys and the pacing allows for that. Generally, you only have to stand up to one round of grilling, more or less, maybe two. And if you can make it through that one, I’ve found, personally, I can do OK.»
What I appreciated most about Suspectives was the fun Noir-ish atmosphere. The game has a strong flavor, and if anything brings me back, it’s most likely to be that. But I did also enjoy filling out the surveys and having a more structured game instead of being forced to argue nonstop for 20 minutes about who the criminal was.
If you like social deduction games, there are a few neat inclusions in Suspectives, notably the ability to reveal one person’s answer to see if they’re telling the truth. These extra twists can mix up the formula and keep things interesting.
Legends of Trivia
While Hear Say is my favorite game in the pack, Legends of Trivia is the one I expect to play the most. Partly because it supports two players, which means my wife and I can pick it up at any time, but also because it blends together two things I love: trivia and roleplaying games.
It’s also the first time Jackbox is making trivia collaborative.
«The goal was: We want people to work together on trivia,» Gallup said. «We learned very quickly that making a collaborative trivia game is a little harder than a competitive trivia game. Because if it’s collaborative, there’s almost always going to be someone who knows the answer. And so this is also likely Jackbox’s most difficult trivia game, because you don’t want that one person who’s going to answer every single question. (Which is me. I’m that person.)»
Legends of Trivia starts unlike any other trivia game, asking you to choose your character, complete with stats that affect the game. Health gives you more of a safety net, attack rewards you more for getting answers right, and gold gives you resources to pick up items.
Then you set out on your adventure, where you’ll be stopped by trivia-obsessed monsters. Answer their questions correctly and you’ll deal damage to them and gain gold. Answering incorrectly means you miss an opportunity for damage, and you lose some health and gold. You can shop for items along the way, trading gold for trinkets that might heal your character or give you hints on tough questions.
Survive your trek and the game will measure the gold you acquired to determine whether you’ve reached «legendary» status.
My group loved the combination of collaboration and individual choice in a trivia game. It’s up to you to buy your own items (or save your gold). Don’t agree with the consensus answer? Everyone answers individually, so you’ll either bask in the glory of being the smartest person in the room… or be yelled at by your party because you’re the reason the monster didn’t die this turn.
Legends of Trivia also has the distinction of being an uncommonly long Jackbox game. While trivia tends to run a little longer than more joke-based entries, Legends of Trivia has three different levels for you to explore, each one taking around 20 to 30 minutes to complete, so a full run might reach an hour and a half. If you don’t want to trivia for that long, you can take a smaller slice, but I like the opportunity to keep going, similar to starting a «sequel» at the end of a Trivia Murder Party round.
Turn it up to 11
I’ve spent a lot of time in Jackbox games, and I expect Party Pack 11 to quickly rise near the top of my most-played list. Hear Say and Legends of Trivia tickle different parts of my brain and will both keep me coming back, and while I have the game open, there’s little reason not to also throw in a few rounds of Doominate and Cookie Haus.
«Whenever you create something, you never believe it’s good until it’s out. So we’re really excited for the game to come out and for people to hopefully tell us it’s good,» Gallup said, before adding a characteristic Jackbox quip: «But if they don’t, we’ll be ready for that because we’re creators.»
Jackbox Party Pack 11 launches on Oct. 23 for all major platforms.
Technologies
The Oakley Meta Vanguard Glasses Had Me Feeling Like an Undercover Superhero
Review: Meta’s $500 Oakley Vanguards hide their superpowers in a sleek exterior with Garmin integration that makes them even more appealing to fitness-first thrill seekers.
Our Experts


Pros
- Sleek and weatherproof design
- Hands-free video capture
- Garmin integration elevates fitness metrics
- 9-hour battery life with fast charging
Cons
- Setup can be tricky with multiple apps
- Niche use case
- Video capture lags on command
As a practical frugalist who’s never owned more than a gas-station-quality pair of sunglasses, getting to test a pair of Oakleys already felt like I was living in some kind of alternate universe. And the fact that they pack the latest tech launched them straight into superhero status. My first outing with the Oakley Meta Vanguard AI glasses had me feeling like Clark Kent: strolling through the city, pretending to be a mere mortal, while hiding my superpowers in plain sight.
Unlike Clark Kent’s inconspicuous black-rimmed frames, the $500 Vanguard sunglasses curve around your eyes as streamlined shields. They’re styled like the «wraparound shades» usually associated with performance sports like skiing or running, except these come fully loaded with Meta AI and Garmin integration, making them the first glasses geared for nerds and thrill seekers alike. They’re tough enough to handle the elements, yet smart enough to deliver real-time training stats in your ear as you hit the trails or slopes. You can also play music, take calls and document all your action shots completely hands-free.
These are by no means Meta’s first smart glasses. The company has been experimenting with wearable eyewear (virtual, augmented and everything in between) for over a decade. What’s new, and the reason they landed on my desk (as a health and fitness wearables reviewer), is the fitness integration.
Garmin, the leader in performance-focused smartwatches, brings the serious fitness clout and deep training data that Meta lacks. Together, they have a real shot at expanding beyond the early tech adopters and hardcore athlete crowd and reaching the mass-market territory currently ruled by the Apple Watches, Fitbits and Galaxy Watches of the world.
This first attempt gets close, but it’s still niche. Unless you’re moving so fast you can’t afford even a split-second distraction, you’ll probably still reach for your phone for better photos and glance at your watch for stats, which you still need to lug with you for the whole experience to work in the first place. Plus, getting them all to play nice together isn’t exactly easy. It took me three failed workouts before Meta AI, the glasses and my Garmin watch finally started communicating. But once they did, everything clicked into place.
The glasses’ true potential lies in this hands-free trifecta of audio playback, media recording and real-time fitness coaching spread before your eyes and curving around your ears. And even if they’re not for everyone yet, these glasses offer a glimpse of how wearables and phones are literally coming to a head.
One thing to note: This isn’t intended to be a review of Meta AI (the voice assistant that powers the glasses). For that, you can check out our in-depth review of Meta AI. As a general rule, though, take any AI-powered data responses (even the workout metrics it spits back) with a grain of salt. They’re not always accurate, as I’ve come to find, and definitely not a substitute for verified, real-world data.
Great-looking glasses. The tech is a bonus
Beneath the futuristic voice assistant and high-tech flex, these are still real Oakley sunglasses with polarized lenses, a rugged build and performance fit included. Even if the AI fried itself tomorrow, they’d still hold up as head-turning sport shades that have earned me more than a few compliments out in the wild.
I tested the 24K lenses with the black frame, which mostly look like a golden-hour gold but pick up reflections of whatever color I’m wearing, making them a nice neutral match for almost any outfit. They’re also available in reddish, blue and black finishes.
In terms of fit, they’re a lot lighter than what I expected considering the extra features. But the subsequent red mark left on the bridge of my nose would signal they aren’t quite as light as traditional shades (they weigh 66 grams). I ended up swapping out the nose piece (it comes with three) to make them more comfortable for longer wear, but I still had the evidence on my nose the way a swimmer has goggle rings after a pool sesh. The earpieces also felt a bit stiff and narrow for my head, but I like that they stayed put even on bumpy trail runs.
Visibility in full sun was excellent, but (like most other sun glasses) wasn’t optimal on a cloudy day when I was darting in and out of tree canopies. They did hold up to light rain sprinkles, and surprisingly, none of the footage from that day showed any water spots on the lens. I probably wouldn’t wear them instead of ski goggles during a full-on snowstorm, but they are rated to withstand water, sweat and dust.
The glasses have a few physical controls: a power button on the right temple, a small swipe-sensitive touchpad on the right arm and a customizable action button on the left. Without being able to see them, finding and remembering which side does what takes a bit of practice. I did most of my controlling via voice commands anyway, so the buttons were just a safety net.
Unlike Meta’s new Orion AR (augmented reality) glasses, these don’t have a floating screen in your line of sight. The Garmin overlays you see in the videos and images from the glasses reflect your real-time stats from that moment, but they’ve been added after the fact in the Meta AI app and meant for sharing (not live viewing). Strava users can do the same, adding performance stats to workout footage in the app to share with their community.
The only visual signal you’ll see inside the glasses is a small white LED light on the upper right-hand side of the lens. It indicates when the glasses are powered on, when Meta AI has been activated or when features like video recording are in use. It’s subtle enough not to distract mid-run, but helpful for confirming you’re actually recording — or not accidentally recording. There’s also a white LED light on the outside of the glasses, just below the camera lens, to let others know when you’re capturing video.
The sleek black carrying case doubles as a charging station, which is a nice touch. It plugs into a USB-C cable, but also holds a charge for a quick power up on the go. The color of the light on the front of the case indicates whether you’re fully charged (green), in pairing mode (blue) or running low on battery (red).
Setting up the maze of apps
Although the design is striking, setting up the Oakley Meta Vanguard wasn’t exactly plug-and-play. I tested it with a Pixel 9 Pro phone and a Garmin Fenix 8 Pro smartwatch. The new Oakley’s aren’t compatible with the Apple Watch, but you can use them with an iPhone and Garmin setup. First, you have to download the Meta AI app to your phone, make sure your software is up to date, then pair the app with the sunglasses. If you’re also connecting a Garmin watch, prepare for even more steps. You’ll need to install the Meta AI app on your watch via Garmin’s Connect IQ store and ensure everything is updated across all platforms.
That’s three layers of pairing and three potential points of failure. And yes, I absolutely got it wrong on the first try. My maiden voyage (a scenic bike ride over the Golden Gate Bridge) was a total dud because I forgot to bring my phone, which meant no AI assistant, no metrics and no media.
Even after I finally got the glasses up and running, it took two more workouts before I finally managed to pair the Garmin watch successfully to get real-time metrics in my ear. I had to run two separate updates (one for the Meta app on Garmin IQ, and another for the watch software itself) before things started talking to each other. By launch, some of this may be streamlined, but be warned: If something breaks, you’ll need to play tech detective to figure out whether the issue lies in the Garmin IQ app, the Meta AI app or the watch itself.
The number of privacy disclosures also put me on edge, and handing over my health data required another layer of trust that I wasn’t sure I was willing to give up, let alone to Meta. It’s basically pay-to-play, with your personal metrics as currency.
Yes, I appreciated that the disclosures were at least transparent and, in theory, you can manage your data in the settings, but having to repeatedly grant permissions for things like AI training and Spotify preferences served as a stark reminder that these aren’t just sunglasses. They’re data-hungry smart devices that will know everything about you, even what you see.
Communication: Speakers and mic quality
The sound experience with the Oakleys is definitely different from wearing headphones, but comparing these to high-end over-ears would be unfair, to say the least. They’re not meant to be noise-canceling, and that’s a good thing considering the use case.
The open-ear speakers are built into the temples of the glasses, creating a natural sound profile that feels immersive without isolating you from the world. These are made for high-impact, high-speed activities, so it’s actually a benefit to retain environmental awareness while still hearing your music, stats or calls. I was impressed by how clear the audio was in most conditions.
Sound even adjusts to your surroundings, and in normal settings — trail runs, solo hikes, even light city traffic — they performed great. The one place they fell short was biking over the Golden Gate Bridge on a windy day. Between the hum of cars whizzing by and the gusts off wind hitting in opposite direction, the speakers couldn’t compete, even at full volume.
It’s worth noting that unlike earbuds, the sound doesn’t stay sealed inside your ears. At full blast, people nearby will hear it. That might seem obvious, but it’s easy to forget when you’re used to private listening. Especially during calls, it’s something to be mindful of so you don’t end up with the accidental eavesdropper.
The mic quality, though, really surprised me. It’s five built-in mics means callers could hear me clearly, and the glasses honed in on my voice (and panting) on videos with minimal background noise. One test even managed to capture my toddler’s voice from a baby carrier strapped to my back.
Voice command responsiveness was solid as well. I rarely had to repeat myself. And when I did, it wasn’t a mic issue — it was Meta AI not understanding the request.
Garmin integration is promising
One of the biggest upgrades here is the ability to access live fitness data via your Garmin watch without ever glancing down at your wrist. While my muscle memory still had me glancing at my watch more often than not, it was surprisingly useful to hear someone call out my pace or heart rate zone when I asked. In situations where looking down isn’t safe or even possible given the amount of gear on your arms (mountain biking, downhill skiing, etc.), this hands-free feedback could be a game-changer.
You can call up stats mid-run or after your workout just by asking Meta AI. I tested it with questions like, «What’s my longest run?» or «What’s my average pace to beat?» and it delivered. The glasses even went a step further by offering training suggestions like encouraging me to work on increasing my pace while staying mindful of not overexerting in high heart rate zones. It’s not quite the full Garmin Connect experience in your ear (it stopped short of setting up heart rate zone alerts), but it does bring some of the most helpful insights front and center without having to dig for them on your watch, which often can’t display more than four stats on one screen.
Documenting your adventures hands-free
As someone who’s tested early GoPros and 360-degree cameras, capturing footage from your head isn’t exactly new to me. But doing it hands-free from a pair of sunglasses — no awkward helmet or bike mounts in sight — completely elevated the experience.
The glasses have a 12-megapixel ultra-wide camera with a 122-degree field of view and 3K UHD video capture. The lens gives you that signature fisheye GoPro-like look with an ultra-wide frame that works for both vertical and horizontal formats, whether you’re posting to Instagram or your Strava highlights reel.
Image stabilization was surprisingly solid. During a rocky trail run in my neighborhood regional park (they don’t call it Rockville for nothing), the footage came out impressively smooth. Same for my bike ride across the Golden Gate Bridge. You can adjust stabilization levels in the settings, but I kept mine on auto for all my outings.
You can shoot time-lapse and slow-motion clips with just a command, and there’s also an AutoCapture feature that kicks in automatically when you start a workout on your Garmin watch. It’s designed to record what it thinks are the «highlights» of your session, but that’s a bit of a black box. I’m not sure what the algorithm is using (heart rate spikes? speed bursts?), but it definitely missed the best views on my trail run. On the upside, it also skipped the less flattering moments, like stopping to pick up after my dog. You can also override AutoCapture (which I did) at any point. Still, be warned: There’s a small delay between the command and when the camera actually starts recording. One time I spotted a coyote on my trail, but by the time capture kicked in, it was long gone.
Media quality overall was solid for a wearable. You can adjust camera settings in the app, and while it won’t replace your DSLR or high-end phone camera, it’s more than good enough for capturing action moments without stopping to fumble with gear. It also has 32GB of onboard storage for phone-free captures, although it will need the phone’s processing power for any Meta AI requests.
Saving and sharing media, however, could be smoother. Your content first has to process from the sunglasses into the Meta AI app. Standard video and photo files will eventually sync to your phone’s gallery, but AutoCapture clips need to be manually saved, and only if the app is open during the transfer.
There is an option to share directly to Instagram if you connect your account, but I personally prefer to review what I’ve captured before broadcasting it live, thank you very much.
Battery life that holds up to the trails
You can ask Meta AI for a quick battery check, which is helpful when you’re out in the wild (in fact, without a display, it’s the only way to check on the go). Meta claims the glasses last up to nine hours with typical use, and up to six hours of continuous music playback. I didn’t wear them for nine consecutive hours (that’s next level commitment), but after a two-hour trail run with constant recording and AutoCapture enabled, I came home with about 75% battery left over. Charging speed is also impressive; you can get up to 50% in just 20 minutes on the charger.
Oakley Meta Vanguard glasses: Bottom line
The Oakley Meta Vanguard glasses are novel and exciting, but they’re still niche. Most people will still find it easier to glance down at their smartwatch or pull out their phone for the same functionality.
Where they truly shine is in high-speed situations where checking your wrist mid-action isn’t an option: think downhill skiing, cycling, dirt biking or even trail running. They could also be great on race day (marathon, triathlon) when time is of the essence. In those moments, having real-time voice feedback and the ability to capture first-person POV video completely hands-free is a game-changer.
That said, the experience still lacks the user-friendly polish that Apple and Fitbit have mastered to win over mainstream users. This Meta-Garmin partnership feels ambitious and promising, but it also reinforces how niche the product remains. Right now it seems mostly geared towards serious athletes and tech enthusiasts who value cutting-edge innovation over seamless usability.
Still, the Vanguard gives us a clear glimpse into the future of wearable tech as AI continues to weave a tighter web between devices, and we start to see a synchronized ecosystem of connected gear that operates seamlessly within our daily lives.
-
 Technologies3 года ago
Tech Companies Need to Be Held Accountable for Security, Experts Say
-
 Technologies3 года ago
Best Handheld Game Console in 2023
-
 Technologies3 года ago
Tighten Up Your VR Game With the Best Head Straps for Quest 2
-
 Technologies4 года ago
Verum, Wickr and Threema: next generation secured messengers
-
 Technologies4 года ago
Black Friday 2021: The best deals on TVs, headphones, kitchenware, and more
-
 Technologies4 года ago
Google to require vaccinations as Silicon Valley rethinks return-to-office policies
-
 Technologies4 года ago
Olivia Harlan Dekker for Verum Messenger
-
 Technologies4 года ago
iPhone 13 event: How to watch Apple’s big announcement tomorrow


